Blog Hop/Instagram Hop, Designer/Patterned/Specialty Papers (DSP), Fancy Folds, feminine, Flowers, Handmade Cards, Handy Tips, Stampin' Up!, Watercolour

CCBH Blushing Bride – Panel Tower Fold Card & more!

CCS Logo 2021-22

Each week some of the Art With Heart team are joining the Colour Creations Blog Hop to bring you creative inspiration to showcase our range of 50+ gorgeous Stampin’ Up! colours.

A blog hop, also known as blog hopping, is to move from one blog to another, continuing in a full circle to read all the posts by participants in the hop. At the end of each post will be a link to continue to the next blog!

Week 6 – Blushing Bride

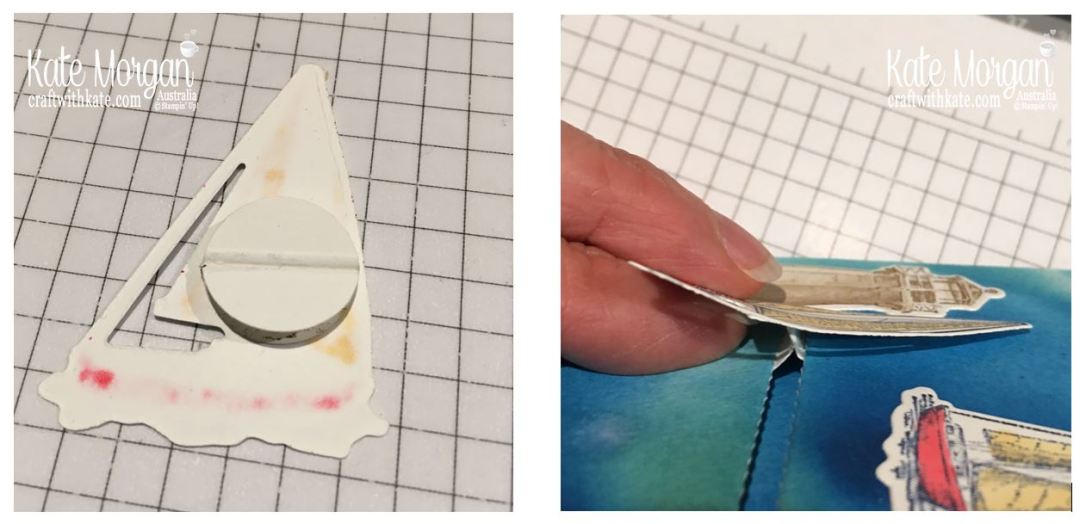
Card 1 – I finally opened my pack of Hand-Penned Designer Series Paper (on sale this month) and the Gold 6″x6″ Metallic Specialty Paper for this fancy fold card.

Panel Tower Fold Card using Hand-Penned Petals by Kate Morgan, Stampin Up Australia 2021

The image I initially stamped in Memento ink in the Stamparatus. I coloured it with Blends Combo Markers (Daffodil Delight & Mint Macaron), however they don’t come in Blushing Bride, so I used the stamp and Blushing Bride Inkpad to colour the main bloom and filled in the missing area with the Wink of Stella while the ink was still damp. Then I placed it back into the Stamparatus in the same position and inked the stamp with Versamark ink and stamped over the top of the Memento outline. Then I added Heat & Stick Powder and heat set it with the Heat Tool. Next, add some Gilded Flakes and rub around with your finger to remove the excess before die cutting the image. Doesn’t it look gorgeous?!!!

Panel Tower Fold Card using Hand-Penned Petals by Kate Morgan, Stampin Up Australia 2021 close up

The scallop squares are cut using the Stitched So Sweetly dies. These are rectangular, however once you cut one, I then placed the die partially over the rectangle to cut it down to a square!

Panel Tower Fold Card using Hand-Penned Petals by Kate Morgan, Stampin Up Australia 2021 side

The back of the card is where you write your message to the recipient!

Panel Tower Fold Card using Hand-Penned Petals by Kate Morgan, Stampin Up Australia 2021 back

Here is how it fits into the Very Vanilla C6 envelope for posting!

Panel Tower Fold Card using Hand-Penned Petals by Kate Morgan, Stampin Up Australia 2021 envelope

I cased this idea from Samantha Clayton (Mixed Up Craft), but used different products and I altered my measurements so this card would fit into our Very Vanilla C6 envelope!

Basic Instructions
Misty Moonlight card base: 8¼” x 6”, score (landscape) at 1″, 2″, 3″ from each end.
Rotate 90° with edge of card at 1″ mark – cut from first scoreline to third scoreline only. Lift the blade and cut from the next scoreline down to the last scoreline only. Repeat this on the other side.
Blushing Bride cardstock: 4⅛” x ⅞” (2) and 5⅞” x ⅞” (2)
DSP layers: 4″ x ¾” (2) and 5¾” x ¾” (2)
Basic White cardstock for back: 5¾” x 2¼”
The folds can be worked out from the photo images above.

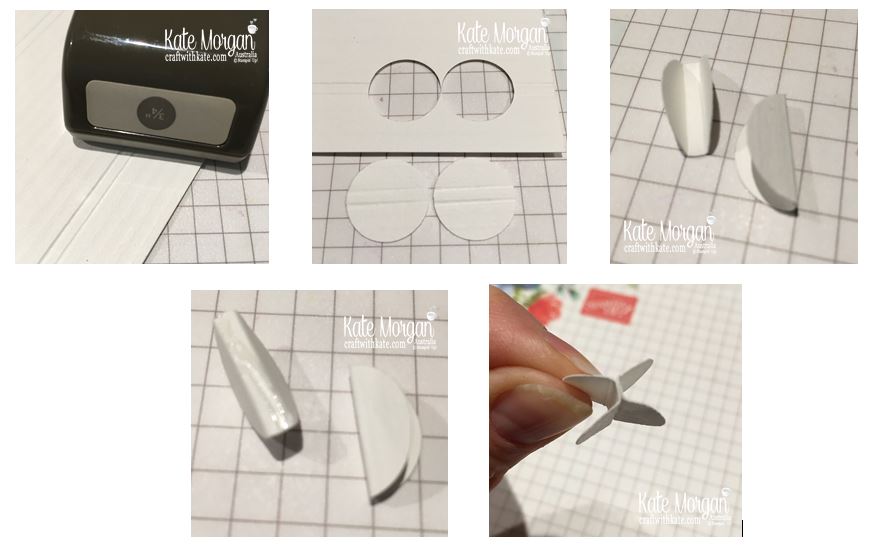
Card 2 – this card also uses similar products to the previous card, with the addition of this gorgeous Stitched Greenery Die used on the Basic Black layer. The patterned paper is cut using the Stitched So Sweetly dies giving that pretty scallop edge and stitched border. I also used the smaller rectangle die in vellum (behind the flower).

Hand-Penned Bundle for Blushing Bride CCS by Kate Morgan, Stampin Up Australia 2021 side

The banner is actually made of cardstock – I cut  2cm strip and folded it in half lengthwise and glued it, so I had the same design on both sides. Then I folded it in a ‘z’ and cut the ends as banners with my paper snips. The main floral image and the sentiment are stamped with Versamark ink, Heat & Stick Powder added and gently heat set this with the Heat Tool so the powder just melts, then add Gilded Leafing. Using a sponge dauber, gently rub in small circular motions to remove the excess gilding.

Using the Penned Flower dies to cut it out, I coloured the image with Water Painters and ink directly from the Soft Succulent, Blushing Bride & Pale Papaya inkpads.

Hand-Penned Bundle with Gilded Leafing for Blushing Bride CCS by Kate Morgan, Stampin Up Australia 2021

I repeated the process for the main image twice and placed the second one on the inside of the card, after I added some Soft Succulent ink with a Blending Brush.

Hand-Penned Bundle for Blushing Bride CCS by Kate Morgan, Stampin Up Australia 2021 inside

Thanks for dropping by. All the products used tonight are linked at the end of this post!

Please click on the image below to head across to the next blog on tonight’s hop and see the wonderful inspiration of Rachel Palmieri!

CCS Next Button

If you come across a broken link or have come from a different entry point, a full list of participants can be viewed on Catherine Proctor’s blog.

Card 1 – click here to shop for products for this card 
Card 2 – click here to shop for products for this card 

Designer Paper Sale on select packs NOW (July 2021)

Shop Online Craft with Kate


2021-2022 Annual Catalogue ends 2 May 2022
2021 J-D Mini catalogue starts 3 August – 3 January 2022 ♥ coming soon ♥
2021 #2 Sale•a•bration Brochure starts 3 August – 30 September 2021 ♥ coming soon ♥
Be sure to download a PDF copy from my SU Catalogue Library page today.


Don’t forget to Follow My Blog to receive blog updates and join my Newsletter Subscription for all the latest news and specials!

Birthday, Blog Hop/Instagram Hop, feminine, Flowers, Handmade Cards, Mini Catalogue and Sale-a-bration (SAB), Stampin' Up!, Watercolour

Rich Razzleberry Perennials

AWHT Colour Creations Showcase

Each week some of the Art With Heart team are joining the Colour Creations Showcase to bring you creative inspiration to showcase our range of 50+ gorgeous Stampin’ Up! colours.

Week 41 – Rich Razzleberry

Rich Razzleberry is from the Regals collection and a colour I used to use a lot of, but not so much recently. It was lovely to get it out again and get creative!

Today I went with the Pretty Perennials Bundle. This is my first time using these products and I thought they would look lovely in Rich RazzleberrySeaside SprayMisty Moonlight.

I began randomly stamping the background card in Rich Razzleberry ink for a lovely tone on tone effect. Then I took a 2″ strip of basic white card and used the thick brush from the Water Painters pack and watercoloured the stripes. Once it was dry, I cut it down to 1½” wide and glued it to the card front. The extra strip was glued inside the card!

Pretty Perennials by Kate Morgan, Stmapin Up Australia 2021.

Next, I stamped the flowers in various sizes and die cut them with the coordinating dies. I sat them on the card to see how I was going to place them. Once I was happy, I glued down some of the smaller ones, with the larger ones slightly layered over the top. The only one I popped up on a dimensional, was the large flower above the sentiment. The six leaves were also embossed in the Subtles TIEF and run through the Mini Stampin’ Cut & Emboss Machine.

The sentiment was stamped in Misty Moonlight ink on Seaside Spray card and fussy cut with Paper Snips. The happy is popped up on dimensionals. I also coloured the Basic Pearls with my Seaside Spray Dark Blends Marker.

Pretty Perennials by Kate Morgan, Stmapin Up Australia 2021..

Please head over to Cathy’s blog to see the full list of participants in this week’s Colour Creations Showcase. We would love for you to visit each one and leave some comments if you feel inspired.

Click here for the List of Supplies for this project or visit my 24/7 Online Shop (Australian residents).


Be sure to download a PDF copy from my SU Catalogue Library page today.


Don’t forget to Follow My Blog to receive blog updates and join my Newsletter Subscription for all the latest news and specials!

Shop Online Craft with KateWreath - Join my TeamWreath - Newsletter by EmailWreath - Classes

Birthday, Handmade Cards, Mini Catalogue and Sale-a-bration (SAB), Stampin' Up!, Watercolour

Watercoloured Hummingbird

Hummingbirds are the most fascinating little birds and this stamp set, A Touch of Ink [155233], free to choose with a $180 product order this month during Sale-a-bration, has these gorgeous images.

My card base is Soft Sea Foam with a layer of Champagne Foil. Another layer of Basic White card is stamped with the flowers image multiple times in the same colour ink. The Blending Brushes were used to add colour of Soft Sea Foam from the top and down the sides of the card. This is a great way to colour without being so precise in just colouring the images alone.

Hummingbird card using Saleabration, A Touch of Ink from Stampin Up Australia 2021 by Kate Morgan

I stamped the bird in Sahara Sand ink and coloured it using the Watercolour Pencils and Blender Pens. The Layered Circles Dies were used to cut it out and then a matt layer of Champagne Foil in the next size up with the scalloped edge die. This was die cut out of the first layer of the card; so you don’t even notice it when you place the stamped white layer on top!

Hummingbird card using Saleabration, A Touch of Ink from Stampin Up Australia 2021 by Kate Morgan closeup

I added some Wink of Stella to the Hummingbird for that extra glimmer!

3478DFC4-528D-483E-88CB-DBAD3E2842D7


Be sure to download a PDF copy from my SU Catalogue Library page today.


Don’t forget to Follow My Blog to receive blog updates and join my Newsletter Subscription for all the latest news and specials!

Shop Online Craft with KateWreath - Join my TeamWreath - Newsletter by EmailWreath - Classes

Birthday, Blog Hop/Instagram Hop, feminine, Flowers, Handmade Cards, Stampin' Up!, Watercolour

Colour Creations Showcase – Melon Mambo No-line Watercolour Technique

AWHT Colour Creations ShowcaseEach week some of the Art With Heart team are joining the Colour Creations Showcase to bring you creative inspiration to showcase our range of 50+ gorgeous Stampin’ Up! colours.

Week 25 – Melon Mambo

For tonight’s card, I wanted to revisit the no-line watercolour technique, where you stamp the image (2nd generation) in Sahara Sand ink onto Watercolour paper.

This is definitely a technique that takes a lot of practice (for me anyway!) and you need to take your time to allow the colour to dry before adding more for a deeper effect. I used the Water Painters (without filling the barrel with water). I just have a glass of water next to me so the brush doesn’t get too wet as I work. I take the ink from the lid of the inkpad and apply with a light colour over the entire bloom, before going back over it in small sections, allowing to dry between layers.

From a distance, the poppy looks pretty good and I’m fairly happy with the outcome. I haven’t added a sentiment as yet, that will come when I figure out who this card will go to, hence why the image is not centred in the die cut frame. I will add the sentiment to the left later on!

The Scripty Embossing Folder gave my card a more old-worldly feel, as does the Scalloped Lace Trim. The die cut is popped up on dimensionals.

On the inside, I stamped the poppies across the bottom using the same technique. The sentiment is stamped in Sahara Sand ink 3 times using the Stamparatus, to get a nice dark colour.

Please head over to Cathy’s blog to see the full list of participants in this week’s Colour Creations Showcase. We would love for you to visit each one and leave some comments if you feel inspired.

Click here for the List of Supplies for this project or visit my 24/7 Online Shop (Australian residents) adding Host Code: 4JHXYXJR


2020 August-December Mini Catalogue ends 4 January 2021

Be sure to download a PDF copy from my SU Catalogue Library page today.


Don’t forget to Follow My Blog to receive blog updates and join my Newsletter Subscription for all the latest news and specials!

Shop Online Craft with KateWreath - Join my TeamWreath - Newsletter by EmailWreath - Classes

Designer/Patterned/Specialty Papers (DSP), Flowers, Handmade Cards, Mini Catalogue and Sale-a-bration (SAB), Stampin' Up!, Watercolour

Poppies in Watercolour

Tonight’s card is another one using the Peaceful Poppies Suite of products. It is just stunning and has so many items to create loads of different projects.

Peaceful Poppies Suite Stampin Up Mini 2020 by Kate Morgan, Australia

Die cutting this element in black card and placing it over some of the beautiful DSP creates an amazing effect. The elements water coloured and placed in the corner are so bright against the black!

Peaceful Poppies Suite Stampin Up Mini 2020 by Kate Morgan, Australia s

A full list of products can be found at the bottom of this post.


2019-2020 Annual Catalogue ends 2 June 2020

2020 Mini catalogue ends 2 June 2020

Be sure to download a PDF copy from my SU Catalogue Library page today.


Don’t forget to Follow My Blog to receive blog updates and join my Newsletter Subscription for all the latest news and specials!

 Happy Stamping,

Blog Signature

Blog Button - Catalogue  Blog Button - Shop   Blog Button - Classes  Blog Button - Join my Team  Blog Button - Watermark

Product List

Birthday, Designer/Patterned/Specialty Papers (DSP), feminine, Flowers, Handmade Cards, Mini Catalogue and Sale-a-bration (SAB), Stampin' Up!, Watercolour

Bright Poppies for a Happy Birthday

Tonight’s card is a bright and bold card using the Painted Poppies stamp set, coordinating Elements and Designer Series Paper.

I stamped the card front with the poppy stamp in Versamark ink as I wanted that watermark look. Strips of the designer paper were added before I added the black circle element. I watercoloured the poppy and leaf from the elements pack and once dry, placed them on with dimensionals.

Peaceful Poppies Suite Stampin Up by Kate Morgan Australia 2020

The sentiment is stamped in Versamark ink on black card and Gold Emboss Powder added and heat set. I fussy cut this and added it with dimensionals. I love how bold it is and the gold adds some class and shine!

Purchase the Painted Poppies Bundle and you can add the Happy Birthday to You stamp set to your order for FREE as the Sale-a-bration free product!

Peaceful Poppies Suite Stampin Up by Kate Morgan Australia 2020.

On the inside I water coloured another element and added it to the corner with another strip of designer paper.

Peaceful Poppies Suite Stampin Up by Kate Morgan Australia 2020 i

A full list of products can be found at the bottom of this post.


2019-2020 Annual Catalogue ends 2 June 2020

2020 Mini catalogue ends 2 June 2020

Be sure to download a PDF copy from my SU Catalogue Library page today.


Don’t forget to Follow My Blog to receive blog updates and join my Newsletter Subscription for all the latest news and specials!

 Happy Stamping,

Blog Signature

Blog Button - Catalogue  Blog Button - Shop   Blog Button - Classes  Blog Button - Join my Team  Blog Button - Watermark

Product List

Birthday, feminine, Flowers, Handmade Cards, Stampin' Up!, Watercolour

Wildly Happy Collage with Pigment Sprinkles

Tonight I have a collage scene using the fox image from the Wildly Happy stamp set. I have also used the Pigment Sprinkles on the Fluid 100 Water colour paper to create that textured background of the grass. Simply wet the paper with an AquaPainter and carefully sprinkle a very small amount of colour onto the paper. You will see it spread instantly and such vibrant colour. I also added a little water in the Stampin’ Spritzer to add a little more water to spread the colour. Leave it to dry completely before cutting the hill shape with scissors. The smaller hill is Mossy Meadow card, cut with the Layering Oval framelits and embossed with the Suble Dynamic Embossing Folder for extra texture.

Wildly Happy Fox Stampin Up by Kate Morgan Australia 2019.JPG

The tree is cut using the Sweet Silhouettes dies in Early Espresso card. I added this with mini dimensionals to add some height above the foxes.

The foxes are coloured using Stampin’ Blends markers and fussy cut before adding them to the card. I love how they are curled up resting under the tree!

Wildly Happy Fox Stampin Up by Kate Morgan Australia 2019.

A full list of products can be found at the end of the post.


2019-2020 Annual Catalogue ends 2 June 2020

2019 Holiday catalogue ends 2 January 2020

Be sure to download a PDF copy from my SU Catalogue Library page today.


Don’t forget to Follow My Blog to receive blog updates and join my Newsletter Subscription for all the latest news and specials!

 Happy Stamping,

Blog Signature

Blog Button - Catalogue  Blog Button - Shop   Blog Button - Classes  Blog Button - Join my Team  Blog Button - Watermark

Product List

Flowers, Handmade Cards, Stampin' Up!, Sympathy, Watercolour

Super Simple water-coloured Magnolias

Tonight’s card focuses on the Magnolia embossing folder and how to colour the flowers with an AquaPainter and some inkpads. By squashing the inkpad into the lid before opening it, gives you enough of a colour palette to work with. Squeezer the AquaPainter to get a drop or two of water into the ink to get the brush going, swirl it around and then gently add the colour to the flower.

Magnolia Blooms watercolour, Stampin Up by Kate Morgan, Australia 2019

The colour will lighten as it dries. Wait for it to dry completely before gluing the layer to your card. The sentiment (Very Versailles stamp set) is stamped in Soft Seam Foam ink on the same colour card and added with dimensionals.

I added some Wink of Stella to the stamen for a bit of glimmer and extra interest.

Magnolia Blooms watercolour, Stampin Up by Kate Morgan, Australia 2019.

Would you give this simple style a go? What colours would you use?

A full list of products can be found at the end of this post.


2019-2020 Annual Catalogue ends 2 June 2020

Holiday catalogue coming soon (4 September 2019)

Be sure to download a PDF copy from my SU Catalogue Library page today.


Don’t forget to Follow My Blog to receive blog updates and join my Newsletter Subscription for all the latest news and specials!

 Happy Stamping,

Blog Signature

Blog Button - Catalogue  Blog Button - Shop   Blog Button - Classes  Blog Button - Join my Team  Blog Button - Watermark

Product List

Birthday, Handmade Cards, Masculine, Stampin' Up!, Techniques & Tutorials, Watercolour

Slider card and Smooshing with watercolour technique with Instructions

Tonight I have a couple of techniques with some watercolour smooshing and a slider card!

I taught this to my class ladies earlier this month and they loved it. It’s always great having a masculine themed class and we focused on this bundle mainly. It reminded me that I must do more masculine themed classes in the future.

To create the watercolour background, I put a couple of drops of re-inker, reasonably close together onto a sheet of acetate, spritzed it with water and then lay the Fluid 100 watercolour paper on top and gently pressed down with the finger tips (don’t rub). You don’t want the colours to mix together, just gently blend. You may need to place the paper down again so you cover the entire piece, as the excess we cut away, will be used later. I then put this aside to dry while I stamped the images and the inside of the card.

Slider card & Smooshing Technique using Stampin Up Sailing Home Bundle by Kate Morgan, Australia, 2019.

The lighthouse is stamped in Soft Suede and coloured with Crumb Cake Stampin’ Blends Combo pack to get the darker and lighter shading. The boats are stamped in Night of Navy ink and coloured with Combo Blends of So Saffron and Poppy Parade. I added some Wink of Stella to the water below the boats rather than colouring it.

Slider card & Smooshing Technique using Stampin Up Sailing Home Bundle by Kate Morgan, Australia, 2019

On the inside I stamped the sentiment, add a Copper Foil anchor and the rope is part of the leftover pieces from the excess watercolour paper! The straight piece of rope is from the slider mechanism from the front!!!

Slider card & Smooshing Technique using Stampin Up Sailing Home Bundle by Kate Morgan, Australia 2019

To create the slider card mechanism:slider card mechanism.JPG

Score 2 lines on card, punch 2 circles with lines through the centre. Fold them into a taco shape. Place glue on the bottom of one and glue them together to create the H shape.

Cut the watercolour piece down to the size you require and die cut the rope die across the front where you want the sliding sailing boat to be. With the strip of left over water-coloured paper, glue this to the card base behind where the die-cut rope was so it still looks great and not having the Navy card show through. I did this by placing the paper down the watercolour paper roughly where I wanted it centred on the card and used a pencil to mark on the card base, either end of the rope, as a guide.

Add glue to the flat side and adhere to the larger sailing ship, ensuring that it is the right orientation (scorelines horizontal). Slide this into the slot so each side is facing toward the top and bottom of the card. It is easiest to do this step before you adhere the front panel to the card base. I used Adhesive Foam Strips around the edges of the watercolour layer and then two more strips either side of the mechanism, but ensure you allow enough space for the circles to slide along.

slider card mechanism.

This is not a spinner card, but a slider card, as I didn’t want the sailing boat doing circles on the ocean. If you want it to spin, you would use some washers from the hardware store joined together by a mini dimensional.

I hope these instructions make sense.


2019-2020 Annual Catalogue ends 2 June 2020

Be sure to download a PDF copy from my SU Catalogue Library page today.


Don’t forget to Follow My Blog to receive blog updates and join my Newsletter Subscription for all the latest news and specials!

 Happy Stamping,

Blog Signature

Blog Button - Catalogue  Blog Button - Shop   Blog Button - Classes  Blog Button - Join my Team  Blog Button - Watermark

Product List

Flowers, Handmade Cards, Punch Art, Stampin' Up!, Techniques & Tutorials, Watercolour

Water-colouring with Pigment Sprinkles and Daisy Lane

Wow, look at this bright background I’ve created with the new Pigment Sprinkles?!!!

Pigment Sprinkles are watercolour pigment crystals in exclusive Stampin’ Up! colours. Mix them with water to make watercolour backgrounds and washes and use them for other water-colouring techniques.  You get 6 jars – 1 of each of these colours: Bermuda Bay, Daffodil Delight, Granny Apple Green, Gorgeous Grape, Mango Melody, Melon Mambo.

I used the new Fluid 100 water colour paper (amazing quality) and I went it quite liberally with the Stampin’ Spritzer before sprinkling some of the Pigment Sprinkles on top. TIP: make sure you are light handed as a little goes a long, long way…. jut ask me how I know?!!! Then sit back and watch the instant magic happen! You can also spritz a little more water on if you want a more watercolour look (like the daisies).

Daisy Lane stamp set & Pigment Sprinkles, Stampin Up Australia by Kate Morgan 2019

The daisies were also created using this same technique but in 2 colours for each size. Allow the water-colour paper to dry completely before trying to punch them out.  The same with the background piece. I actually used my heat tool to quicken up the drying process as I was a little impatient and wanted to keep going. I stamped the stem in Gorgeous Grape ink so it would stand out on the bright background 😉

Use a bone folder to help curve the petals of the daisies before gluing to the card; just gives a bit more life to them.

Daisy Lane stamp set & Pigment Sprinkles, Stampin Up Australia by Kate Morgan 2019.

How gorgeous are those Perennial Essence Centres? So fussy and they are nice and bright to match perfectly with this card.

Purchase the Daisy Lane Bundle from me (only $61.00 for the stamp set and medium daisy punch) and I’ll personally email you 11 step-by-step full colour picture Tutorials created by our AWHT ladies, to help you recreate some amazing cards.

Daisy Lane Bundle Tutorials by AWHT & Kate Morgan Stampin Up Australia 2019

Are you going to add these Sprinkles to your collection?

A list of products can be found at the end of the post.


2019-2020 Annual Catalogue ends 2 June 2020

Be sure to download a PDF copy from my SU Catalogue Library page today.


Don’t forget to Follow My Blog to receive blog updates and join my Newsletter Subscription for all the latest news and specials!

 Happy Stamping,

Blog Signature

Blog Button - Catalogue  Blog Button - Shop   Blog Button - Classes  Blog Button - Join my Team  Blog Button - Watermark

Product List