
Tonight I have a couple of techniques with some watercolour smooshing and a slider card!
I taught this to my class ladies earlier this month and they loved it. It’s always great having a masculine themed class and we focused on this bundle mainly. It reminded me that I must do more masculine themed classes in the future.
To create the watercolour background, I put a couple of drops of re-inker, reasonably close together onto a sheet of acetate, spritzed it with water and then lay the Fluid 100 watercolour paper on top and gently pressed down with the finger tips (don’t rub). You don’t want the colours to mix together, just gently blend. You may need to place the paper down again so you cover the entire piece, as the excess we cut away, will be used later. I then put this aside to dry while I stamped the images and the inside of the card.

The lighthouse is stamped in Soft Suede and coloured with Crumb Cake Stampin’ Blends Combo pack to get the darker and lighter shading. The boats are stamped in Night of Navy ink and coloured with Combo Blends of So Saffron and Poppy Parade. I added some Wink of Stella to the water below the boats rather than colouring it.

On the inside I stamped the sentiment, add a Copper Foil anchor and the rope is part of the leftover pieces from the excess watercolour paper! The straight piece of rope is from the slider mechanism from the front!!!

To create the slider card mechanism: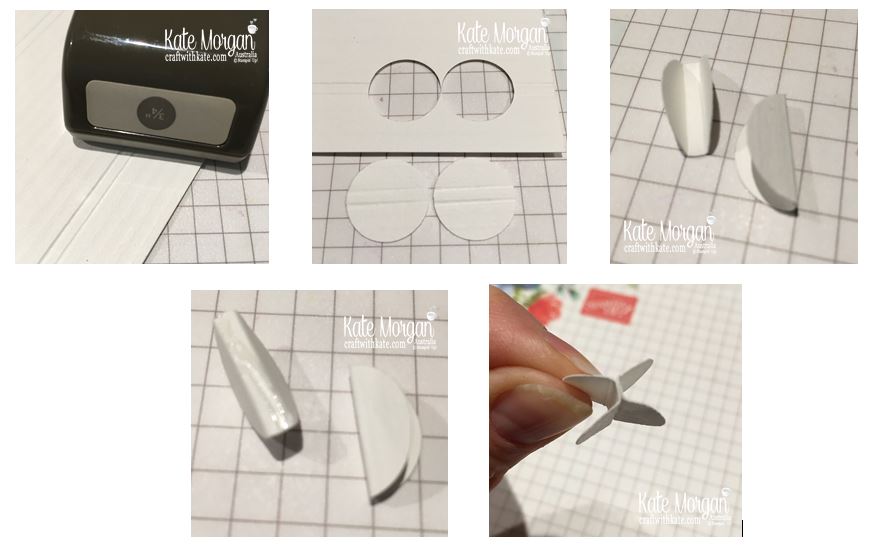
Score 2 lines on card, punch 2 circles with lines through the centre. Fold them into a taco shape. Place glue on the bottom of one and glue them together to create the H shape.
Cut the watercolour piece down to the size you require and die cut the rope die across the front where you want the sliding sailing boat to be. With the strip of left over water-coloured paper, glue this to the card base behind where the die-cut rope was so it still looks great and not having the Navy card show through. I did this by placing the paper down the watercolour paper roughly where I wanted it centred on the card and used a pencil to mark on the card base, either end of the rope, as a guide.
Add glue to the flat side and adhere to the larger sailing ship, ensuring that it is the right orientation (scorelines horizontal). Slide this into the slot so each side is facing toward the top and bottom of the card. It is easiest to do this step before you adhere the front panel to the card base. I used Adhesive Foam Strips around the edges of the watercolour layer and then two more strips either side of the mechanism, but ensure you allow enough space for the circles to slide along.
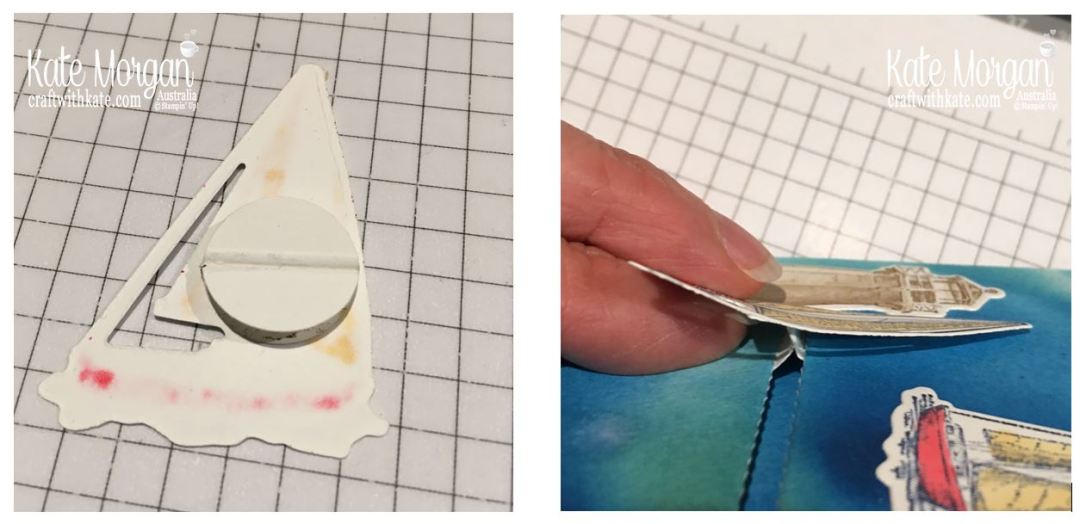
This is not a spinner card, but a slider card, as I didn’t want the sailing boat doing circles on the ocean. If you want it to spin, you would use some washers from the hardware store joined together by a mini dimensional.
I hope these instructions make sense.
2019-2020 Annual Catalogue ends 2 June 2020
Be sure to download a PDF copy from my SU Catalogue Library page today.
Don’t forget to Follow My Blog to receive blog updates and join my Newsletter Subscription for all the latest news and specials!


Product List


 Circle Punch")


