Today I have a Double Z Fold Card made for my kids’ netball coaches… yep, there are 2 coaches so I had to make 2 of them!!!
I must admit, it did take quite a while to come up with creating the whole team on the one card, but I think this works quite well. The goals at either end and then all the players on the court, even with the centre circle! The team colours are a Gold and Burgundy, so the closest colours were Merry Merlotand Crushed Curry. I used Balmy Blue for the background, even thought most of the season I could have used Basic Gray or Smoky Slate (being the winter competition)!!!!
The net is made by stamping the image from the Sea of Textures stamp set and then die cut with the Pretty Pines, small pine cone thinit and trimmed. The players are all punch art using the Cookie Cutterpunch, Fox Builderpunch and the retired Owl builder punch. The centre circle was 2 circle punches; cut the smaller one, then line up the bigger one over where the smaller one was punched!
The bibs with the positions are stamped using the new Make a Difference stamp set!
A free written tutorial for this Double Z Fold design can be found on my Free Tutorials page.
A full list of products can be found at the end of this post!
Today I share a fancy fold card using the Pretty Kittystamp set, Tea Room Specialty Designer paper and Watercolour Pencils!
From 1 August, a new 10 pack of Watercolour Pencils will be available in the following colours: Balmy Blue, Cajun Craze, Cherry Cobbler, Coastal Cabana, Crushed Curry, Flirty Flamingo, Garden Green, Gorgeous Grape, Granny Apple Green, Night of Navy. These can be used by themselves or with our Blender Pens or Aqua Painter.
I made this card for my eldest daughter who turns 12 today. She loves cats (we have 2) and she loves butterflies, so this was perfect for her.
The front piece of cardstock is embossed with the new TuftedDynamic Textured Embossing Folder.
This card opens up so you can see the gorgeous Tea Room Specialty Designer paper with the kitty image. This is coloured with the Watercolour Pencils and then I used a Blender Pen to add some shading. This image is die cut with the Stitched Shapes Framelits and added with dimensionals to a piece of Rich Razzleberry Layering OvalsScallop die which is glued down to the DSP. Open this flap to reveal another layer for your message.
When fully open, you have this Whisper White piece with the sentiment stamped (Happy Birthday Gorgeous) in the centre where you can write your message.
A full list of products can be found at the end of this post!
You only have 1 more day to join my team and get the additional 10 ink pad family assortment for FREE with the Starter Kit. It is only $169 to join and you choose any products to the value or $235 to get started and FREE delivery. There are no contracts or strings attached to this offer. Click here to join (Australian residents only).
Tonight the Art with Heart team are sharing creative projects featuring designer series paper. This month, Stampin’ Up! have a special on designer series paper, buy 3, get 1 free! We hope our blog hop inspires you to get crafting with your designer series paper.
If you’re already hopping, then you just came to me from Cathy Proctor. If you’re just joining, great! Use the “next” button at the end of my post to hop all the way around. Blog Hops are full circles, so you can start hopping here and then at the end of each post there is a link to the next one. There is also a list of participants at the end in case of any broken links.
Now let’s get started!
My first project is a 12″ x 12″ scrapbook page of my eldest daughter when she was only 11 months old. She was already walking and into everything, so we went outside to get some winter sunshine and of course, she went straight for the flowers. So what better paper to use than the Petal Promenade DSP! I’ve paired it up on a base of Fresh Fig with some coloured punch outs of Sahara Sand and Blushing Bride using the Tailored Tag punch. I also added the cat punch and some of the Tea Room copper metallic edged ribbon, tied in a bow. The sentiment is from the Accented Blooms stamp set and the metal rose is from the Share What You Love Embellishment Kit.
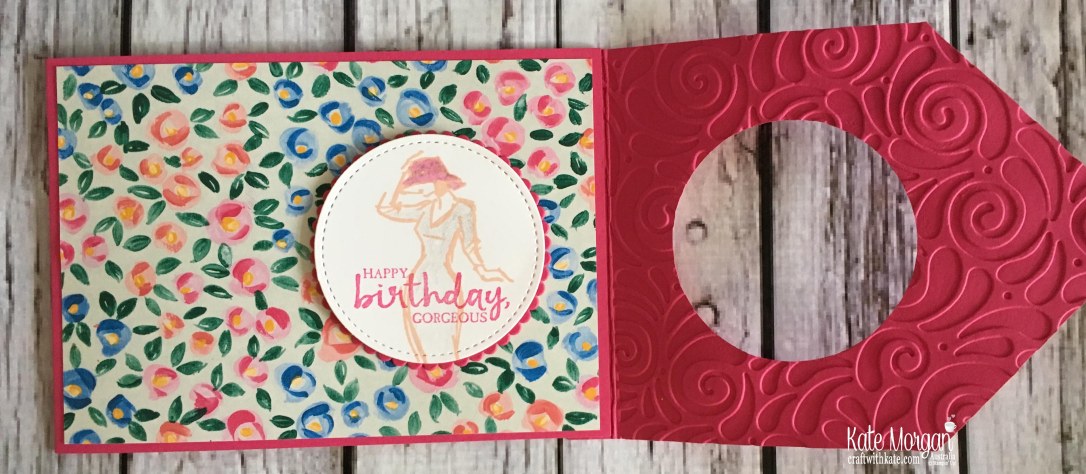
My second project is a fancy fold card using the Tropical Escape DSP which coordinates with the Tropical Chic Bundle; Tropical Chic stamp set and Tropical Thinlits dies. It can be found on pages 120-121 of the annual catalogue.
The colours I have used are: Shaded Spruce, Blushing Bride and Soft Sea Foam.
The layering squares framelits added in the diamond formation, adds a new dimension to this fold. As you can see below, the frame is adhered to the left panel of the card and the centre piece is adhered to the right panel and slides underneath to close.
with the card fully open, I have added some stamping to coordinate with the design on the front!
Thanks for visiting today.
Don’t forget to email me at craftwithkate@live.com.au to request your copy of a Catalogue or to ask about joining the Art With Heart team.
Now it’s time to follow the blog hop to our next participant, the talented Ros!
If you find a broken link or have come to this blog hop from a different entry point, you can view the participants below.
Today I share a feminine card using the gorgeous Petal Promenade DSP. Have you seen these papers? They are actually just like a photo, which is how Stampin’ Up! created them!
I love the softness of the petals and the colouring of these roses, but I also think it may be overpowering as a full layer on a card. So I have cut it into 2 panels to adhere to the front of the card in this fancy fold style.
It is a gatefold card, but when you open it, the oval layers interlock!
I saw Dawn Griffiths make one of these, but of course I needed to alter the paper sizes for A4, rather than US sizing, so went back to my trusty file to find a gatefold card that I had made many years ago and adapted it.
Here it is open. I have stamped the image again and coloured the petals with the Wink of Stella, the same as the front!
A list of products can be found at the end of this post!
July is the month to join my team with an additional 10 ink pad family assortment for FREE with the Starter Kit. It is only $169 to join and you choose any products to the value or $235 to get started and FREE delivery. There are no contracts or strings attached to this offer. Click here to join (Australian residents only).
Today I share this card using the Let the Good Times Roll bundle in the Occasions catalogue. You may remember I shared one earlier in January that was a feminine one, but today is my dads 70th birthday and I thought this was an appropriate card for him, as it brought back wonderful memories of the times he would take me on the rides at the theme parks while my mum & sister looked on in terror!!!! Dad & I loved them!!!
The base card measures 8¼” x 5⅞” and is folded in half.
The Whisper White insert measures 8″ x 5½”.
Are you ready to see the magic happen as you open up the card to reveal the 3D pop up inside?
Who wouldn’t get a thrill out of opening this card?!!!! Isn’t it just so cool?!!
This is a 14 piece photopolymer set, so it makes it super easy to line up the stamped images as well as using the coordinating dies to cut them out so no more fussy cutting! I have used lots of colour as I think it is such a fun card that screams colour!
Remember, here are the tips I found when using this bundle:
use whisper white, not the thick whisper white card, it’s easier to fold the tracks
do not score your white card all the way through. Only score each side about 1/2″, line up the die and then cut, then use a ruler to score across to the edge of the die cut
Score along each edge of the tracks and the bottom edge before trying to fold them
Add an extra layer over the framework of the roller coaster for strength
it will fold flat, you just need patience in the manipulating of the tracks
I made a quick 30 second video to show how it folds flat, view here. (I’m not into making videos, so no instructions with it, lol).
You can also view the YouTube video by Brandi at the Stampin’ Up! home office here to see more about how to create the pop up section!
When you spend $90+ during Sale-a-bration, you get to choose 1 free item from the Sale-a-bration brochure. Go on, have a look, you know you want to!!!
A full list of products can be found at the end of this post!
Join my team during Sale-a-bration and get even more rewards!
Standard Starter Kit + more stamps during Sale-a-bration.
FIRST – Choose $235 in Stampin’ Up! Products for just $169!
SECOND – Choose TWO additional FREE stamp sets*, that’s up to a $174 value!
*You may choose only stamp sets from the annual or occasions catalogues (bundles, kits, Sale-a-bration items cannot be selected as free stamp sets for this promotion).
Sale-a-bration period to earn FREE product: 3rd January – 31st March 2018 Occasions catalogue period: 3rd January – 31st May 2018
Be sure to download a copy of the Occasions catalogue and the Sale-a-bration brochure on my SU Catalogue Library page today.
Don’t forget to Follow My Blog to receive blog updates and join my Newsletter Subscriptionfor all the latest news and specials!
Today I share with you a card that took a little while to create and understand how it actually worked when putting it together. When you see it, you will be amazed, but I have to admit there was some frustration at the beginning!
I’m using the Let the Good Times Roll bundle in the Occasions catalogue.
I started with an A5 piece of Lemon Lime Twist card stock = 8¼” x 5⅞” folded in half.
The Whisper White insert measures 8″ x 5½”.
Firstly, I will share with you the inside of the card before the front, and you will see why in a second. This is the most amazing 3D pop up card you will have seen in a while!
What kid would not get a thrill out of opening this card?!!!! Isn’t it just so cool?!!
This is a 14 piece photopolymer set, so it makes it super easy to line up the stamped images as well as using the coordinating dies to cut them out. I have lots of colours as I think it is such a fun card that screams colour!
Here is the front of the card:
Now a few tips I have found when using this bundle:
use whisper white, not the thick whisper white card, it’s easier to fold the tracks
do not score your white card all the way through. Only score each side about 1/2″, line up the die and then cut, then use a ruler to score across to the edge of the die cut
Score along each edge of the tracks and the bottom edge before trying to fold them
Add an extra layer over the framework of the roller coaster for strength
it will fold flat, you just need patience in the manipulating of the tracks
I made a quick 30 second video to show how it folds flat, view here. (I’m not into making videos, so no instructions with it, lol).
You can also view the YouTube video by Brandi at the Stampin’ Up! home office here to see more about how to create the pop up section!
When you spend $90+ during Sale-a-bration, you get to choose 1 free item from the Sale-a-bration brochure below. Go on, have a look, you know you want to!!!
A full list of products can be found at the end of this post!
Sale-a-bration period to earn FREE product is 3rd January – 31st March 2018 Occasions catalogue begins on 3rd January and runs through until 31st May 2018
Click on the pictures above to download your PDF copy!
Don’t forget to Follow My Blog to receive blog updates and join my Newsletter Subscriptionfor all the latest news and specials!
Who doesn’t love a bright and colourful kids birthday card?!!! Today I am using the Let the Good Times Roll stamp set, with the coordinating Thrill Ride Pop-up Thinitsdies (available in a bundle) from the upcoming Occasions catalogue due for release in January, and check them out!
Here is the front of the card. These little roller coaster cars are so cute with the birthday balloons hanging from them as they travel along the track.
but open the card and this is where the magic happens….
Check out the pop up on the inside!! Isn’t it amazing?! I have to admit, this card did take a bit of time to create, as it was quite fiddly and time consuming, but it is so worth it. You just need to take your time and keep manipulating the pieces to get it right. Make sure you score along the bottom of the roller coaster and along the edges on either side of the tracks with your bone folder, to make it easier too.
This card does fold flat to fit into a C6 envelope and can be mailed!!!
A list of product can be found at the end of this post!
Don’t forget to Follow My Blog to receive blog updates and join my Newsletter Subscriptionfor all the latest news and specials!
Welcome to another Art with Heart Team blog hop where we are focusing on fancy folds. You will find loads of creative inspiration tonight, showcasing different folding techniques and projects. Don’t be afraid of trying some Fancy Fold cards; they may look intimidating, but in fact, they are not that difficult to create.
If you’re already hopping, then you just came to me from the talented, Tina Gillespie. If you’re just joining, great! Use the “next” button at the end of my post to hop all the way around. Blog Hops are full circles, so you can start hopping here and then at the end of each post there is a link to the next one. There is also a list of participants at the end in case of any broken links.
Now let’s get started!
For my projects today I am using the Best Birds stamp set with the Whole Lot of Lovely Designer Series Paper. I love how striking this Designer Paper is too and I knew it had to be a focal point. #cutitnothhoardit
Fancy Fold Card #1
For my first card today, I am sharing a fairly simple fancy fold card, a Double Z Fold.
The card base is Pool Party card = 11⅜” x 5⅛” and score at 2¾” & 5½”. Trim off a 1″ strip from the bottom of the card which will create the double z fold. You just flip that strip over, so the shorter end is on the right as shown. Then you decorate as you like. Here is my colour combination using the coordinating colours in the Designer Paper!
Back panel of the card
Products used
Stamps:Best Birds Inks: Crushed Curry, Pool Party, Soft Suede Card/Paper: Crushed Curry, Pear Pizzazz, Pool Party, Whisper White, Whole Lot of Lovely DSP Accessories: Big Shot, Layering Ovals Framelits dies, Magnetic Platform, Stampin’ Trimmer, Paper Snips, Stampin’ Scrub, Stampin’ Mist, Tombo Multipurpose Glue, Simply Scored, Clear Block Bundle, Dimensionals, Fast Fuse, Tombo Glue, Wink of Stella, Blender Pen, ⅜” Gold Metallic-Edge Ribbon
Fancy Fold Card #2
For my second one, I have a more advanced fancy fold card. I am sharing a style that I think is amazing, but I’ve never found it in Australian cardstock sizes, so I created my own A5 Gatefold Shutter card. It took quite a bit of time to figure out all the correct measurements, but I am super happy with the outcome. Now I have mastered it, I can whip them up in no time at all!
When you take off the belly band, the centre diamond opens to reveal a secret message inside!
Kids love this style of card, they think it’s like magic when it opens up. They look difficult to make, but if you follow the instructions, they are actually quite easy.
If you would like a copy of my FREE tutorial how I made these cards, head over to my ‘Free Tutorials’ page to download your PDF copy, but make sure you continue the blog hop first to see what all the other talented ladies have created!
Products used
Stamps:Best Birds Inks:Basic Black & Tangerine Tango Card/Paper: Tangerine Tango, Whisper White, Whole Lot of Lovely DSP Accessories: Big Shot, Layering Circles Framelits dies, Magnetic Platform, Stampin’ Trimmer, Paper Snips, Stampin’ Scrub, Stampin’ Mist, Tombo Multipurpose Glue, Simply Scored, Clear Block Bundle, Dimensionals, Fast Fuse, Tear & Tape, Bone Folder, Ruler, Pencil, 1¾” circle punch, 2¼” circle punch
Thanks for visiting today.
Don’t forget to email me at craftwithkate@live.com.au to request your copy of any Catalogue or to ask about joining the Art With Heart team.
Now it’s time to follow the blog hop to our next participant, Andrea Roberts.
If you find a broken link or have come to this blog hop from a different entry point, you can view the participants below: