Tonight the Art with Heart team girls are sharing some creative projects by adding texture with embossing. Embossing can add a lovely dimension, and with our wonderful Stampin’ Up! products, we can create many different looks. These include Heat embossing using embossing powder, dry embossing using our textured folders or by adding embossing paste!
If you’re already hopping, then you just came to me from the lovely, Sharon Davern. If you’re just joining, great! Use the “next” button at the end of my post to hop all the way around. Blog Hops are full circles, so you can start hopping here and then at the end of each post there is a link to the next one. There is also a list of participants at the end in case of any broken links.
Now let’s get started!
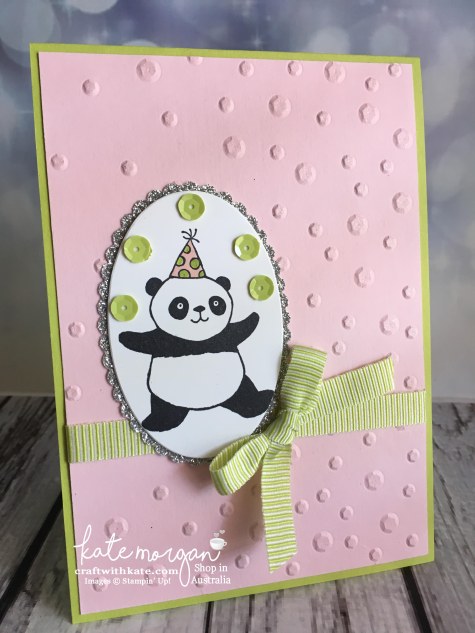
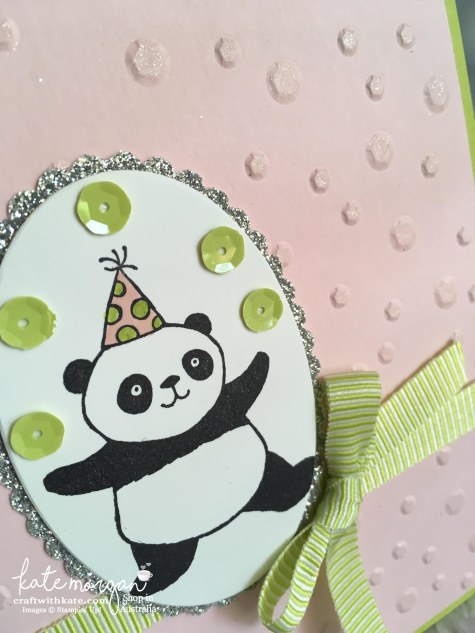
My first project today features some new products you may not have seen yet, from the soon to be released Occasions catalogue and Sale-a-bration brochure. This stamp set, Party Pandas is going to be very popular as one of the FREE stamp sets when you spend $90+ during Sale-a-bration! I have also featured the Scattered Sequins Dynamic Textured Impressions Embossing Folder.
I have added some Wink of Stella to each sequin, but I’m not sure if you can this in the photos? The Lemon Lime Twist ribbon and the Adhesive Backed Tutti Fruitti Sequinsare also new products.
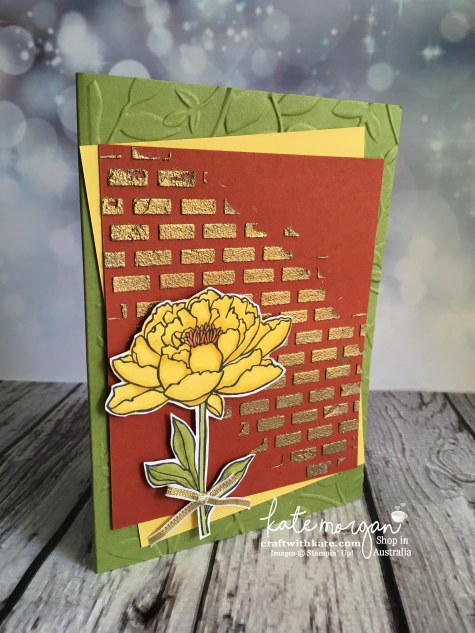
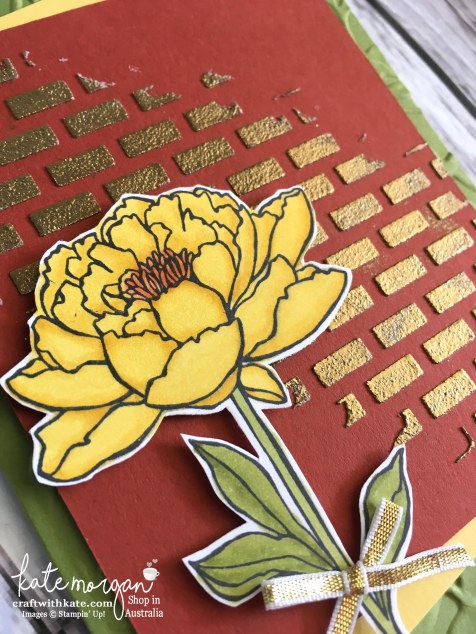
For my next project, I have used the Embossing Paste with Pattern PartyDecorative Masksand then quickly added some gold embossing powderand heat set it. This showcases two embossing techniques in one, and look at that amazing effect!!!! I’ve also dry embossed the background, so all three embossing techniques are used on this one card!
I’ve also used the Stampin Blends Markers to colour the flower!
The embossing paste adds a wonderful texture to your projects. The best thing about it, is that you can colour it with your reinkers to change the colour, you can add embossing powder before it dries and heat set it, but you can also mix in some fine glitter!
Welcome to Week 26 of The Heart of Christmas: Handmade Inspiration from the Art with Heart team!
My project today is not just a beautiful handmade card, but also a gift, with some scissor bling being the feature! You can see the scissor bling hanging from the centre of the card. This can be removed and added to the recipients Paper Snips/Scissors after Christmas.
You may also notice some new ribbons… yes, they will be available in the upcoming Occasions catalogue. I was lucky enough to receive some at our recent OnStage event.
Lemon Lime Twist 1cm Mini Striped Ribbon
Berry Burst 1cm Metallic Edged Ribbon
You have to see them in real life, just to see how stunning they are.
The scissor bling is attached to some little phone charm cords that I purchased on eBay.
A full list of product can be found at the end of this post!
I hope you have enjoyed my Heart of Christmas post and I look forward to sharing more Christmas inspiration with you next Wednesday! If you would like to see what others in our team have created, you can view the participant list over on the blog of our leader, Claire Daly.
Don’t forget to Follow My Blog to receive blog updates and join my Newsletter Subscriptionfor all the latest news and specials!
Are you like me and struggle with Masculine cards? Well, I have been on a bit of a roll lately with lots of requests for Masculine cards, and this Wood Textures Designer Series Paper is perfect to use!!!
I have obviously gone for the earthy tones and the Seasonal Layers thinlits are the perfect match, along with some of the burlap ribbon. The sentiment is from the Delightful Daisy stamp set as I wanted a fairly large image to stamp onto the Oval Stitched Shapesframelits die cut.
I love all the layers on this card. What do you think?
A full list of product can be found at the end of this post!
Don’t forget to Follow My Blog to receive blog updates and join my Newsletter Subscriptionfor all the latest news and specials!
My project today is a Masculine Farewell card using the Wood Textures Designer Paper, Painted Harvest stamp set and the Seasonal Layers thinlits.
I initially had the Lemon Lime Twist panel on the left plain, but then i decided to stamp those little acorns and I think it looks great. I also stamped one on the envelope!
The sentiment was printed using my computer, but look at that detail in the Wood Textures DSP?!!! It has so much detail and it looks so real! I love these detailed leaves too.
On the inside of the card I used some of the Year of Cheer Specialty Washi Tape and a small piece of the Wood Textures DSP.
A full list of product can be found at the end of this post!
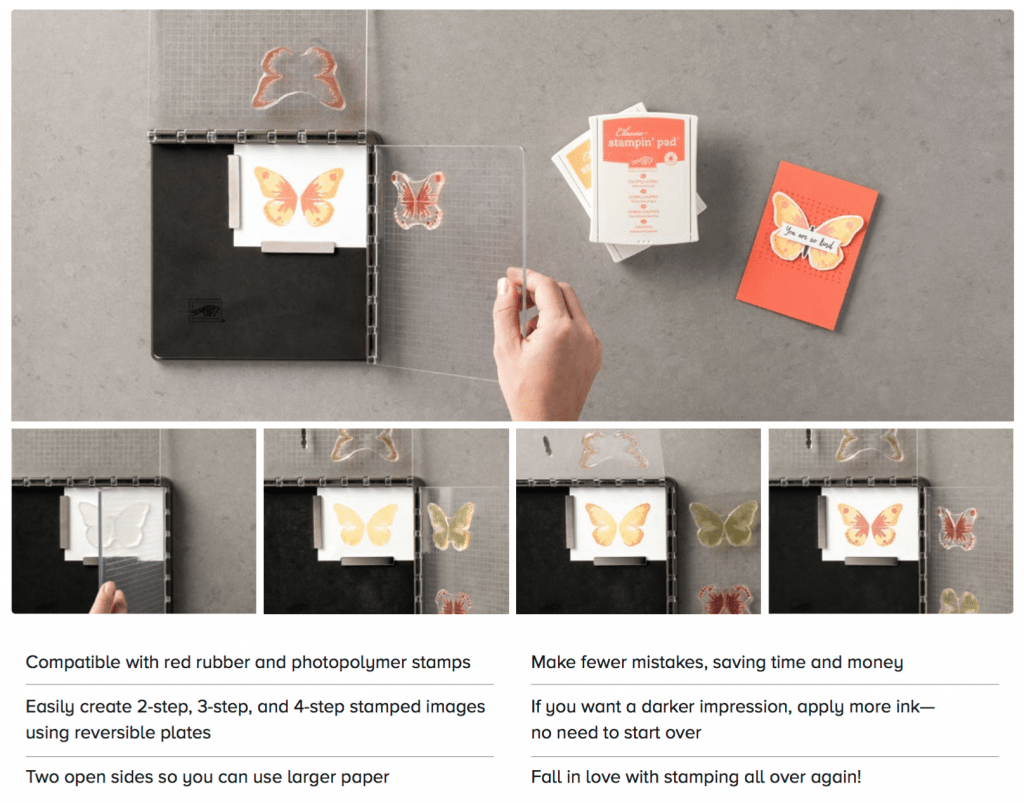
At the Stampin’ Up! OnStage event last Saturday, we were informed about the most exciting news for any stamper… the Stamparatus is here!
Click here to watch the Video – you will not be disappointed, it’s by far the best stamp positioning tool on the market. It does so much more than any others out there! Be sure to watch the whole video, don’t miss the Hinge Step Technique at the end!
Here’s why you need this tool:
It’s big news when something breaks the mold and changes everything. The Stamparatus will change the way you stamp, and before long, you’ll wonder how you crafted without it! Why do YOU need one? You’ll fall in love with stamping all over again when you learn everything you can do with it!
Make multiples with ease
Consistently stamp crisp, clean images
If you want a darker impression, apply more ink and restamp—no need to start over
Make fewer mistakes, saving time and money
Easily create 2-step, 3-step, and 4-step stamped images using reversible plates
Develop new and specialized stamping techniques with adjustable stamping plates and precision placement
Need product details!
Compatible with Stampin’ Up!’s red rubber and photopolymer stamp
Foam mat to use with photopolymer stamps
Rulers and gridlines for quick measuring
2 open sides so you can stamp on larger paper
2 reversible plates: a total of 4 surfaces to work with
2 magnets to hold the paper in place
Magnet storage areas
Retail Price $85.00 AUD
The global launch will feature three reservation windows. Opens 8am.
RESERVATION WINDOWS
AVAILABLE TO SHIP
17–30 November 2017
Approx. 1 February 2018
6–30 December 2017
Approx. 19 March 2018
16–30 January 2018
Approx. 15 April 2018
Here’s how to reserve your Stamparatus!
Click here for instructions on how to RESERVE your Stamparatus
To reserve a Stamparatus, you must have a customer account. To create one, click Create Account on the online store.
Why does it take so long for the Stamparatus to ship? We will place an order with the manufacturer based on how many reservations are made during any given reservation window. Shipping dates depend on how long it takes the order to arrive in our warehouse after the tools have been manufactured.
You will be required to have a credit card to reserve the product, however you won’t be billed immediately. When inventory arrives in the warehouse, they will add your reservation to a shopping cart, then send you an email notifying you that your Stamparatus order is ready. Once you finalise payment and close your order, the system will charge your credit card.
If you change your mind and want to cancel your reservation, you can at any time. To cancel, please see the How to Reserve Your Stamparatus Tutorial for Customers PDF.
The tool will be available in the 2018–2019 annual catalogue!
There is a limit of 1 per reservation window.
FUN FACT
How did we come up with the name Stamparatus?
We landed on an innovative name by combining two words that speak to the end use of the tool as well as Stampin’ Up! branding.
Stamp: To impress a pattern or mark (especially an official one) on a surface, object, or document using an engraved or inked block or die or other instrument
Apparatus: The technical equipment or machinery needed for a particular activity or purpose
Stamp + Apparatus = Stamparatus
Make sure you watch the video to see how it works with Photopolymer and Clear Mount red rubber stamps! The plates are removable, flip up and down, side to side, no other stamp positioning tool can do that!!!!
I will be reserving mine at 8am tomorrow for sure!!!!
Don’t forget to Follow My Blog to receive blog updates and join my Newsletter Subscriptionfor all the latest news and specials!
Welcome to Week 25 of The Heart of Christmas: Handmade Inspiration from the Art with Heart team!
Sometimes we get so crazy with the Holiday catalogue, that we forget about the Christmas products in the Annual catalogue, so today, my project uses the Christmas Pines stamp set and the coordinating Pretty Pines thinlits with the Merry Little Christmas Designer Series Paper!
All those beautiful pine needles layered together with the red glimmer berries just scream Christmas to me! I can almost smell the scent of pine lol
Look at those rhinestones that have been coloured using the new Cherry Cobbler Dark Stampin’ Blends Marker!
My inspiration for this card came from Shannon Jaramillo, so thank you!
A full list of product can be found at the end of this post!
I hope you have enjoyed my Heart of Christmas post and I look forward to sharing more Christmas inspiration with you next Wednesday! If you would like to see what others in our team have created, you can view the participant list over on the blog of our leader, Claire Daly.
Don’t forget to Follow My Blog to receive blog updates and join my Newsletter Subscriptionfor all the latest news and specials!
On Saturday, I attended the Stampin’ Up! OnStage Local event here in Melbourne at the Melbourne Park Function Centre. We were lucky it was here in our home town and I was even more excited that four members of my team were able to join me!!! (Unfortunately, Amie wasn’t able to attend and we sure did miss her, and hopefully she may be able to make it to the next one).
Here are the name tags that I made for each of us to wear on our lanyards. I made them using Photoshop Elements on the computer and printed them using our team floral logo. Then I die cut them using the Stitched Shapes framelits, mounted them onto a Melon Mambo circle (Layering Circle framelits) and then laminated them. Then I die cut them again (Layering Circle framelits). I added a small hole punch in the top and added the cords (purchased on ebay).
I also made these cute little boxes using some current and retired Stampin Up colours and DSPs. I actually asked on our team forum what their favourite colour is and went from there (aren’t I sneaky?!!!). The gift tags were made using the coordinating cardstock and the butterfly is from the Move Me thinlits.
and I bet you are wondering what was inside the box?!!! No, not chocolates… I would have eaten them all!!! lol
I actually purchased some bone folders and had them engraved with each of their names on it along with our team name, Team Craftalicious!
Aren’t they adorable???
For demonstrators who attend this event, it coincides with the release of the Occasions catalogue and Sale-a-bration brochure! So yes, I have a copy in my hot little hands but unfortunately I cannot share it with you just yet, but it won’t be long and you will see lots of new yummy products!
Don’t forget to Follow My Blog to receive blog updates and join my Newsletter Subscriptionfor all the latest news and specials!
My project today features the gorgeous Wood Textures DSP and isn’t it stunning?!!
I was asked to make quite a few masculine farewell cards and this is a style that I struggle with immensely, but I actually love this. I saw a similar card by Jo Anne Hewins on Pinterest and went from there.
Colour Palette: Early Espresso, Very Vanilla, Tranquil Tide & Cajun Craze
The sentiment was printed from my computer.
A full list of product can be found at the end of this post!
Don’t forget to Follow My Blog to receive blog updates and join my Newsletter Subscriptionfor all the latest news and specials!
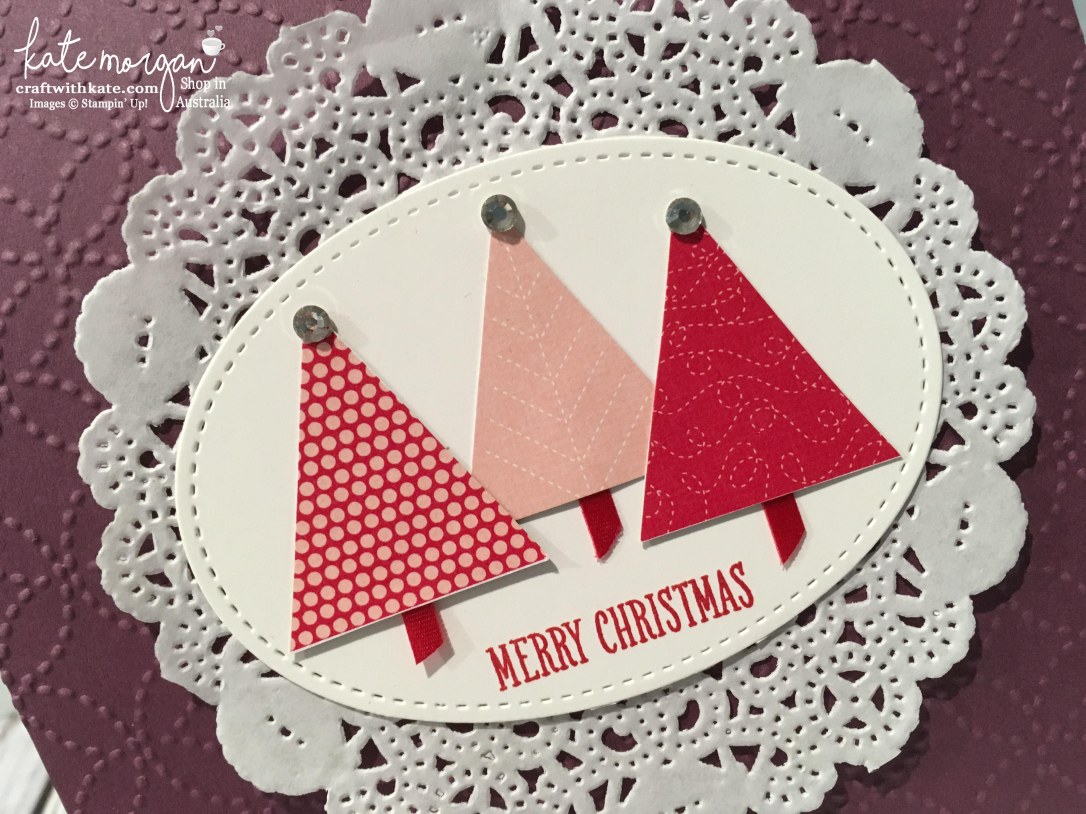
Welcome to Week 24 of The Heart of Christmas: Handmade Inspiration from the Art with Heart team!
My project today is a quick and easy card using the Quilted Christmas DSP. Where, you say? Look at those 3 little Christmas trees. They are cut from the Designer paper!
The background is embossed using the Quilt Top Embossing Folder. A doily is added, then the oval stitched framelit in whisper white. I stamped the Merry Christmas sentiment, from the At Home with You stamp set (oops, forgot the add that to the product list at the bottom of this post)!
A small piece of the Red Ribbon was attached behind each tree before adding each one to the stitched oval with a dimensional. A rhinestone was added to the top of each tree!
A full list of product can be found at the end of this post!
I hope you have enjoyed my Heart of Christmas post and I look forward to sharing more Christmas inspiration with you next Wednesday! If you would like to see what others in our team have created, you can view the participant list over on the blog of our leader, Claire Daly.
Don’t forget to Follow My Blog to receive blog updates and join my Newsletter Subscriptionfor all the latest news and specials!


 Burlap Ribbon")


 Designer Series Paper")

 Solid Ribbon")


