Blog Hop/Instagram Hop, Christmas, Designer/Patterned/Specialty Papers (DSP), Handmade Cards, Holiday Catalogue, Stampin' Up!

Heart of Christmas – Week 2 Twinkling Tidings

Welcome to the Heart of Christmas Blog Hop. I’m thrilled you are here to join us each Monday evening to share Christmas inspiration using @stampinupofficial seasonal products.

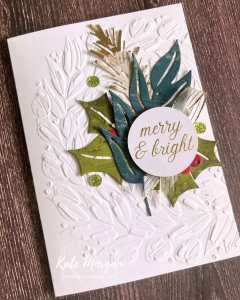
Twinkling Tidings Card

My card this week features the new Hot Foiling System (HFS) with the Gold Foil and the Twinkling Tidings Bundle (Stamp Set and Hot Foil Dies).

On a Thick Basic White card base, I’ve covered it with a piece of the Neutral Noel Specialty Designer Series Paper (DSP).
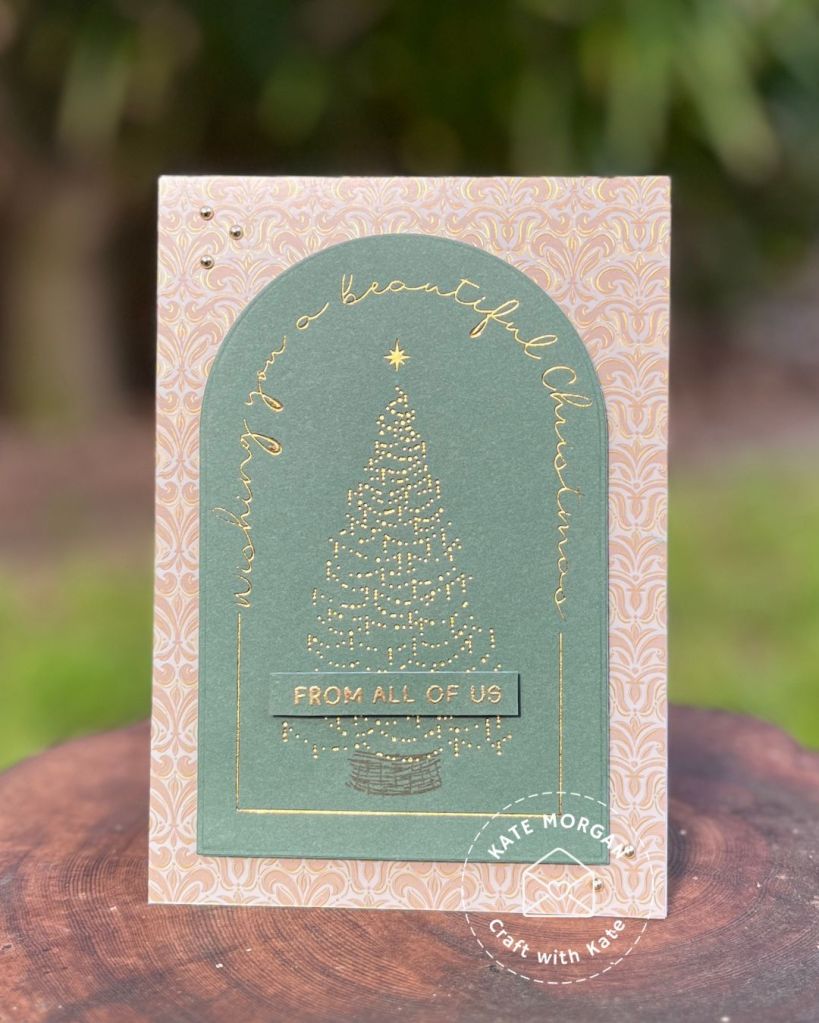
The Hot Foil Dies are placed onto the HFS with some Gold Foil and Peaceful Pine Two-Tone card stock. I stamped the basket in Pecan Pie ink. Then I used the arch die in the set to cut it out. I placed Dimensionals on the back and adhered it to the card base.

The sentiment [Christmas Mice] was stamped in Versamark ink, Gold WOW Emboss Powder added and melted with my Heat Tool. This was also added on Mini Dimensionals. Some Festive Pearls finish the card front.

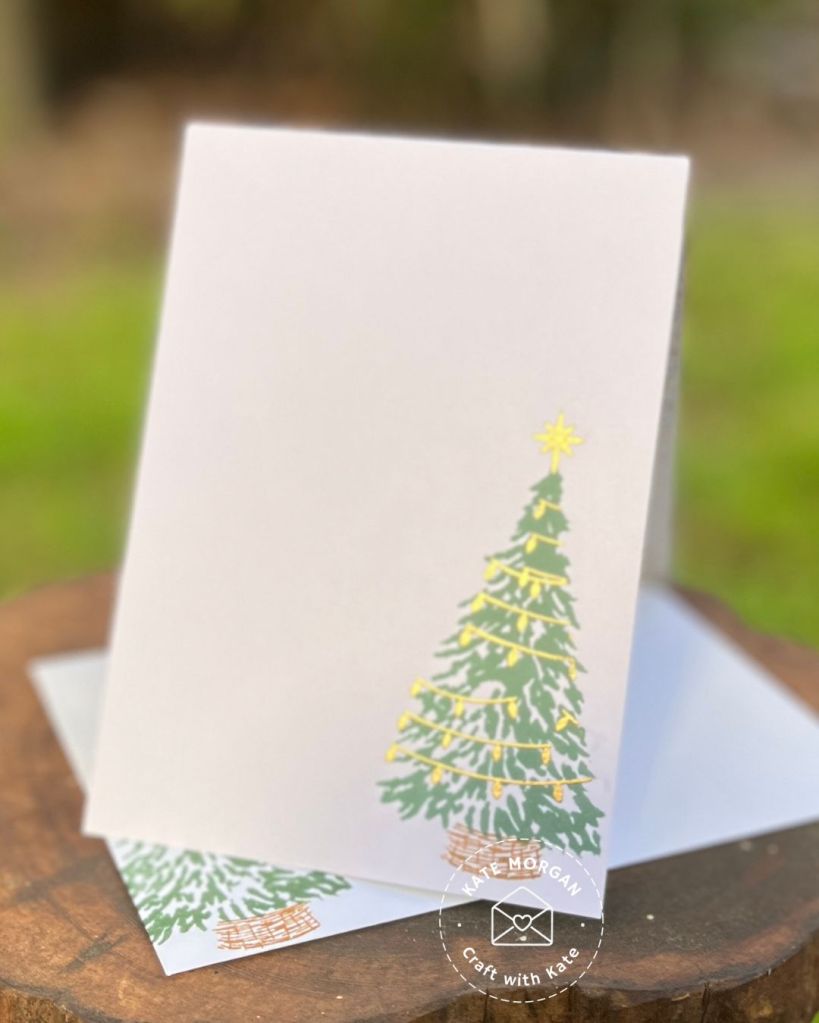
On the inside and on the envelope, I stamped the tree and Gold heat embossed the star and the string of lights.
Please enjoy the wonderful inspiration of our next team member, Claire Daly.

The full list of participants for this week can be viewed on Claire Daly’s blog.

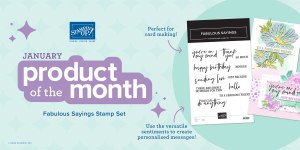
Be sure to add the Product of the Month (POM) for $9 when you add $125+ in product to your cart.

Product List @stampinupofficial
Stamps:
Christmas Mice, Twinkling Tidings*
Dies: Twinkling Tidings*
Ink: Peaceful Pine, Pecan Pie, Versamark
Paper: Basic Thick White, Peaceful Pine Two-Tone, Neutral Noel Specialty DSP, Basic White C6 Envelopes
Other: Gold Foil, Gold WOW Emboss Powder, Festive Pearls, Acrylic Blocks, Bone Folder, Cut & Emboss Machine, Hot Foiling System, Mini Dimensionals, Multipurpose Glue, Paper Trimmer, Simply Shammy, Take Your Pick Tool.
*can be purchased together as a bundle to save 10%


Be sure to download a PDF copy of current catalogues from my SU Catalogue Library page.

Don’t forget to Follow My Blog to receive blog updates and all the latest news and specials!

Blog Hop/Instagram Hop, Designer/Patterned/Specialty Papers (DSP), Fancy Folds, Handmade Cards, Holiday Catalogue, Stampin' Up!, Sympathy

Night of Navy: Fold Back Sympathy card

Welcome to the Colour Creations Instahop. You can follow us on Instagram starting  @craftwithkate. Each week we will showcase the Stampin’ Up! colours in alphabetical order.

Week 34 – Night of Navy

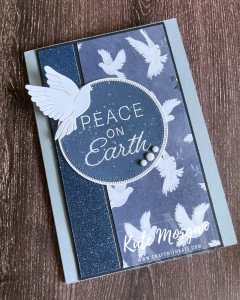
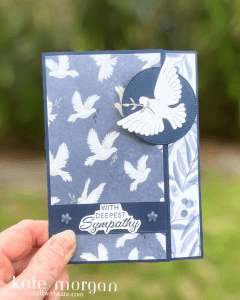
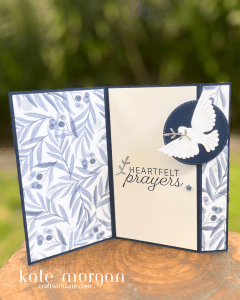
This handmade sympathy card features the Peace on Earth bundle and the Peaceful Garden Designer Series Paper (DSP) in a very easy fun fold design. The narrow panel on the right folds back to open the card, with the circle feature holding the card closed. This fold is so versatile to use with any of the beautiful Stampin’ Up! Designer Serie Papers.

How you can re-create this card

1. Create the base – a Night of Navy card base, 19.4cm x 14.9cm, scored @ 8.5cm and 16.8cm.

2. Designer Paper – 14.4cmx 8cm (2), 14.4cm x 2cm. Adhere the strip to the right hand panel and the  other two pieces to the front and inside left of the card.

3. Basic White – 14.4cm x 8cm, adhere inside for your message. Die cut the dove to adhere to the circle feature.

4. Night of Navy – 8cm x 2cm for the front and a circle for the feature element. This is die cut using the Stylish Shapes dies. To adhere this to the narrow panel by adding 3 Dimensionals in a row only to the right hand side (back) of the circle.

5. Finishing touches – Stamp the sentiment in Night of Navy ink onto Basic White card and fussy cut. Adhere to the Navy strip on the front of the card. Die cut a couple of the branches from the Glimmer paper and adhere as shown. Add some Hues of Blue Flowers.

Thanks for dropping by. I hope you join me next week for Old Olive inspiration.

2026 Jan-Apr Mini catalogue is here! click here

Bonus Days are back

Product of the Month

Product of the Month items are specially designed to be some of the best items Stampin’ Up! has to offer that aren’t available in any catalogue or Online Exclusives. A new release every month that is only available for purchase once per account with a qualifying order. These items will be limited quantity and are likely to sell out quickly—once they’re sold out, they’re gone for good! Once you add $125+ in product to you cart, you can add the POM for $9.

Product List @stampinupofficial
Stamps:
Peace on Earth*
Dies: Peace on Earth*, Stylish Shapes
Ink: Night of Navy
Paper: Basic White, Night of Navy, Peaceful Garden Designer Series Paper, Peaceful Garden Glimmer, Basic White C6 Envelopes
Other: Hues of Blue Flowers, Acrylic Blocks, Bone Folder, Paper Trimmer, Multipurpose Glue, Mini Stampin’ Dimensionals, Stampin’ Cut & Emboss Machine, Take Your Pick Tool, Simply Shammy.
*can be purchased together as a bundle to save 10%


Be sure to download a PDF copy of current catalogues from my SU Catalogue Library page.

Don’t forget to Follow My Blog to receive blog updates and all the latest news and specials!
Christmas, Designer/Patterned/Specialty Papers (DSP), Handmade Cards, Holiday Catalogue, Jul-Dec Mini Catalogue and Sale-a-bration, Stampin' Up!

Peaceful Garden Accordian Fold card

This handmade card features the Peace on Earth bundle and Peaceful Garden Designer Series Paper. 

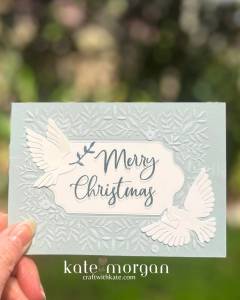
Start with a Cloud Cover card base, 29.7cm x 10.5cm, scored @ 14.8cm. Dry emboss the card front with the Peaceful Greenery 3D Embossing Folder. Die cut a Basic White label, stamp the sentiment [Traditional Labels stamp set] in Misty Moonlight ink and again in Cloud Cover ink but slighty offset to create a shadow effect. Adhere it to the card. Die cut the doves and envelopes in Basic White and the branch is cut from some Peaceful Garden Glimmer.

As you open the card you see this amazing accordian patterned paper unfold.

To create this, start with a piece of DSP 25.5cm x 10cm and score at 8cm, 10.5cm, 13cm, 15.5cm, 18cm, 20.5cm & 23cm.

Glue the left panel in place, fold up the accordian section, holding it tight, add glue to the final panel, and fold the back of the card closed onto the front. Hold it for a few seconds to dry then you can add the Basic White panel [10cm x 5.7cm] to the inside.

Add a sentiment to one of the folds; I’ve added one from the Greetings For You Mix & Match Ephemera Pack.

I was inspired by Laura of Southridge Studios and I wanted to create my own with metric measurements.

Many of the Art with Heart Team participate in the Colour Creations Instagram hop that goes live every Wednesday night. We showcase one SU colour each week. We would love you to follow us!

Product List 
Stamps: 
Peace on Earth*, Traditional Labels
Dies: Peace on Earth*
Paper: Basic White, Cloud Cover, Peaceful Garden Glimmer, Peaceful Garden DSP, Basic White C6 Envelopes
Ink: Misty Moonlight, Cloud Cover
Other:  Peaceful Greenery EF, Greetings For You Mix & Match Ephemera Pack, Acrylick Blocks, Paper Snips, Bone Folder, Paper Trimmer, Multipurpose Glue, Stampin’ Dimensionals, Take Your Pick Tool.
*can be purchased together as a bundle to save 10%


Be sure to download a PDF copy of current catalogues from my SU Catalogue Library page.

Don’t forget to Follow My Blog to receive blog updates and all the latest news and specials!
Blog Hop/Instagram Hop, Christmas, Designer/Patterned/Specialty Papers (DSP), Handmade Cards, Holiday Catalogue, Jul-Dec Mini Catalogue and Sale-a-bration, Stampin' Up!

Traditions of Chrismas Split Panel layout card

This handmade card features the Traditions of Christmas Specialty Designer Series Paper. I think this is such a cool layout, it may just become a go to in the future!!!

How you can re-create this card

1. Create the base – a Bubble Bath card base, 21cm x 14.9cm, scored @ 10.5cm.

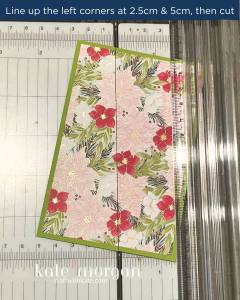
2. Layer – a piece of DSP [12.3cm x 8cm] is glued to a matt layer of Granny Apple Green cardstock [12.8cm x 8.5cm]. Place in your trimmer and line up the left corners at 2.5cm and 5cm as shown below and cut. You place the smaller side to the right side of your card base and the larger panel to the left side of the card base.

3. Add the sentiment – Stamp the sentiment [Traditional Labels stamp set] in Cherry Cobbler ink onto a Basic White Stylish Shapes die cut circle. Die cut another circle one size bigger in Gold Foil to place behind the sentiment one. These are added to the card on Dimensionals.

4. Embellish – the two floral images are fussy cut from the DSP and adhered to the sentiment feature. Some Traditional Sparkling Sequins are added for sparkle.

I was inspired by Creative Juice by Loni and I wanted to create my own with metric measurements.

Many of the Art with Heart Team participate in the Colour Creations Instagram hop that goes live every Wednesday night. We showcase one SU colour each week. We would love you to follow us!

Product List 
Stamps: 
Traditional Labels
Dies: Stylish Shapes
Paper:  Basic White, Gold Foil, Bubble Bath, Granny Apple Green, Traditions of Christmas Specialty DSP, Basic White C6 Envelopes
Ink: Cherry Cobbler
Other:  Traditional Sparkling Sequins, Acrylick Blocks, Paper Snips, Bone Folder, Paper Trimmer, Multipurpose Glue, Stampin’ Dimensionals, Take Your Pick Tool.
*can be purchased together as a bundle to save 10%


Be sure to download a PDF copy of current catalogues from my SU Catalogue Library page.

Don’t forget to Follow My Blog to receive blog updates and all the latest news and specials!

Blog Hop/Instagram Hop, feminine, Flowers, Handmade Cards, Holiday Catalogue, Jul-Dec Mini Catalogue and Sale-a-bration, Stampin' Up!

Lemon Lolly: Christmas Greenery in a fresh colour palette

Welcome to the Colour Creations Instahop. You can follow us on Instagram starting  @craftwithkate. Each week we will showcase the Stampin’ Up! colours in alphabetical order.

Week 29

This handmade card features the Christmas Greenery stamp set, however it is not necessarily a Christmas card, although it could be sent to someone who may not celebrate Christmas to let them know you are thinking of them at this time of year.  This fresh colour palette is perfect for sending love & joy to someone you care about. My colours this week are Lemon Lolly, Fresh Freesia, Lost Lagoon and Misty Moonlight.

How you can re-create this card

1. Create the base – a Thick Basic White card base, 21cm x 14.9cm, scored @ 10.5cm.

2. Stamp and colour – the images are stamped randomly in a cluster. I find holding the label over the space where you will eventually add it helps in the placement of the stamping.

3. Add the sentiment – one of the Traditional Labels dies in Lemon Lolly cardstock is stamped in Misty Moonlight ink and added on Dimensionals.

5. Finishing touches – some Traditional Sparkling Sequins are dotted around, along with some gold dragonflies and birds. Wink of Stella is splattered for extra sparkle!

Many of us also participate in the Heart of Christmas blog hop that goes live every Monday night, where we showcase Christmas inspiration in the lead up to Christmas. We would love you to join us for our final one this Monday!

Thanks for dropping by. I hope you join me next Wednesday for Lost Lagoon inspiration.

Product List @stampinupofficial
Stamps:
Christmas Greenery, Peace on Earth
Dies: Traditional Labels
Ink: Fresh Freesia, Lemon Lolly, Lost Lagoon, Misty Moonlight
Paper: Basic White, Lemon Lolly, Basic White C6 Envelopes
Other: Traditional Sparkling Sequins, Adhesive-backed Dragonflies & Birds, Wink of Stella, Acrylic Blocks, Bone Folder, Paper Trimmer, Stampin’ Dimensionals, Stampin’ Cut & Emboss Machine, Take Your Pick Tool, Simply Shammy.
*can be purchased together as a bundle to save 10%


Be sure to download a PDF copy of current catalogues from my SU Catalogue Library page.

Don’t forget to Follow My Blog to receive blog updates and all the latest news and specials!

Blog Hop/Instagram Hop, Christmas, Designer/Patterned/Specialty Papers (DSP), Handmade Cards, Holiday Catalogue, Jul-Dec Mini Catalogue and Sale-a-bration, Stampin' Up!

Heart of Christmas 12: Pinwheel Patchwork Christmas card

Welcome to the Heart of Christmas blog hop for 2025!
I’m thrilled you are here to join us each Monday evening for the AWHT Heart of Christmas Blog Hop showcasing Stampin’ Up! seasonal products.

Week 12

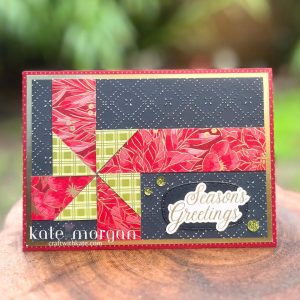
This handmade card features the Traditions of Christmas Specialty Designer Series Paper in this Pinwheel Patchwork style design. To me it looks a bit like the ribbon on a wrapped gift!

How you can re-create this card

1. Create the base – a Thick White card base, 21cm x 14.9cm, scored @ 10.5cm.

2. Die cut & Layer – a piece of DSP [14.8cm x 10.5cm] is added to cover the card base, then some Gold Foil [14.3cm x 10cm] is added. Take a piece of Two-Tone Secret Sea cardstock [13.8cm x 9.5cm] and score at 1½”, rotate clockwise and score again at 1½”.

Embossed this with the new Beautiful Patterns Embossing Folder and lightly sand to reveal the white core.

A 1″ x 12″ strip of the Traditions of Christmas Specialty Designer Series Paper is cut down into the following pieces: 4″, 2½”, 1¾” (2) and (2) 1″ squares. These 2 x 1″ squares are cut in half on the diagonal and flipped to reveal the reverse pattern which creates the pinwheel effect.

Take the longest piece and adhere it to the upper right section against the scorelines. It will hang over the edge, but that is fine as they will be trimmed later. The next biggest strip, place in the upper left section, lining it up against the scorelines. The two smaller pieces fit into the lower two sections. Trim away the excess hanging off the edges with scissors.

The four triangles are adhered on top of the strips (as shown) at right angles and the points meet in the centre to create the pinwheel.

4. Add the sentiment – one of the Greetings For You Mix & Match Ephemera Pack is adhered to a die cut label that has some Wink of Stella around the edges.

5. Finishing touches – some Traditional Sparkling Sequins are added for extra glitter.

Many of us also participate in the Colour Creations Instagram hop that goes live every Wednesday night. We showcase one SU colour each week. We would love you to follow us!

Thanks for dropping by. I hope you join me next Monday for more Chrismas inspiration for our final blog hop in 2025 .

Please enjoy the wonderful inspiration of our next team member, Claire Daly.

The full list of participants for this week can be viewed on Sharon Davern’s blog.

Product List 
Stamps:
N/A
Dies: Traditional Labels
Paper: Thick Basic White, Gold Foil, Secret Sea Two-Tone, Traditions of Christmas Specialty DSP, Basic White C6 Envelopes
Other: Beautiful Patterns Embossing Folder, Greetings for You Mix & Match Ephemera Pack, Traditional Sparkling Sequins, Wink of Stella, Sanding Block, Paper Snips, Bone Folder, Paper Trimmer, Multipurpose Glue, Stampin’ Dimensionals, Stampin’ Cut & Emboss Machine, Take Your Pick Tool.
*can be purchased together as a bundle to save 10%


Be sure to download a PDF copy of current catalogues from my SU Catalogue Library page.

Don’t forget to Follow My Blog to receive blog updates and all the latest news and specials!
Blog Hop/Instagram Hop, Christmas, Designer/Patterned/Specialty Papers (DSP), Fancy Folds, Handmade Cards, Holiday Catalogue, Jul-Dec Mini Catalogue and Sale-a-bration, Stampin' Up!, Techniques & Tutorials

Heart of Christmas 11: Traditions of Christmas Craft Class

Welcome to the Heart of Christmas blog hop for 2025!
I’m thrilled you are here to join us each Monday evening for the AWHT Heart of Christmas Blog Hop showcasing Stampin’ Up! seasonal products.

Week 11

These projects features the Traditions of Christmas Suite Collection. 

A LITTLE ‘WHY’ ABOUT THESE PROJECTS
I recently attended the online Traditions of Christmas Craft Class led by Stampin’ Up!s designers. Being online via a live stream in the comfort of your own home, makes attending so easy. It is recorded and available straight after via an exclusive Facebook page. You can rewatch it as often as you wish. So many amazing techniques, tips and tricks were shared and variations in using alternative products if you are not keen on the Traditions of Christmas Suite Collection.

Here are the projects:

Card 1 uses some ink blending with a homemade mask, ink splatters and die cuts with a lovely sentiment.

Card 2 is so pretty in Secret Sea and Old Olive with a stamped background

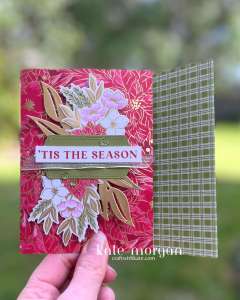
Card 3 is a fun fold using the DSP

as you open this card from under the right side of the feature element

to fully open – check out that gold foil embossed with the Traditional Wreath 3D Embossing Folder!

Project 4 is a 8″ x 8″ home decor piece and here it is hanging on my front door!

I would encourage you to purchase this Craft Class available in the online store. Click here to purchase and view all the details.

Many of us also participate in the Colour Creations Instagram hop that goes live every Wednesday night. We showcase one SU colour each week. We would love you to follow us!

Thanks for dropping by. I hope you join me next Monday for more Chrismas inspiration.

Please enjoy the wonderful inspiration of our next team member, Rosa Leyden.

The full list of participants for this week can be viewed on Sharon Davern’s blog.

Product List 
Stamps:
Christmas Greenery*, Traditional Labels*
Dies: Christmas Greenery*, Traditional Labels*
Ink & Colouring: Cherry Cobbler, Old Olive, Real Red, Secret Sea, Wink of Stella, Pool Party Blends Combo Markers
Paper: Basic White, Secret Sea, Gold Foil Sheets, Traditions of Christmas Specialty Designer Series Paper, Keeping Traditions 12×12 Two-Tone Cardstock, Basic White C6 Envelopes, Cardboard backing sheet from DSP Pack.
Colouring Tools:  Blending Pens, Blending Brushes
Adhesives: Multipurpose Glue, Mini Stampin’ Dimensionals, Stampin’ Dimensionals, Stampin’ Seal, Tear & Tape
Tools/Other: Traditional Wreath 3D Embossing Folder, Traditional Sparkling Sequins, Acrylic Blocks (C, D, E), Sanding Block, Stampin’ Pierce Mat, Paper Snips, Bone Folder, Paper Trimmer, Stampin’ Cut & Emboss Machine, Take Your Pick Tool, Simply Shammy,.
*can be purchased together as a bundle to save 10%


Be sure to download a PDF copy of current catalogues from my SU Catalogue Library page.

Don’t forget to Follow My Blog to receive blog updates and all the latest news and specials!

Christmas, Designer/Patterned/Specialty Papers (DSP), Handmade Cards, Holiday Catalogue, Jul-Dec Mini Catalogue and Sale-a-bration, Stampin' Up!

Christmas Greenery Wreath card

This handmade card features the Christmas Greenery Dies, Traditional Wreath 3D Embossing Folder and the Season of Elegance Specialty DSP.

How you can re-create this card

1. Create the base – a Thick White card base, 21cm x 14.9cm, scored @ 10.5cm. Dry emboss with front with the Traditional Wreath 3D Embossing Folder.

2. Die cut & Layer – the Christmas Greenery dies for the foliage are cut from the Season of Elegance Specialty Designer Series Paper.

4. Add the sentiment – one of the Greetings For You Mix & Match Ephemera Pack is added with a piece of Gold Striped Mesh Ribbon behind it.

5. Finishing touches – some Traditional Sparkling Sequins are added for extra glitter.

Product List 
Stamps:
N/A
Dies: Christmas Greenery
Paper: Thick Basic White, Season of Elegance Specialty DSP, Basic White C6 Envelopes
Other: Gold Striped Mesh Ribbon, Greetings for You Mix & Match Ephemera Pack, Traditional Wreath 3D Embossing Folder, Traditional Sparkling Sequins, Paper Snips, Bone Folder, Paper Trimmer, Multipurpose Glue, Stampin’ Dimensionals, Stampin’ Cut & Emboss Machine, Take Your Pick Tool.
*can be purchased together as a bundle to save 10%


Be sure to download a PDF copy of current catalogues from my SU Catalogue Library page.

Don’t forget to Follow My Blog to receive blog updates and all the latest news and specials!
Blog Hop/Instagram Hop, Christmas, Designer/Patterned/Specialty Papers (DSP), Handmade Cards, Holiday Catalogue, Stampin' Up!

Heart of Christmas 10: Easy Christmas cards featuring the Peaceful Garden papers

Welcome to the Heart of Christmas blog hop for 2025!
I’m thrilled you are here to join us each Monday evening for the AWHT Heart of Christmas Blog Hop showcasing Stampin’ Up! seasonal products.

Week 10

These handmade cards are very easy to replicate and the Peaceful Garden Designer Series Paper (DSP) is so beautiful, we want them to be the focus!

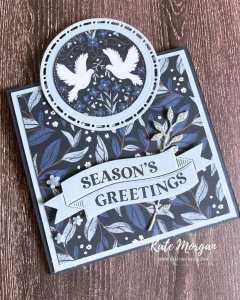
Card 1 – is a top folding card that measures 21cm x 11cm, scored at 10.5cm. Add the card & Designer Paper layers and the circle feature attaches at the top. This is a Cloud Cover Spotlight on Nature die with a Stylish Shapes die circle of the Designer Paper inside. The Traditional Labels die banner is stamped and added on Dimensionals with a Glimmer leaf diecut behind on the right. Some Hues of Blue Flowers are added to finish.

Card 2 – is a side folding card that measures 21cm x 14.8cm, scored at 10.5cm. Add the Secret sea layer [14.6cm x 9cm], the Designer Paper [14.4cm x 5.8cm] and a strip of Glimmer [14.4cm x 2.5cm]. Stamp the sentiment onto Mistry Moonlight card in Versamark ink, add White Emboss Powder and melt with a Heat Tool. Add some White Craft ink refill to an Acrylic Block and add some drops of water using a Water Painter. Make sure the tip isn’t too wet, and gently tap it against a Bone Folder to gently add the splatters. Once dry, diecut the two circles and adhere them together then onto the card. Add a white dove to one side and some embellishments to the other.

Many of us also participate in the Colour Creations Instagram hop that goes live every Wednesday night. We showcase one SU colour each week. We would love you to follow us!

Thanks for dropping by. I hope you join me next Monday for more Chrismas inspiration.

Please enjoy the wonderful inspiration of our next team member, Andrea Sargent.

The full list of participants for this week can be viewed on Sharon Davern’s blog.

Product List 
Stamps:
Peace on Earth*, Traditional Labels*
Dies: Peace on Earth*, Spotlight on Nature, Stylish Shapes, Traditional Labels*
Ink: Secret Sea, Versamark, White Craft Refill
Paper: Basic White, Cloud Cover, Misty Moonlight, Secret Sea, Peaceful Garden DSP, Peaceful Garden Glimmer Paper, Basic White C6 Envelopes
Other: Hues of Blue Flowers, Neutral Matte Dots, White WOW Emboss Powder, Acrylic Blocks, Paper Snips, Bone Folder, Paper Trimmer, Multipurpose Glue, Mini Stampin’ Dimensionals, Glue Dots, Tear & Tape, Stampin’ Cut & Emboss Machine, Take Your Pick Tool, Simply Shammy, Heat Tool, Water Painters.
*can be purchased together as a bundle to save 10%


Be sure to download a PDF copy of current catalogues from my SU Catalogue Library page.

Don’t forget to Follow My Blog to receive blog updates and all the latest news and specials!

Blog Hop/Instagram Hop, Christmas, Designer/Patterned/Specialty Papers (DSP), Handmade Cards, Holiday Catalogue, Jul-Dec Mini Catalogue and Sale-a-bration, Markers for Colouring, Stampin' Up!

Heart of Christmas 9: Branching Out Shaker card

Welcome to the Heart of Christmas blog hop for 2025!
I’m thrilled you are here to join us each Monday evening for the AWHT Heart of Christmas Blog Hop showcasing Stampin’ Up! seasonal products.

Week 9

This handmade shaker card features the Branching Out dies and the Peaceful Garden Designer Series Paper (DSP).

A LITTLE ‘WHY’ ABOUT THIS CARD
I was inspired by a card Tami Hewlett created and I had these Gold Shaker Stars in anticipation of making some shaker cards. Seeing Tami’s card gave me great inspiration to make one similar.

How you can re-create this card

1. Create the base – a Crumb Cake card base, 29.7cm x 10.5cm, scored @ 14.8cm.

2. Layering – Some DSP 14.3cm x 10cm has Pecan Pie ink blended around the edges then adhered to the card base. Die cut die #2 (#1 being the smallest) in Basic White card then using a Blending Brush, gently blend Old Olive ink on the lower section. Adhere this to the centre of the card (sits behind the shaker element). To cut the Secret Sea card, place dies #1 and #3 with the smaller inside, and equal distance between them and run through your die cutting machine. Adhere a piece of Window Sheet behind the Secret Sea element. Add Foam Adhesive Strips on the back ensuring it is fully enclosed so no shaker bits will fall out once attached. Carefully place some of the shaker stars onto the white card, remove the backing from the foam strips and carefully place the window element on top.

3. Die Cut Embellishments – die cut some pinecones in Crumb Cake card, pine needles fom the green piece of Seasons of Elegance SDSP and the berries from Basic White card. The stems of the berries are coloured using the Old Olive Stampin’ Write Marker. The pinecones have some Pecan Pie ink gently blended. Adhere these pieces, starting with the pine needles, to the top corner of the shaker element. Next the pinecones then the berries.

4. Add the sentiment – one of the Greetings For You Mix & Match Ephemera Pack sentiments is added with a Dimensional behind the right side.

5. Finishing touches – some Traditional Sparkling Sequins and a Gold Striped Mesh Ribbon bow are added.

Many of us also participate in the Colour Creations Instagram hop that goes live every Wednesday night. We showcase one SU colour each week. We would love you to follow us!

Thanks for dropping by. I hope you join me next Monday for more Chrismas inspiration.

Please enjoy the wonderful inspiration of our next team member, Sue Madex.

The full list of participants for this week can be viewed on Sharon Davern’s blog.

Don’t forget about the joining offer during October. It is a huge $175 saving. Click here for all the details.

Product List 
Stamps:
None
Dies: Branching Out
Ink: Pecan Pie, Old Olive
Paper: Basic White, Crumb Cake, Pecan Pie, Secret Sea, Peaceful Garden DSP, Season of Elegance SDSP, Window
Sheets, Basic White C6 Envelopes
Stampin’ Write Markers:  Old Olive
Other: Gold Shaker Stars, Traditional Sparkling Sequins, Gold Striped Mesh Ribbon, Greetings For You Mix & Match Ephemera Pack, Blending Brushes, Acrylic Blocks, Paper Snips, Bone Folder, Paper Trimmer, Multipurpose Glue, Foam Adhesive Strips, Mini Stampin’ Dimensionals, Glue Dots, Tear & Tape, Stampin’ Cut & Emboss Machine, Take Your Pick Tool.
*can be purchased together as a bundle to save 10%


Be sure to download a PDF copy of current catalogues from my SU Catalogue Library page.

Don’t forget to Follow My Blog to receive blog updates and all the latest news and specials!