Designer/Patterned/Specialty Papers (DSP), feminine, Flowers, Mother's Day, Punch Art, Stampin' Up!

Bench Fold card with Varied Vases Bundle

Dear Crafters,

Today I share a bench fold card that uses the Varied Vases bundle from the brand new Stampin’ Up! Annual catalogue. This is a wonderful bundle which has 34 photopolymer stamps in the set and a coordinating punch to cut out the images. The best part is that it’s only $68.25 for the bundle!

Bench Fold card using Stampin Up Vivid Vases by Kate Morgan, Australia 2018.JPG

The Wood Textures DSP is also carrying over into this new catalogue, which is wonderful news. This rarely happens but it has been so popular and it coordinates with so many of our wonderful products.

This was the card I made for my mum for Mother’s Day this year ♥

Bench Fold card using Stampin Up Vivid Vases by Kate Morgan, Australia

I was inspired by Tanya de Roy. You can watch Tanya’s YouTube tutorial here.

A list of products can be found at the end of this post!


2018-2019 Annual Catalogue ends 3 June 2019
Be sure to download a PDF copy from my SU Catalogue Library page today.


Don’t forget to Follow My Blog to receive blog updates and join my Newsletter Subscription for all the latest news and specials!

 Happy Stamping,

Blog Signature

Blog Button - Catalogue  Blog Button - Shop   Blog Button - Classes  Blog Button - Join my Team  Blog Button - Watermark

Product List

Birthday, Blog Hop/Instagram Hop, feminine, Flowers, Stampin' Up!

Colour Creations Blog Hop featuring Bermuda Bay with Accented Blooms

Hello Crafters,

Some of the Art With Heart team have decided to do a weekly Blog Hop that highlights a different colour in our range each week. Today we are featuring one of my favourite colours, Bermuda Bay!!!

Today I’ve used the Accented Blooms stamp set with the coordinating Tailored Tag punch. I stamped the image with Versamark ink, added white embossing powder and heat set it. Then I coloured the images with Stampin’ Write Markers; Daffodil Delight, Gorgeous Grape, Melon Mambo & Bermuda Bay. Then I added some Wink of Stella to the Bermuda Bay flowers to add some shine and highlight the colour.

Accented Blooms Birthday card Stampin Up by Kate Morgan, Australia 2018.jpg

Using the Trio punch, I took out a notch on the spine of the card to thread the new gorgeous grape mini striped ribbon through and tie it in a bow!

The sentiment is from the Best Bunny stamp set. I used the Stamparatus to create this. I had the sentiment on one plate and the solid image on another. I stamped the sentiment first with Versamark and then add the white embossing powder and heat set it. Then I placed it back in the Stamparatus and inked the solid image with Bermuda Bay ink and stamped it a couple of times to get a deep, rich colour. Then I used a tissue to wipe off the excess ink from the embossed sentiment. This was then punched out and added with dimensionals.

Accented Blooms Birthday card, Stampin Up by Kate Morgan, Australia 2018

Head on over to Catherine’s blog where you’ll find the links to all of the participants for this week.

A full list of products can be found at the end of this post!


2018-2019 Annual Catalogue ends 3 June 2019
Be sure to download a PDF copy from my SU Catalogue Library page today.


Don’t forget to Follow My Blog to receive blog updates and join my Newsletter Subscription for all the latest news and specials!

 Happy Stamping,

Blog Signature

Blog Button - Catalogue  Blog Button - Shop   Blog Button - Classes  Blog Button - Join my Team  Blog Button - Watermark

Product List

feminine, Flowers, Punch Art, Stampin' Up!

Varied Vases Bundle is a favourite!

Dear Crafters,

Today I share another card using the Varied Vases bundle but this time with the gorgeous Basket Weave Dynamic Textured Embossing Folder and the new Pearlized Doilies.

Varied Vases Stampin Up Basket Weave TIEF by Kate Morgan Australia 2018.JPG

On the vases after I had stamped them and cut them out, I added some fine tip glue to them for that added shine to look wet like water! I added them to the card with dimensionals. The tulips are also popped up with mini dimensionals. With the stamp set being photopolymer, it is very easy to line up the solid image to colour the flowers!

Varied Vases Stampin Up Basket Weave TIEF by Kate Morgan, Australia 2018

I’m pleased the lace trim has also been included again in this catalogue.

A list of products can be found at the end of this post!


2018-2019 Annual Catalogue ends 3 June 2019
Be sure to download a PDF copy from my SU Catalogue Library page today.


Don’t forget to Follow My Blog to receive blog updates and join my Newsletter Subscription for all the latest news and specials!

 Happy Stamping,

Blog Signature

Blog Button - Catalogue  Blog Button - Shop   Blog Button - Classes  Blog Button - Join my Team  Blog Button - Watermark

Product List

Blog Hop/Instagram Hop, Butterflies, Designer/Patterned/Specialty Papers (DSP), Flowers, Handmade Cards, Stampin' Up!

Blog Hop: In Colors

Blog Hop In Colour.jpg

Dear Crafters,

Tonight the Art with Heart team are sharing creative projects featuring “in color” theme. Check out the new 2018 – 2020 in colors and lets not forget the current 2017 – 2019 in colors. If you would like a copy of the 2018-2019 annual catalogue, contact any of the girls on the blog hop and we will get in touch with you.

If you’re already hopping, then you just came to me from Rebecca Jacovou. If you’re just joining, great! Use the “next” button at the end of my post to hop all the way around. Blog Hops are full circles, so you can start hopping here and then at the end of each post there is a link to the next one. There is also a list of participants at the end in case of any broken links.

Now let’s get started!

I am so excited about the new upcoming in colors, they are just so bright and cheery and I love them all. They are just like a rainbow of colour and that makes me happy, so my first two cards use the 2018-2020 in colors!

This first card I have just cut panels of card and glued them to a piece of Very Vanilla card then glued it to the front of the Lovely Lipstick (my favourite in colour!) card base. A piece of Dotted Ribbon was placed across the centre. The sentiment is stamped onto a die cut from the Stitched Shapes Framelits and added with dimensionals.

Sentiment of My Heart In Color Blog Hop 2018 Stampin Up Annual catalogue by Kate Morgan Australia

This stamped sentiment is the Stampin’ Up! Statement of the Heart and it says everything to me and everyone else on this blog hop, what crafting means to us. Isn’t it beautiful??!

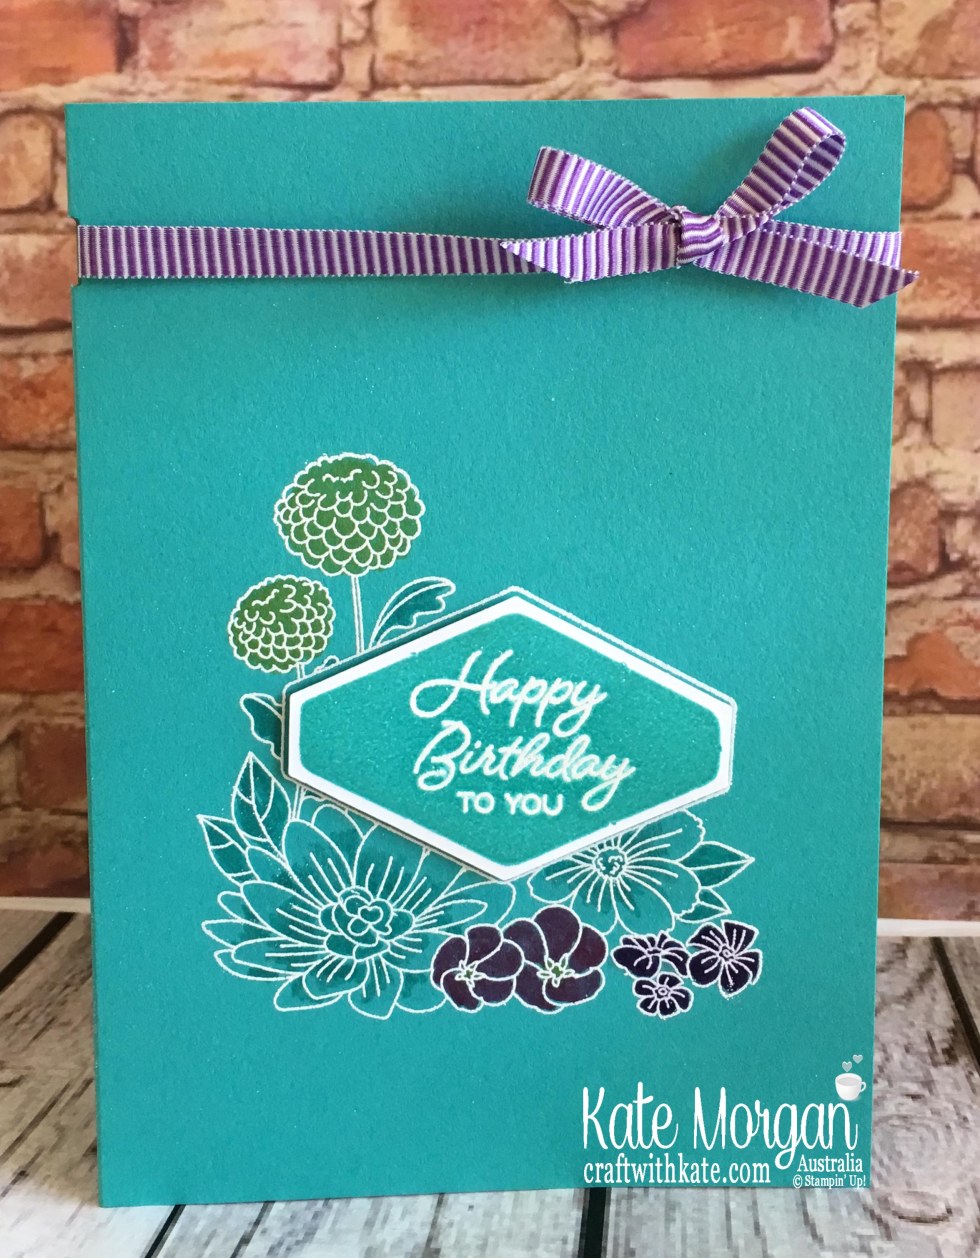
This next one is also using these same in colors; Blueberry Bushel, Call Me Clover, Grapefruit Grove, Lovely Lipstick & Pineapple Punch. The new Handwritten background stamp was placed in the Stamparatus to get this 3-toned effect. The Stampartus made it so much easier to ink up the sections starting with the lightest to the darkest, lining up the image perfectly. And if you haven’t got the crisp image and miss a little, you can ink it up again and re-stamp!

2018 In Color Blog Hop Handwritten Love What You Do Thank You card Stampin Up Annual catalogue by Kate Morgan Australia

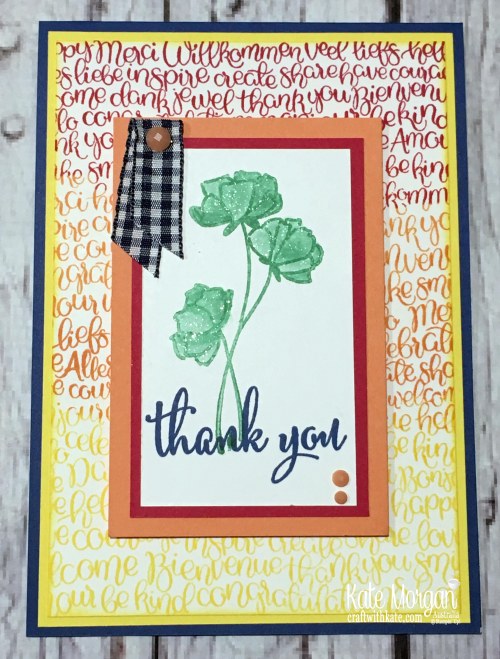
The sentiment and flower image are from the Love What You Do stamp set. Can you see the Wink of Stella on those petals? So pretty! I added some gingham ribbon and Faceted Dots.

2018 In Color Blog Hop Handwritten Love What You Do Thank You card Stampin Up Annual catalogue by Kate Morgan Australia.

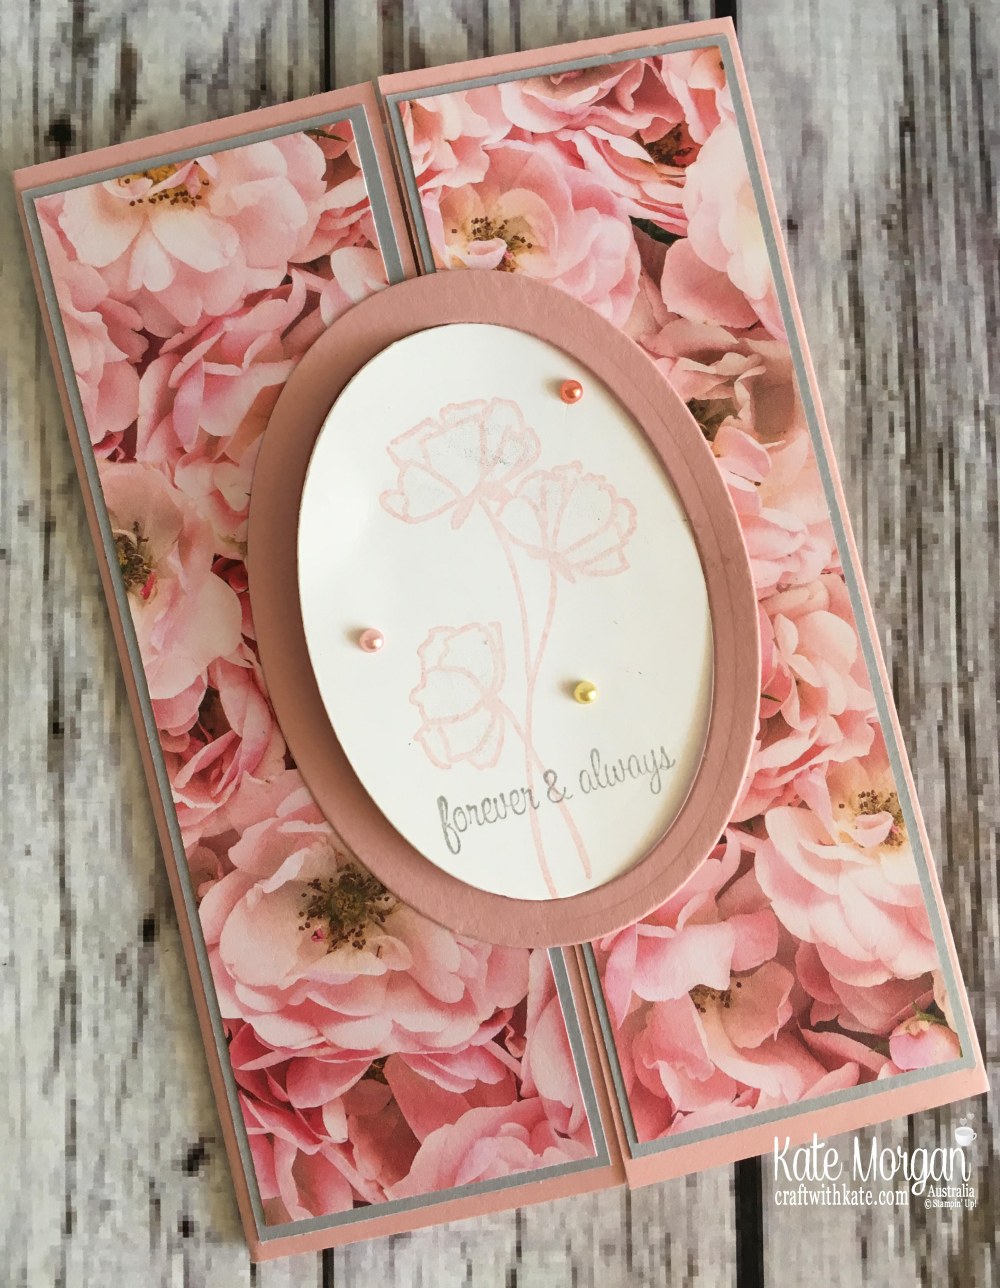
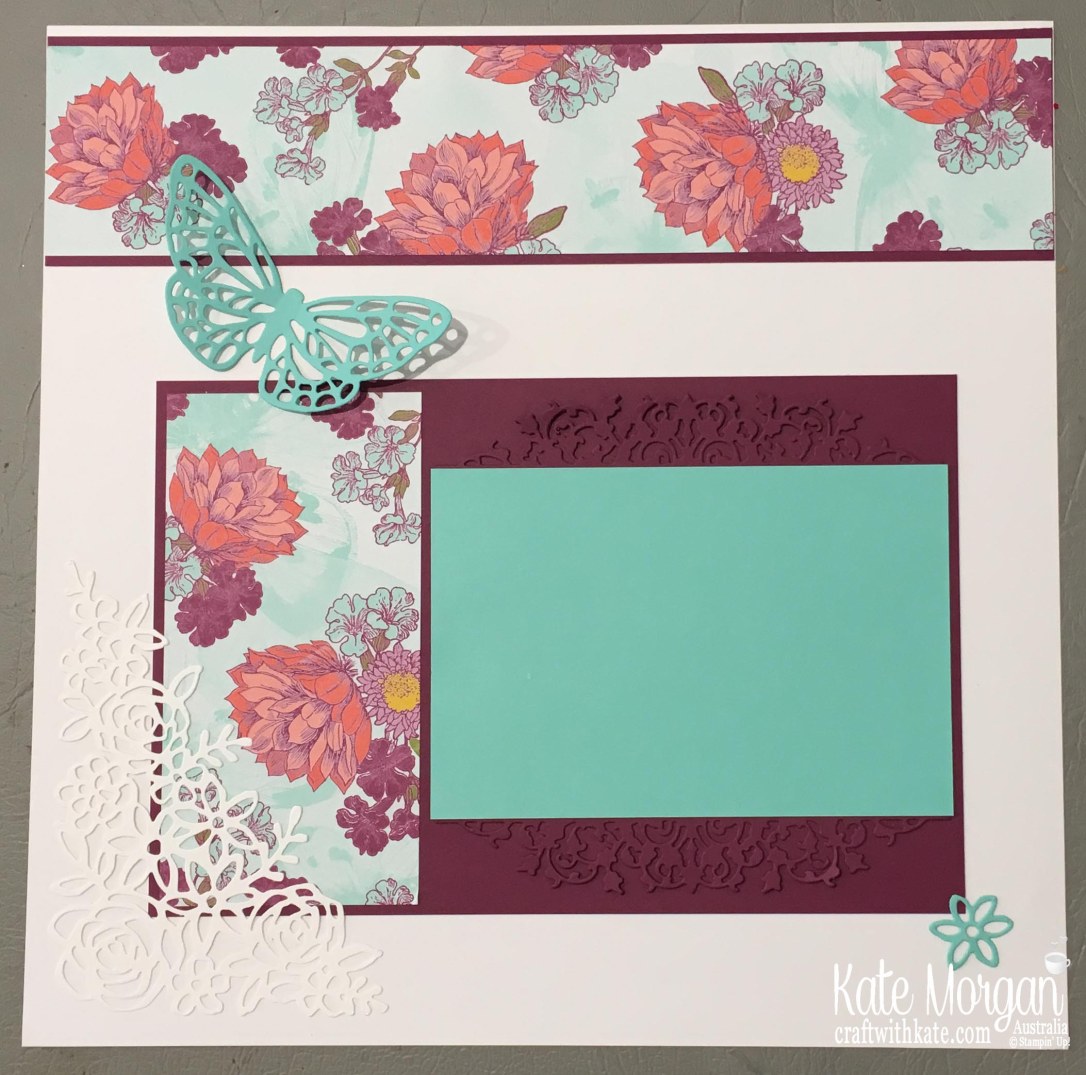
This next card uses Berry Burst & Powder Pink, 2017-2019 in colors, paired with Whisper White. Again I used the Stamparatus for the sentiment, but stamping it in Powder Pink, then using the Berry Burst Stampin’ Write marker to apply ink to the bottom of the sentiment end re-stamping for that dual tone.

Abstract Impressions Stampin Up 2018 Butterfly with handmade bead by Kate Morgan Australia

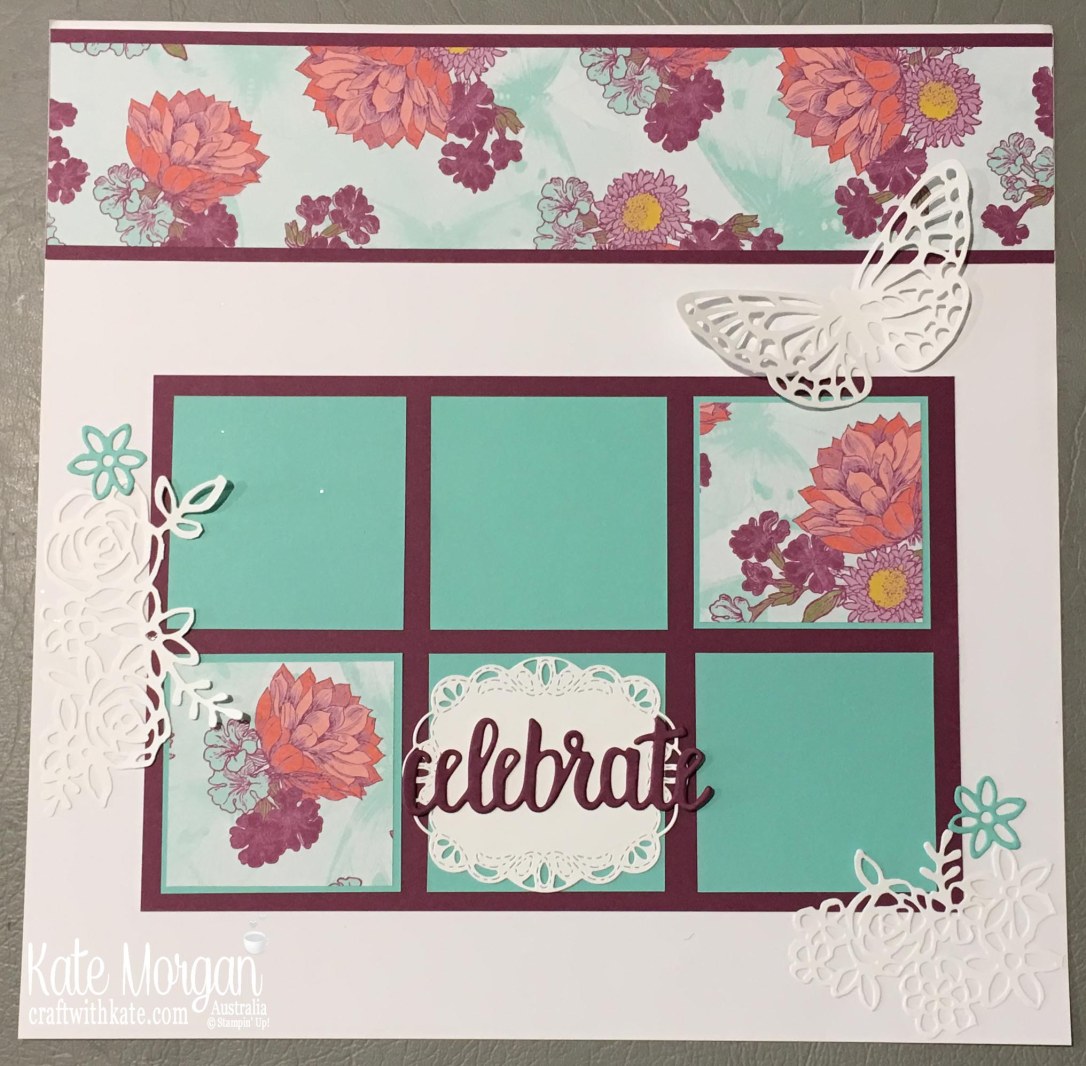
I have used the new Abstract Impressions bundle which will be available on 1st June. I was worried when the Butterflies thinlits were retiring, so this bundle was a must have for me!  I really wanted the butterfly to be the feature, so I die cut the image in Berry Burst card and the floral image in Whisper White, the same as the card base.

Abstract Impressions Stampin Up 2018 Butterfly with handmade bead by Kate Morgan, Australia

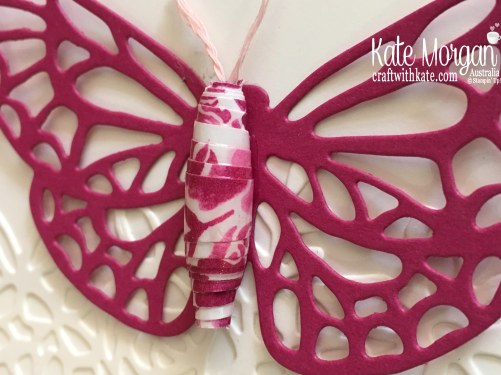
Check out the centre of the butterfly. Can you see what I’ve done? It’s like a handmade bead! I cut a 4½” strip of DSP, tapered off at one end. Add some glue and roll it up around a skewer. Leaving the bead on the skewer, I then added some Fine Tip glue over the entire thing to make it shiny (a bit hard to tell in the photo) and let it dry overnight across the top of a bowl before adding it to my butterfly. I glued a little twine in the top for its antennae.

Thanks for visiting today.


Don’t forget to email me at craftwithkate@live.com.au to request your copy of a Catalogue or to ask about joining the Art With Heart team.

Now it’s time to follow the blog hop to our next participant, the talented Alisha Watson.

AWHT Blog Hop Next blog button

If you find a broken link or have come to this blog hop from a different entry point, you can view the participants below.

  1. Ros Davidson
  2. Caroline Manwaring
  3. Sharon Davern
  4. Claire Daly
  5. Tina Gillespie
  6. Rebecca Jacovou
  7. Kate Morgan <you are here>
  8. Alisha Watson
  9. Rachel Palmieri
  10. Catherine Proctor
  11. Monika O’Neill

Happy Hopping!

Blog Signature

Designer/Patterned/Specialty Papers (DSP), Farewell, feminine, Flowers, Handmade Cards, Stampin' Up!

Farewell cards: same DSP but look so different!

Dear Crafters,

Today I share lots of Farewell cards using a similar style, same Designer Paper but in different colours. Check them out below and see which one you like best!

Delightful Daisy DSP Stampin Up Farewell card by Kate Morgan Australia.

Delightful Daisy DSP Stampin Up Farewell card by Kate Morgan Australia

Delightful Daisy DSP Stampin Up Farewell card by Kate Morgan, Australia.

Delightful Daisy DSP Stampin Up Farewell card by Kate Morgan, Australia

A list of products can be found at the end of this post!


2018 Occasions catalogue ends 31st May 2018
2017-2018 Annual Catalogue ends 31st May 2018
Be sure to download a PDF copy from my SU Catalogue Library page today.


Don’t forget to Follow My Blog to receive blog updates and join my Newsletter Subscription for all the latest news and specials!

Happy Stamping,

Blog Signature

Blog Button - Catalogue  Blog Button - Shop   Blog Button - Classes  Blog Button - Join my Team  Blog Button - Watermark

Product List

Birthday, Designer/Patterned/Specialty Papers (DSP), feminine, Flowers, Stampin' Up!

Three-fold card with Share What You Love SDSP and instructions

Dear Crafters,

Today I share another style card that uses the Share What You Love Specialty Designer Series Paper. This paper is available now as part of the early release to customers. Click here to see more!

This is a three fold card, and you can make two cards from 1 sheet of 12″ x 12″ DSP.

Share What You Love Suite 2018 Stampin Up by Kate Morgan, Australia.

Cut your sheet to 12″ x 6″, then score at 1¾”, 4¾”, 7¾”. You also need some white card 2¾” x 3¾” and black card 3” x 4” for the front. Ensure you stamp, then mount the layers and only add glue to the back of the card on one side before adding to the centre of your card. You don’t want to glue all the functioning layers together!

As you open the first fold, you then add the next sentiment and so on.

Share What You Love Suite 2018 Stampin Up by Kate Morgan, Australia 2

I used the 2″ circle punch and the starburst punch which is the perfect size to layer. The sentiments are from the coordinating Love What You Do stamp set.

Share What You Love Suite 2018 Stampin Up by Kate Morgan, Australia 3

The sentiment on the back of the card is from the Picture Perfect Birthday set which is going to carryover into the new annual catalogue!

I just adore the pearly shine on this DSP, so I actually added a layer on the back for where I will write my birthday message.

Share What You Love Suite 2018 Stampin Up by Kate Morgan, Australia back

A full list of products can be found at the end of this post!


2018 Occasions catalogue ends 31st May 2018
2017-2018 Annual Catalogue ends 31st May 2018
Be sure to download a PDF copy from my SU Catalogue Library page today.


Don’t forget to Follow My Blog to receive blog updates and join my Newsletter Subscription for all the latest news and specials!

Happy Stamping,

Blog Signature

Blog Button - Catalogue  Blog Button - Shop   Blog Button - Classes  Blog Button - Join my Team  Blog Button - Watermark

Product List

Designer/Patterned/Specialty Papers (DSP), feminine, Flowers, Handmade Cards, Handy Tips, Stampin' Up!, Techniques & Tutorials

Love What You Do & Share What You Love Designer Paper cards

Dear Crafters,

Today I share some cards that we made at my craft class on Saturday, where we made 6 cards each!

From 1 sheet of Speciality Designer Series Paper, you can make 8 of these cards. This double sided paper is stunning on both sides, you want to make the most of it, so by making cards in this style, you get to see both sides and enjoy the shimmer it has on the patterns.

I got my inspiration for these from Creating Success with Rhonda Wade on FB, but I changed up the measurements to suit our Australian card format to fit into our C6 envelopes.

Love What You Do &amp; Share What You Love Specialty DSP Stampin Up by Kate Morgan Australia

Cut the Designer Paper at 5-7/8″ and then cut that piece into 4 equal parts, 3″ wide each so you end up with 4 pieces of 5-7/8″ x 3″. Ensure if there is a design on the paper that is directional, you cut it the correct way and be sure to check the reverse side!

Next, take an A4 sheet of coordinating card stock and place it in your trimmer with the short side to the top and cut it at 5-1/2″. Place that strip to the side for later. Rotate the card 90 degrees and cut at 5-7/8″. Place the 5-1/2″ side to the top of the trimmer or Simply Scored and score at 4-1/8″. Cut a strip of black card measuring 5-7/8″ x 3/4″. Add a strip of Tear & Tape down the inside flap of the main card and add the strip of black making sure you line it up straight to show the right amount of black you would like showing. Place the DSP on the card lining it up with the card base on the right had side. Add a strip of Tear & Tape down the left side and holding it all firmly in place so it doesn’t move, fold over the card flap and press to seal and there you have your card. Now decorate as you wish. I have used the Starburst punch and the 2″ circle punch and stamped on it.

Click here for the link to my written tutorial!

Here is that same card open to see the reverse side of the paper. How could you stick that to a card and not see it?!!! This is the perfect card style to show it off!

Love What You Do &amp; Share What You Love Specialty DSP Stampin Up by Kate Morgan Australia open

Now for Card #2

Love What You Do, Birthday Blooms &amp; Share What You Love Specialty DSP Stampin Up by Kate Morgan Australia

and open…

Love What You Do, Birthday Blooms &amp; Share What You Love Specialty DSP Stampin Up by Kate Morgan Australia open

I’ll come back later in the week to share some more of these gorgeous cards that we made.

A list of products can be found at the end of this post!


2018 Occasions catalogue ends 31st May 2018
2017-2018 Annual Catalogue ends 31st May 2018
Be sure to download a PDF copy from my SU Catalogue Library page today.


Don’t forget to Follow My Blog to receive blog updates and join my Newsletter Subscription for all the latest news and specials!

Happy Stamping,

Blog Signature

Blog Button - Catalogue  Blog Button - Shop   Blog Button - Classes  Blog Button - Join my Team  Blog Button - Watermark

Product List

Flowers, Handy Tips, Mother's Day, Punch Art, Stampin' Up!, Thank you

Varied Vases, blooms with happiness

Dear Crafters,

Today I share another card using new products from the upcoming Annual Catalogue; Varied Vases Bundle plus the Stamparatus!

I have used the new InColors, Blueberry Bushel and Lovely Lipstick with Whisper White and Silver Glimmer.

Varied Vases &amp; Stamparatus 2018 Stampin Up by Kate Morgan, Australia

I love a punch bundle (10% discount) and this one has so many options.

Handy tip when using this bundle: Punch a template from some scrap card to use to be able to line up all the stamp images on your acrylic block so you can stamp them all and then punch them all out at once! Keep your template in the stamp case for your next project.

Varied Vases punch lining up by Kate Morgan Stampin Up Australia.

Using the Stamparatus to get those straight line images and spacing makes it so much easier. Just place your 2 line image stamps on the acrylic plate at the top using the lines on the plate to ensure they are straight. Then place your cardstock down with the magnet, and once you stamp the first images, lift the plate off, move the plate down one notch to stamp the next image… perfect placement every time!

Varied Vases &amp; Stamparatus Stampin Up 2018 by Kate Morgan, Australia

The vase was stamped off once with the Blueberry Bushel ink to get that lighter look!

A list of products can be found at the end of this post, but there are some missing as they are not available to purchase yet!


2018 Occasions catalogue ends 31st May 2018
2017-2018 Annual Catalogue ends 31st May 2018
Be sure to download a PDF copy from my SU Catalogue Library page today.


Don’t forget to Follow My Blog to receive blog updates and join my Newsletter Subscription for all the latest news and specials!

 Happy Stamping,

Blog Signature

Blog Button - Catalogue  Blog Button - Shop   Blog Button - Classes  Blog Button - Join my Team  Blog Button - Watermark

Product List

Birthday, feminine, Flowers, Handmade Cards, Stampin' Up!, Techniques & Tutorials

Versamark Resist Technique with Paint Play

Dear Crafters,

Today I share a card using the Versamark resist technique, also known as ‘Ghosting’. It is really simple but effective. Start with glossy white card and stamp the flowers with Versamark ink. Let it sit for a few minutes, while you score your Night of Navy card and cut a strip of Berry Burst and Powder pink. Glue these together and then stamp the sentiment for the retiring Butterfly Basics stamp set in Night of Navy ink.

Versamark Resist Technique using Stampin Up Butterfly Basics, Paint Play by Kate Morgan, Australia

Now the glossy card has had a bit of time to rest, it will still be sticky, but you can now go and ink up the sponge brayer and apply across the entire gloss card. Once you have the desired coverage, using a piece of paper towel, rub in circular motions to remove the ink from the versamark images. Cut the glossy card down to size and glue to the base card. Add the sentiment strip.

Versamark Resist Technique using Stampin Up Butterfly Basics, Paint Play by Kate Morgan, Australia. 2018

To finish it off, I added some of the Glitter enamel dots, they are so divine and add that little bit of sparkle. I also added a Berry Burst Bitty Bow.

Both of the stamp sets and the embellishments will be retiring and are only available while stocks last. Be sure to add them to your shopping cart now.

A full list of products can be found at the end of this post!


2018 Occasions catalogue ends 31st May 2018
2017-2018 Annual Catalogue ends 31st May 2018
Be sure to download a PDF copy from my SU Catalogue Library page today.


Don’t forget to Follow My Blog to receive blog updates and join my Newsletter Subscription for all the latest news and specials!

Happy Stamping,

Blog Signature

Blog Button - Catalogue  Blog Button - Shop   Blog Button - Classes  Blog Button - Join my Team  Blog Button - Watermark

Product List

Designer/Patterned/Specialty Papers (DSP), Flowers, Handy Tips, Stampin' Up!

Stamparatus Storage for your craft desk

Dear Crafters,

Today I share a project that I have created to store my brand new Stamparatus in while it sits on my craft desk!!!

Yes, I got mine early in the first release, but never fear, it will soon be in the upcoming Annual catalogue to purchase. When you see it in action, believe me, it will be at the top of your shopping list. It is awesome!

Stamparatus storage using Stampin Up Delightful Daisy DSP 2018 by Kate Morgan, Independent Demonstator, Australia.

The Designer paper is from the Delightful Daisy DSP pack and I hadn’t used it as the print is very bold and large, but I do actually like it and think it is a very happy design and makes me smile. So what better way to use it, than cover this box/storage for my Stamparatus. I just cut down the box that it came in, and covered it with the DSP.

Here is the back with the stand I made out of some of the cardboard backings which come with the foil sheets! Waste not, want not!!!

I cut it down to 6″ x 6″ and then scored one side at 2½” & 3½”. Using a pencil, I marked ½” from each scoreline.

Then I rotated 90 degrees and marked 1″ at the opposite end with a pencil on the top and bottom. From this mark to the v” mark cut both sides so you end up with a triangle type shape. Place the largest of the Lots of Labels framelits dies 2½” from the top, lining it up inside the centre of the scorelines. Place it in the Big Shot, but don’t run it all the way through, just about 1½” or so. Where you stop cutting with the framelit, use scissors to cut to the scorelines on each side, then you can fold on the scorelines and glue together.

Not sure if this makes sense, but you can probably see what I mean from the picture below.

Stamparatus storage using Stampin Up Delightful Daisy DSP 2018 by Kate Morgan, Independent Demonstator Australia.

A full list of products can be found at the end of this post!


Occasions catalogue period: 3rd January – 31st May 2018
Be sure to download a copy of the Occasions catalogue from my SU Catalogue Library page today.


Don’t forget to Follow My Blog to receive blog updates and join my Newsletter Subscription for all the latest news and specials!

Happy Stamping,

Blog Signature

Blog Button - Catalogue  Blog Button - Shop   Blog Button - Classes  Blog Button - Join my Team  Blog Button - Watermark

Product List