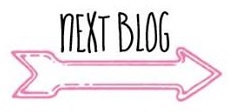
Some of the Art With Heart team have decided to do a weekly Blog Hop that highlights a different colour in our range each week. Today we are featuring one of my favourite colours, Bermuda Bay!!!
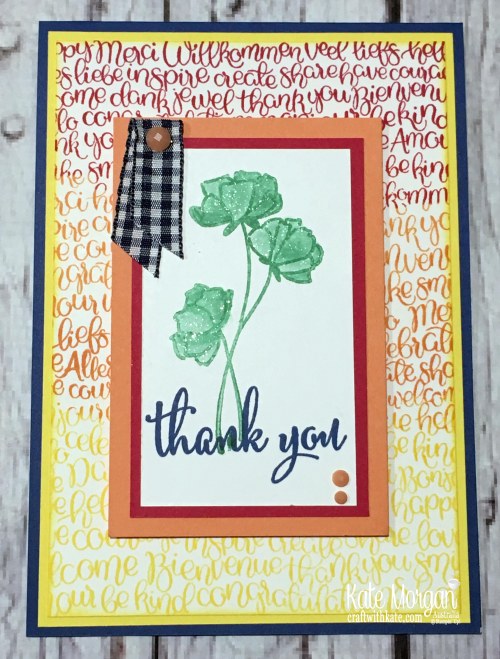
Today I’ve used the Accented Bloomsstamp set with the coordinating Tailored Tagpunch. I stamped the image with Versamark ink, added white embossing powder and heat set it. Then I coloured the images with Stampin’ Write Markers; Daffodil Delight, Gorgeous Grape, Melon Mambo & Bermuda Bay. Then I added some Wink of Stella to the Bermuda Bay flowers to add some shine and highlight the colour.
Using the Trio punch, I took out a notch on the spine of the card to thread the new gorgeous grape mini striped ribbonthrough and tie it in a bow!
The sentiment is from the Best Bunnystamp set. I used the Stamparatus to create this. I had the sentiment on one plate and the solid image on another. I stamped the sentiment first with Versamark and then add the white embossing powder and heat set it. Then I placed it back in the Stamparatus and inked the solid image with Bermuda Bay ink and stamped it a couple of times to get a deep, rich colour. Then I used a tissue to wipe off the excess ink from the embossed sentiment. This was then punched out and added with dimensionals.
Head on over to Catherine’s blog where you’ll find the links to all of the participants for this week.
A full list of products can be found at the end of this post!
Some of the Art With Heart team have decided to do a weekly Blog Hop that highlights a different colour in our range each week. Today is the second hop, as I missed the first one last week which featured the new colour, Balmy Blue (love it), however this week is Basic Gray and I am featuring both colours to get me started!!!
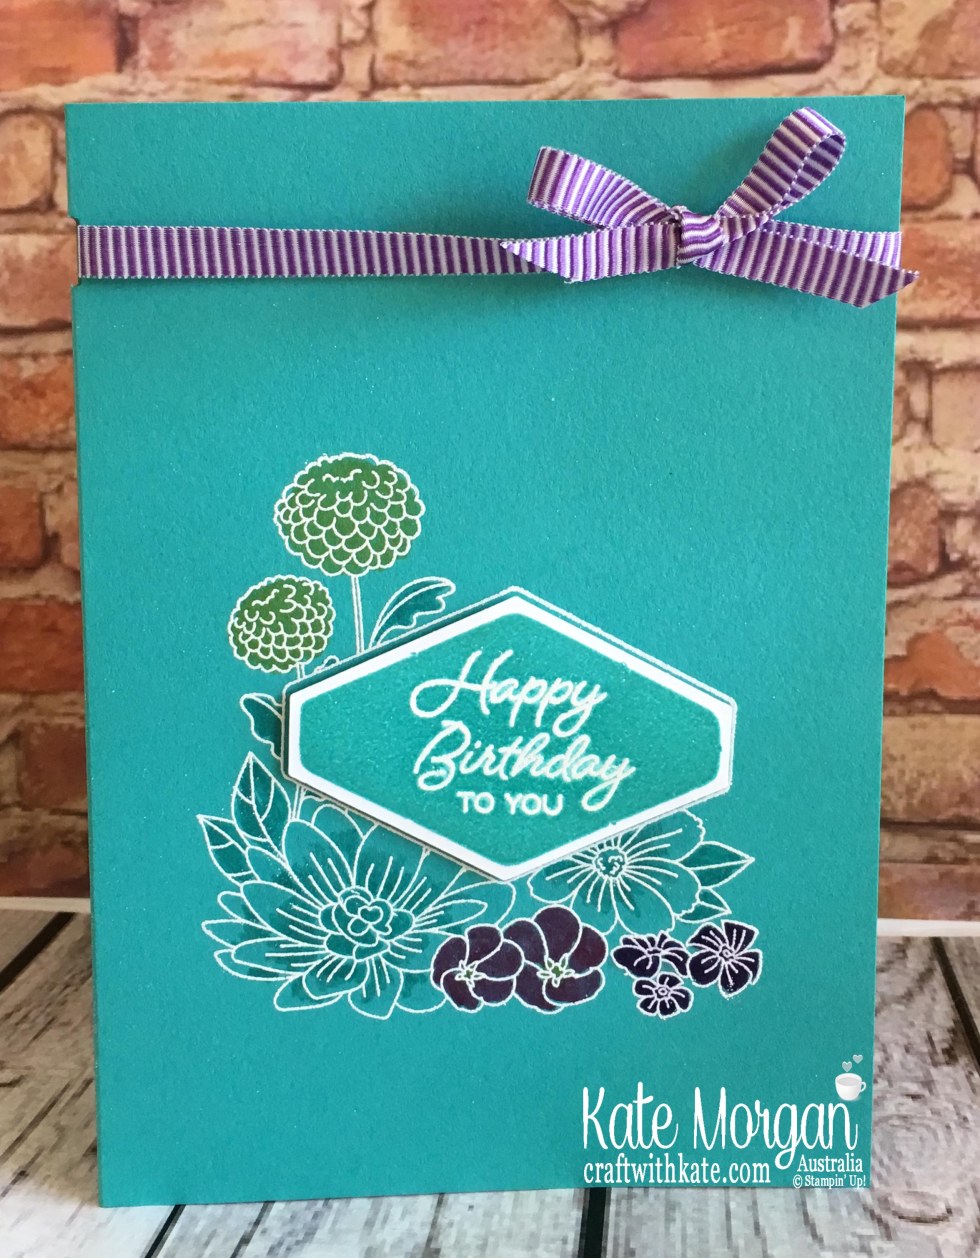
I am featuring the Best Bunny Bundle; stamp set and coordinating punch. It is fantastic value at just $53 for both items!
I stamped the bunny on basic gray card with basic gray ink and punched out the pieces. I added some Wink of Stella to the centre of his ears, nose, tail and belly. His head has a mini dimensional behind for some added height. Behind him is the Tailored TagPunch in Whisper White with Balmy Blue ink sponged around the edges and added with dimensionals.
Check out that gorgeous polka dot tulle ribbon wrapped around the card and tied in a bow. It is so soft and easy to tie in a bow.
Did you notice the embossed background? This is the brand new TuftedDynamic Textured Embossing Folder. It is simply stunning and reminds me of a baby blanket, perfect for this card.
On the inside, I have simply stamped some stars in both coordinating colour inks and sponged the edges.
Head on over to Catherine’s blog where you’ll find the links to all of the participants for this week.
A list of products can be found at the end of this post!
Tonight the Art with Heart team are sharing creative projects featuring “in color” theme. Check out the new 2018 – 2020 in colors and lets not forget the current 2017 – 2019 in colors. If you would like a copy of the 2018-2019 annual catalogue, contact any of the girls on the blog hop and we will get in touch with you.
If you’re already hopping, then you just came to me from Rebecca Jacovou. If you’re just joining, great! Use the “next” button at the end of my post to hop all the way around. Blog Hops are full circles, so you can start hopping here and then at the end of each post there is a link to the next one. There is also a list of participants at the end in case of any broken links.
Now let’s get started!
I am so excited about the new upcoming in colors, they are just so bright and cheery and I love them all. They are just like a rainbow of colour and that makes me happy, so my first two cards use the 2018-2020 in colors!
This first card I have just cut panels of card and glued them to a piece of Very Vanilla card then glued it to the front of the Lovely Lipstick (my favourite in colour!) card base. A piece of Dotted Ribbon was placed across the centre. The sentiment is stamped onto a die cut from the Stitched Shapes Framelits and added with dimensionals.
This stamped sentiment is the Stampin’ Up! Statement of the Heartand it says everything to me and everyone else on this blog hop, what crafting means to us. Isn’t it beautiful??!
This next one is also using these same in colors; Blueberry Bushel, Call Me Clover, Grapefruit Grove, Lovely Lipstick & Pineapple Punch. The new Handwrittenbackground stamp was placed in the Stamparatus to get this 3-toned effect. The Stampartus made it so much easier to ink up the sections starting with the lightest to the darkest, lining up the image perfectly. And if you haven’t got the crisp image and miss a little, you can ink it up again and re-stamp!
The sentiment and flower image are from the Love What You Do stamp set. Can you see the Wink of Stella on those petals? So pretty! I added some gingham ribbon and Faceted Dots.
This next card uses Berry Burst & Powder Pink, 2017-2019 in colors, paired with Whisper White. Again I used the Stamparatus for the sentiment, but stamping it in Powder Pink, then using the Berry Burst Stampin’ Write marker to apply ink to the bottom of the sentiment end re-stamping for that dual tone.
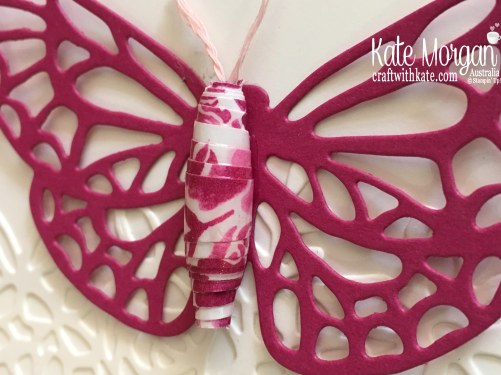
I have used the new Abstract Impressions bundle which will be available on 1st June. I was worried when the Butterflies thinlits were retiring, so this bundle was a must have for me! I really wanted the butterfly to be the feature, so I die cut the image in Berry Burst card and the floral image in Whisper White, the same as the card base.
Check out the centre of the butterfly. Can you see what I’ve done? It’s like a handmade bead! I cut a 4½” strip of DSP, tapered off at one end. Add some glue and roll it up around a skewer. Leaving the bead on the skewer, I then added some Fine Tip glue over the entire thing to make it shiny (a bit hard to tell in the photo) and let it dry overnight across the top of a bowl before adding it to my butterfly. I glued a little twine in the top for its antennae.
Thanks for visiting today.
Don’t forget to email me at craftwithkate@live.com.au to request your copy of a Catalogue or to ask about joining the Art With Heart team.
Now it’s time to follow the blog hop to our next participant, the talented Alisha Watson.
If you find a broken link or have come to this blog hop from a different entry point, you can view the participants below.
Tonight the Art with Heart team are sharing creative projects featuring products from the last chance products list. There are lots of products to choose from with retiring stamp sets, inkpads and ink refills guaranteed to be available until 7 May (and all other products while supplies last). Contact anyone on the blog hop to place your last chance order today.
If you’re already hopping, then you just came to me from the lovely, Monika. If you’re just joining, great! Use the “next” button at the end of my post to hop all the way around. Blog Hops are full circles, so you can start hopping here and then at the end of each post there is a link to the next one. There is also a list of participants at the end in case of any broken links.
Now let’s get started!
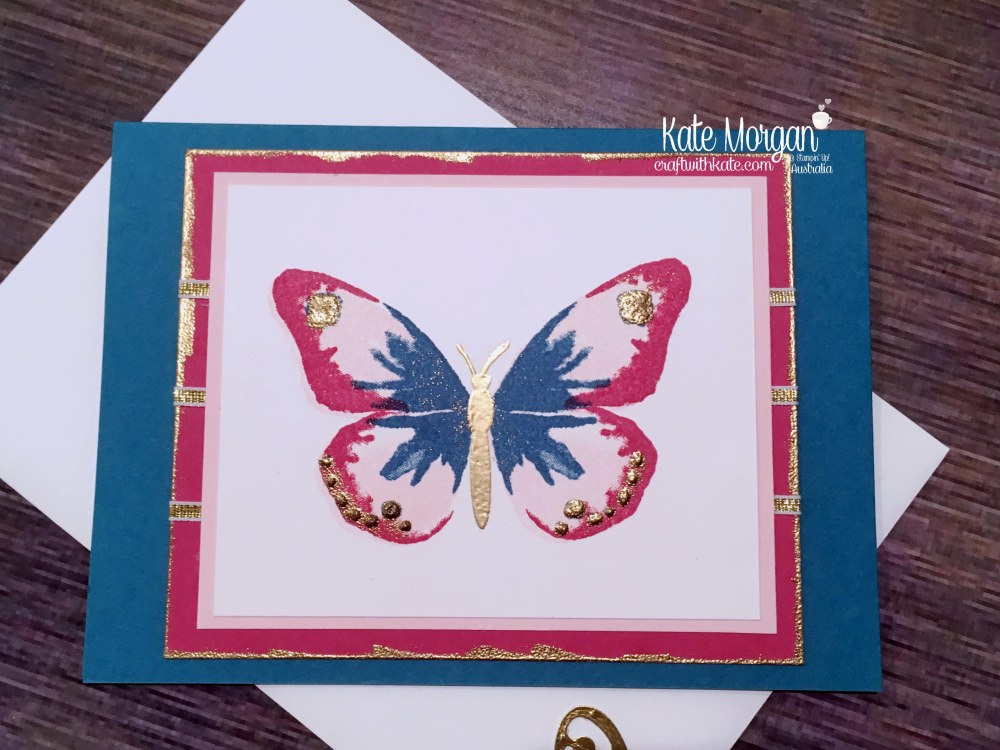
Tonight the Art with Heart team are sharing our favourite retiring products and mine is definitely the Watercolour Wings stamp set and coordinating dies, Bold Butterfly framelits & Butterflies thinlits.
I have also used 3 of my favourite retiring colours; Island Indigo, Pink Pirouette, Rose Red, and I will miss them, however there are some new stunning colours to replace them. Yay!
The 1/8″ metallic gold ribbon is also retiring, so make sure you get some of that added to your shopping cart. I have used it on the Rose Red card above in horizontal stripes. I also added Versamark ink to the centre of the butterfly as well as sponged it around the edges of the Rose Red card, added some Gold embossing powder and heat set it for added shine. I used my Fine Tip glue pen to add to the dots on the butterfly, gold embossing powder and heat set!
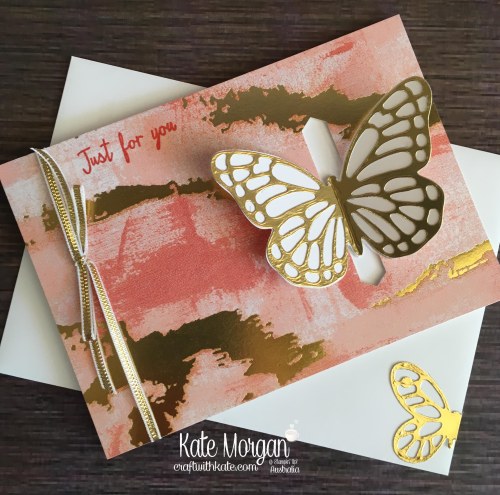
My next card uses the same products but I have teamed it up with the stunning Painted with Love DSPwhich will also retire on 31st May. It has this amazing gold through it. This card is a pop through card, where the butterfly slides through the slit when you open it!
I sure will miss these products but I am looking forward to sharing some new items soon.
Thanks for visiting today.
Don’t forget to email me at craftwithkate@live.com.au to request your copy of a Catalogue or to ask about joining the Art With Heart team.
Now it’s time to follow the blog hop to our next participant, the talented Rachel Palmieri.
If you find a broken link or have come to this blog hop from a different entry point, you can view the participants below.
Tonight the Art with Heart team are sharing creative projects using products from the Sale-a-bration brochure. All Sale-a-bration products are earned for FREE with sales of $90+ (AUD).
Spend $90, choose one free level 1 product
Spend $180, choose one free level 2 product, OR choose two level 1 items
Spend $270, have the option to choose three level 1 items or one level 1 item and one level 2 item
The Sale-a-bration promotion is current now until 31st March . Be sure to request your copy of the brochure today. Sale-a-bration is also a great time to join our fabulous team. Ask me how!
If you’re already hopping, then you just came to me from the lovely, Rebecca Jacovou. If you’re just joining, great! Use the “next” button at the end of my post to hop all the way around. Blog Hops are full circles, so you can start hopping here and then at the end of each post there is a link to the next one. There is also a list of participants at the end in case of any broken links.
Now let’s get started!
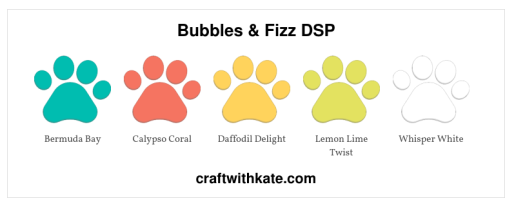
Today I share my favourite Sale-a-bration product, and hands down, it has to be this bright and colourful Designer Series Paper, Bubbles & Fizz. Here are the colours:
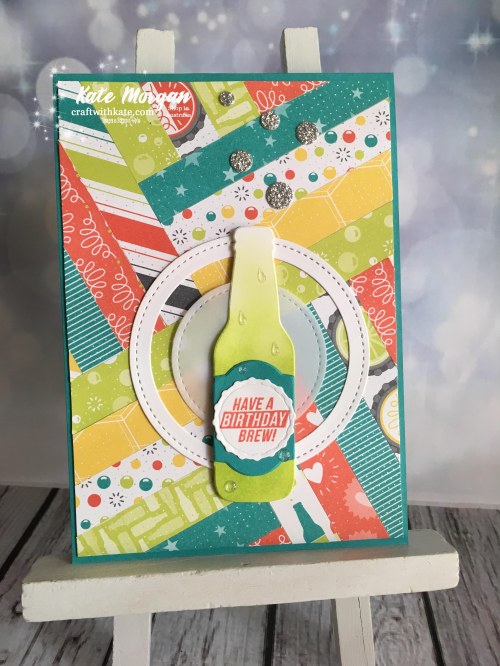
I wanted to show you all the different designs, so what better way to do it, than with the herringbone technique!
I sliced the DSP into 1/2″ x 12″ strips. I took a piece of scrap card cut to 4″ x 5-5/8″ and covered it in Fast Fuse. Then I began placing the strips starting with the Lemon Lime Twist bubbles one across the centre. I kept adding strips in different directions, cutting them off at the edge of the card. This creates an amazing background!
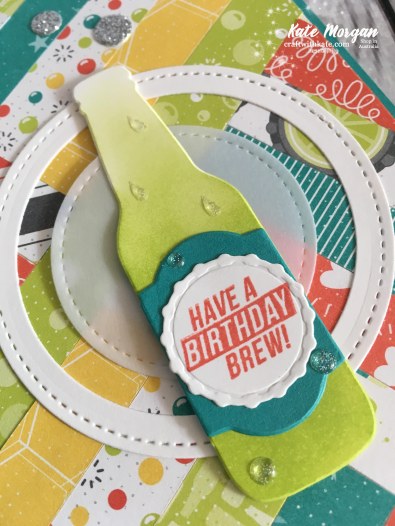
The Stitched Shapes Circle Framelits, break up all the straight lines and helps take the eye to the feature of the bottle like a target.
I die cut the large bottle in white card from the Bottles & Bubbles Framelits dies. I used a sponge dauber to add some Lemon Lime Twist ink to it, applying more at the bottom and lighter at the top. Check out those gorgeous Glitter & Clear Epoxy Shapes on the bottle. I even used some of the extra strips to decorate the inside of the card!
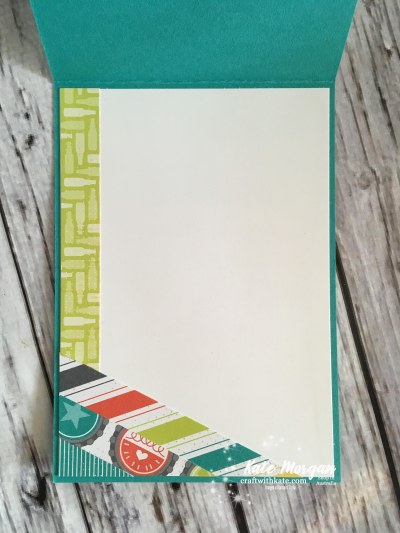
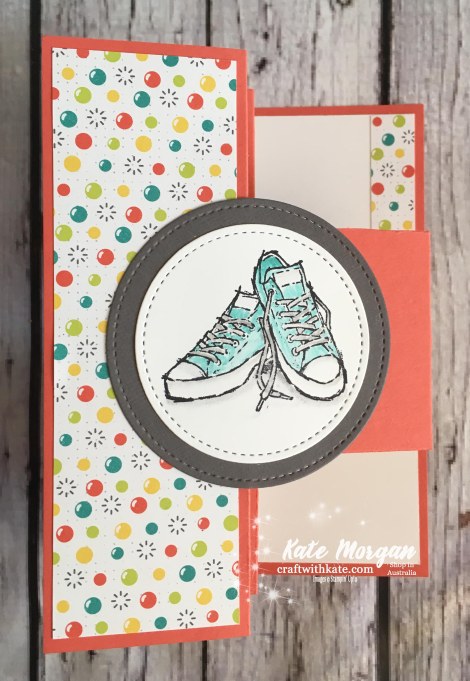
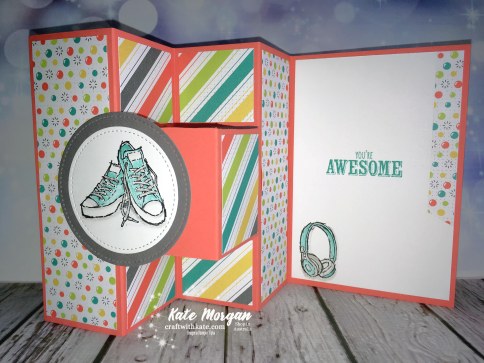
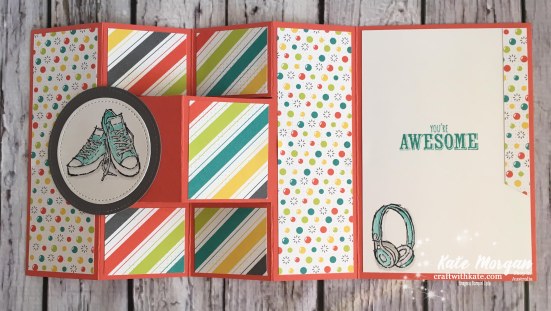
For my next card, I have used the same Designer Series Paper with the Epic Celebrationsstamp set from the Sale-a-bration brochure with the Trifold Shutter card technique.
I coloured the images using a blender pen and ink pads; Bermuda Bay and Smoky Slate. The Stitched Shapes Framelits were used to die cut the shoes image.
As you can see, this DSP can be used in many different ways, not just with the Bubble Over Suite!
and here it is opened flat!
Thanks for visiting today.
Don’t forget to email me at craftwithkate@live.com.au to request your copy of any Catalogue or to ask about joining the Art With Heart team.
Now it’s time to follow the blog hop to our next participant, Alisha Watson.
If you find a broken link or have come to this blog hop from a different entry point, you can view the participants below.
Tonight the Art with Heart team are sharing creative projects using product from the occasions catalogue. The occasions catalogue is current now until 31st May. Be sure to request your copy of the catalogue today (along with the sale-a-bration brochure). Sale-a-bration is also a great time to join our fabulous team. Ask any of the girls on the hop!
If you’re already hopping, then you just came to me from the lovely, Leanne Mitchell. If you’re just joining, great! Use the “next” button at the end of my post to hop all the way around. Blog Hops are full circles, so you can start hopping here and then at the end of each post there is a link to the next one. There is also a list of participants at the end in case of any broken links.
Now let’s get started!
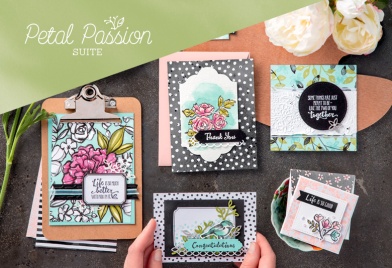
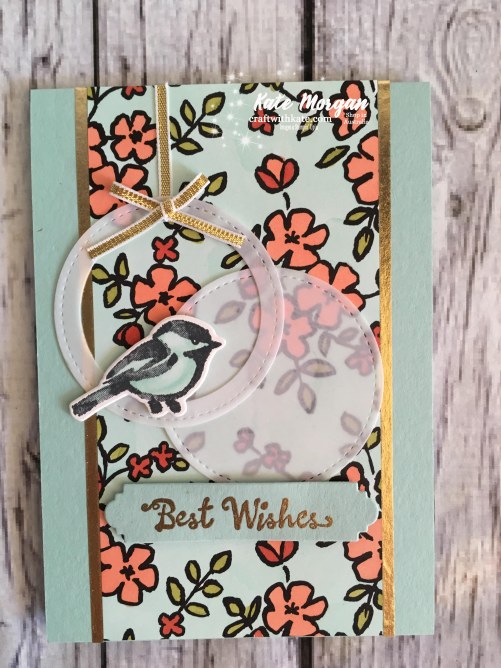
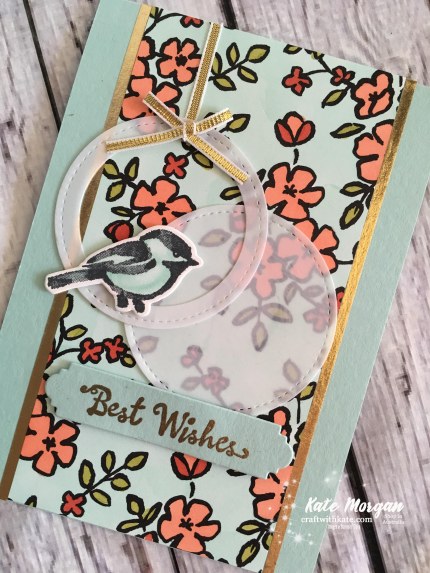
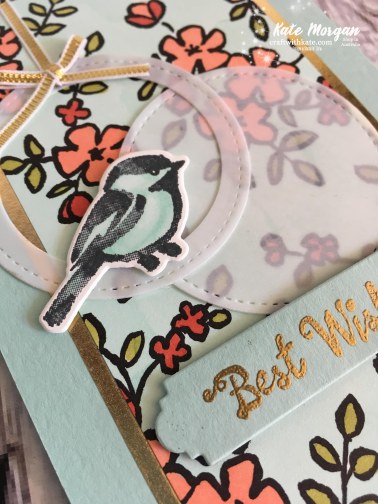
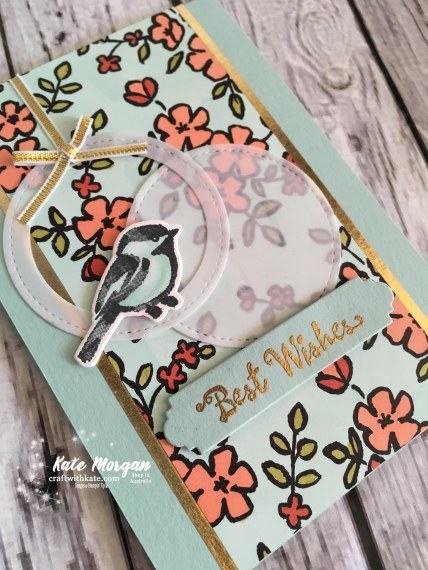
Today I share my favourite suite in the new Occasions catalogue as I have previously mentioned and I just love how many items are in this Petal Passion Suite.
I am using Pool Party as my base card with a layer of the Petal Passion DSP. Yes, these papers are black and white and can look quite harsh at first, but wait until you see them with some colour!
Petal Passion DSP
I coloured the DSP with my Stampin’ Blends; Calypso Coral Combo, Old Olive Combo and Pool Party Light for the background. What a difference it makes!!!
I also coloured the bird with the Pool Party Combo blends pack and the Colour Lifter. I die cut some vellum circles using the Stitched Shapes Framelits dies and glued them down by lightly sponging on some Tombo Multipurpose glue, so you can’t see it. I then added some of the gold metallic ⅛” ribbon and tied another piece in a bow and added it with a glue dot.
The sentiment is heat embossed with gold embossing powder and it looks stunning on that framelit.
The gold strips down each side of the DSP is some Washi tape.
Thanks for visiting today.
Don’t forget to email me at craftwithkate@live.com.au to request your copy of any Catalogue or to ask about joining the Art With Heart team.
Now it’s time to follow the blog hop to our next participant, Monika O’Neill.
If you find a broken link or have come to this blog hop from a different entry point, you can view the participants below:
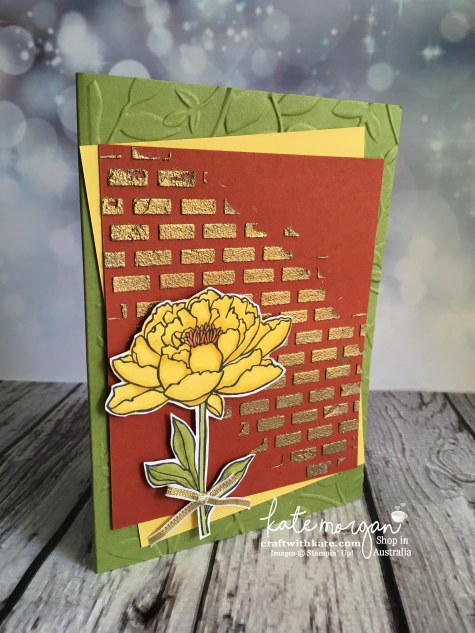
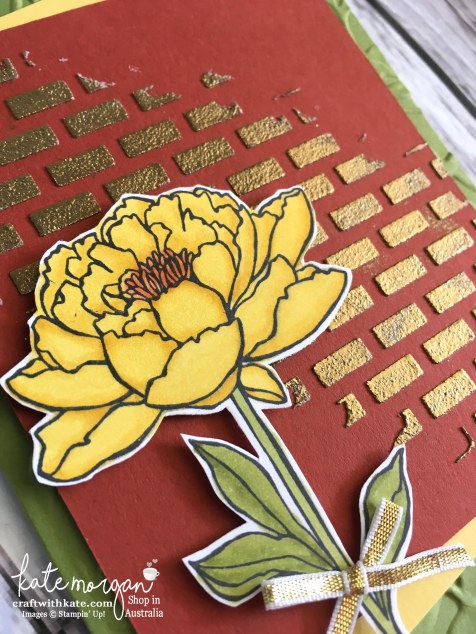
Tonight the Art with Heart team girls are sharing some creative projects by adding texture with embossing. Embossing can add a lovely dimension, and with our wonderful Stampin’ Up! products, we can create many different looks. These include Heat embossing using embossing powder, dry embossing using our textured folders or by adding embossing paste!
If you’re already hopping, then you just came to me from the lovely, Sharon Davern. If you’re just joining, great! Use the “next” button at the end of my post to hop all the way around. Blog Hops are full circles, so you can start hopping here and then at the end of each post there is a link to the next one. There is also a list of participants at the end in case of any broken links.
Now let’s get started!
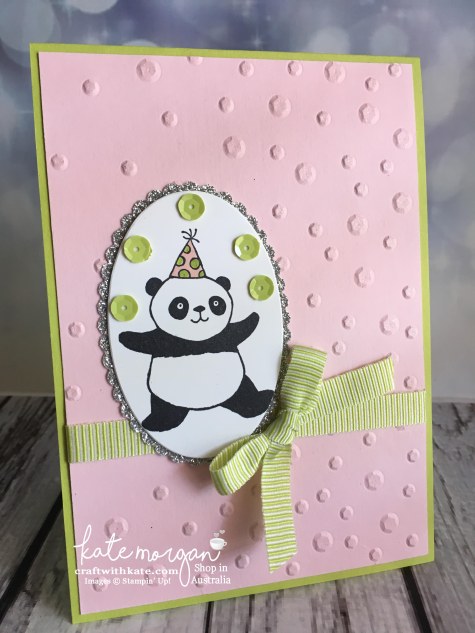
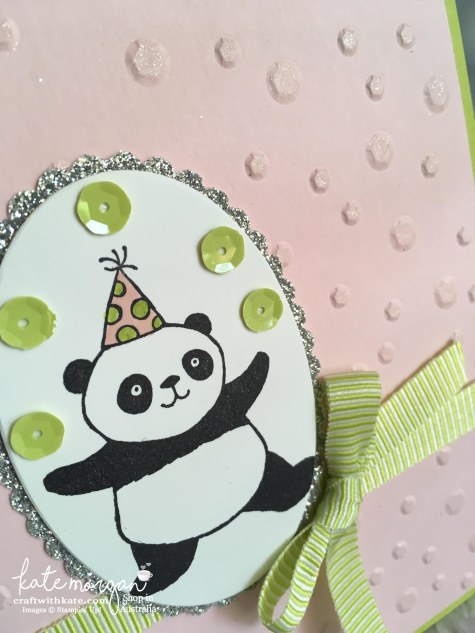
My first project today features some new products you may not have seen yet, from the soon to be released Occasions catalogue and Sale-a-bration brochure. This stamp set, Party Pandas is going to be very popular as one of the FREE stamp sets when you spend $90+ during Sale-a-bration! I have also featured the Scattered Sequins Dynamic Textured Impressions Embossing Folder.
I have added some Wink of Stella to each sequin, but I’m not sure if you can this in the photos? The Lemon Lime Twist ribbon and the Adhesive Backed Tutti Fruitti Sequinsare also new products.
For my next project, I have used the Embossing Paste with Pattern PartyDecorative Masksand then quickly added some gold embossing powderand heat set it. This showcases two embossing techniques in one, and look at that amazing effect!!!! I’ve also dry embossed the background, so all three embossing techniques are used on this one card!
I’ve also used the Stampin Blends Markers to colour the flower!
The embossing paste adds a wonderful texture to your projects. The best thing about it, is that you can colour it with your reinkers to change the colour, you can add embossing powder before it dries and heat set it, but you can also mix in some fine glitter!
Tonight the Art with Heart team girls are sharing some wonderful ideas to inspire you with our Designer Series Papers. This month is the start of the new Stampin’ Up! year and we have a special promotion on our Designer Series Paper, buy 3 get 1 FREE for the month of October and there is no limit!
If you’re already hopping, then you just came to me from the talented, Ros Davidson. If you’re just joining, great! Use the “next” button at the end of my post to hop all the way around. Blog Hops are full circles, so you can start hopping here and then at the end of each post there is a link to the next one. There is also a list of participants at the end in case of any broken links.
Now let’s get started!
Project #1
The Wood Textures DSPis awesome, especially for masculine cards and projects. Here is an example where I have used it as a feature at the bottom of the card. To me, it acts a bit like a fence with the hot air balloons travelling above!
Wood Textures DSP
Project #2
This is the Petal Garden DSP, isn’t it stunning?!!! I just love this one. You can do so much with these papers and both sides of every double sided page is worthy of use. Here I have created two very simple cards showcasing the gorgeous floral patterns with the shimmer ribbon, Pretty Label punch and the sentiment is from the Happy Birthday Gorgeous stamp set.
Petal Garden DSP
Project #3
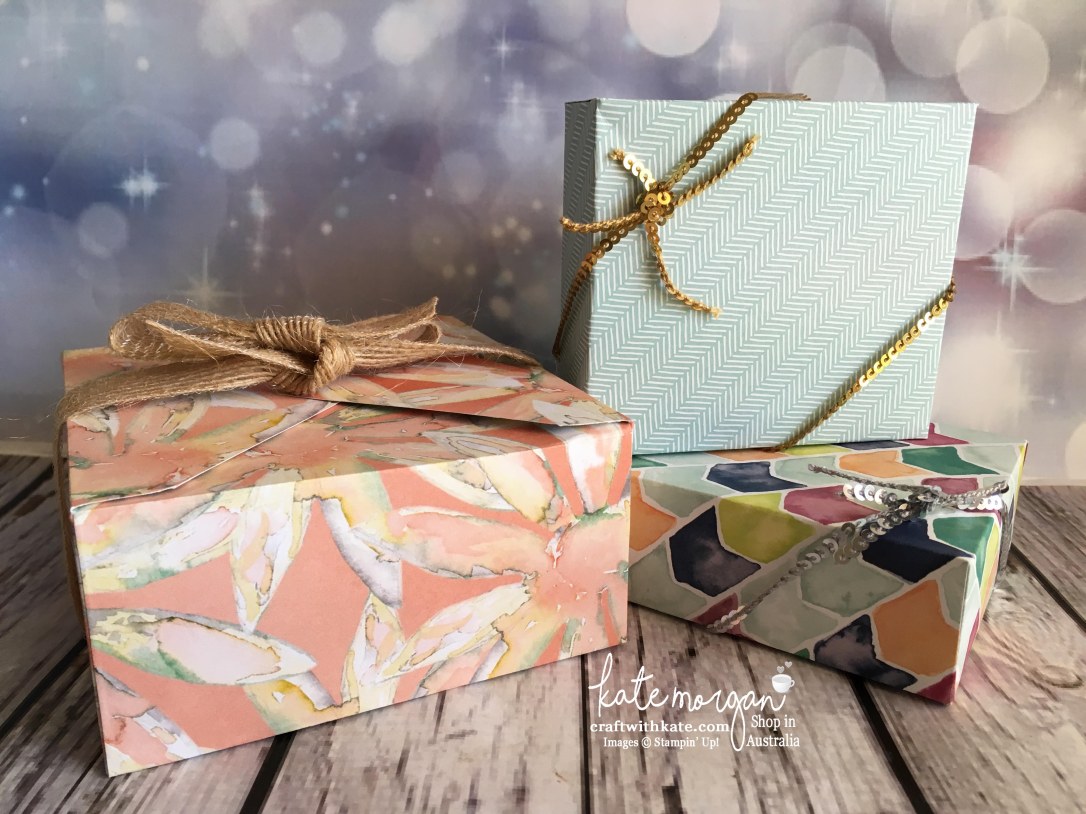
I have created some 3D boxes as gift wrapping for some very special birthdays coming up this week. These boxes are very easy to create using the Envelope Punch Board and some of our stunning DSPs. The one on the left uses a pattern from the Delightful Daisy DSP. The top one is from the Coffee Break DSP and one underneath, is from the Naturally Eclectic DSP. I have decorated them with the new mini sequin trim and the burlap ribbon.
Project #4
Here is a 12″ x 12″ Scrapbooking page using the gorgeous Whole Lot of Lovely DSP. This was a gorgeous day trip during our recent driving holiday up to Sydney. One of our favourite places to visit, is the Licorice and Chocolate Factory in Junee. As you can see, we did stock up just a little at the shop on our way out!!! I also used some gold foil with the Decorative Ribbon Border punch and the Birthday Blossoms & Brushwork Alphabet stamp sets.
Whole Lot of Lovely DSP
Thanks for visiting today.
Don’t forget to email me at craftwithkate@live.com.au to request your copy of any Catalogue or to ask about joining the Art With Heart team.
Now it’s time to follow the blog hop to our next participant, Rachel Palmieri.
If you find a broken link or have come to this blog hop from a different entry point, you can view the participants below:
Welcome to another Art with Heart Team blog hop where we are focusing on fancy folds. You will find loads of creative inspiration tonight, showcasing different folding techniques and projects. Don’t be afraid of trying some Fancy Fold cards; they may look intimidating, but in fact, they are not that difficult to create.
If you’re already hopping, then you just came to me from the talented, Tina Gillespie. If you’re just joining, great! Use the “next” button at the end of my post to hop all the way around. Blog Hops are full circles, so you can start hopping here and then at the end of each post there is a link to the next one. There is also a list of participants at the end in case of any broken links.
Now let’s get started!
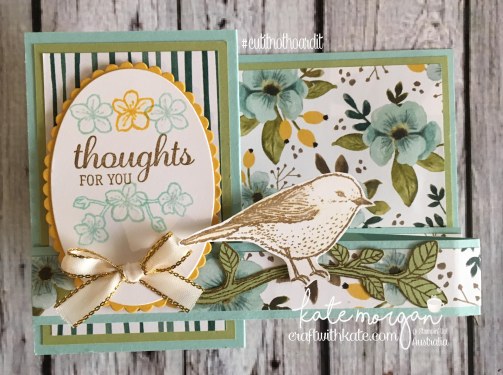
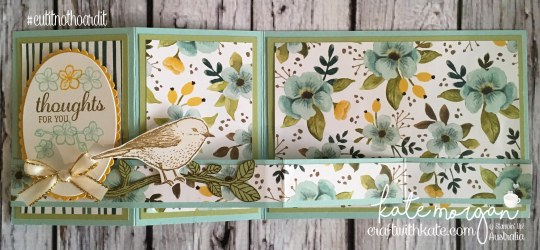
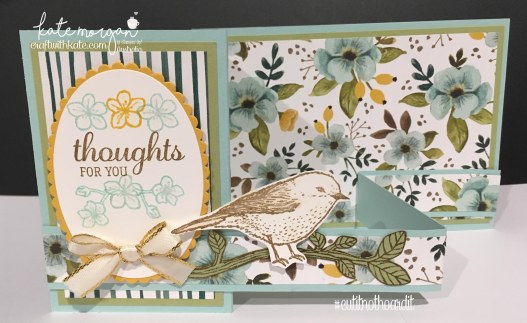
For my projects today I am using the Best Birds stamp set with the Whole Lot of Lovely Designer Series Paper. I love how striking this Designer Paper is too and I knew it had to be a focal point. #cutitnothhoardit
Fancy Fold Card #1
For my first card today, I am sharing a fairly simple fancy fold card, a Double Z Fold.
The card base is Pool Party card = 11⅜” x 5⅛” and score at 2¾” & 5½”. Trim off a 1″ strip from the bottom of the card which will create the double z fold. You just flip that strip over, so the shorter end is on the right as shown. Then you decorate as you like. Here is my colour combination using the coordinating colours in the Designer Paper!
Back panel of the card
Products used
Stamps:Best Birds Inks: Crushed Curry, Pool Party, Soft Suede Card/Paper: Crushed Curry, Pear Pizzazz, Pool Party, Whisper White, Whole Lot of Lovely DSP Accessories: Big Shot, Layering Ovals Framelits dies, Magnetic Platform, Stampin’ Trimmer, Paper Snips, Stampin’ Scrub, Stampin’ Mist, Tombo Multipurpose Glue, Simply Scored, Clear Block Bundle, Dimensionals, Fast Fuse, Tombo Glue, Wink of Stella, Blender Pen, ⅜” Gold Metallic-Edge Ribbon
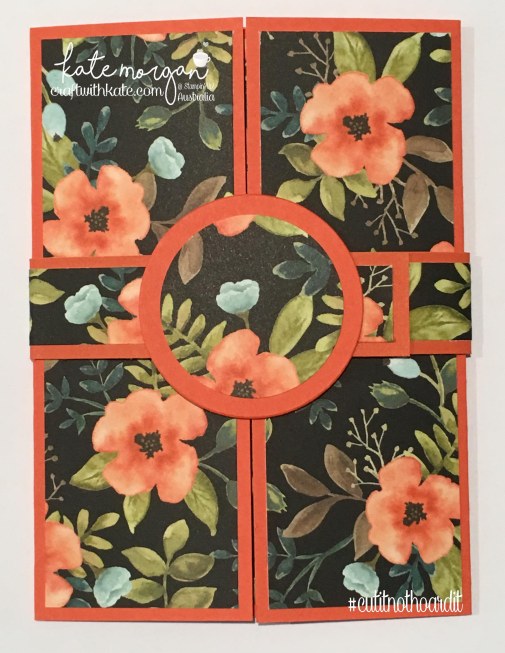
Fancy Fold Card #2
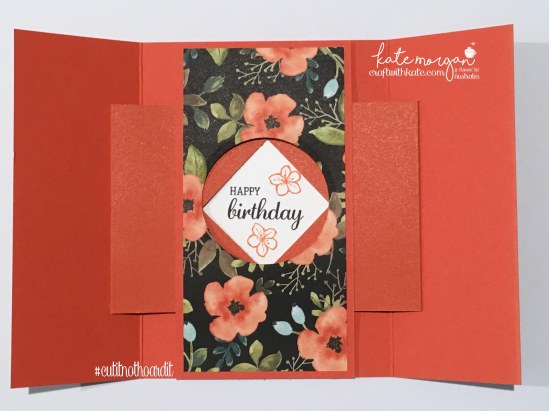
For my second one, I have a more advanced fancy fold card. I am sharing a style that I think is amazing, but I’ve never found it in Australian cardstock sizes, so I created my own A5 Gatefold Shutter card. It took quite a bit of time to figure out all the correct measurements, but I am super happy with the outcome. Now I have mastered it, I can whip them up in no time at all!
When you take off the belly band, the centre diamond opens to reveal a secret message inside!
Kids love this style of card, they think it’s like magic when it opens up. They look difficult to make, but if you follow the instructions, they are actually quite easy.
If you would like a copy of my FREE tutorial how I made these cards, head over to my ‘Free Tutorials’ page to download your PDF copy, but make sure you continue the blog hop first to see what all the other talented ladies have created!
Products used
Stamps:Best Birds Inks:Basic Black & Tangerine Tango Card/Paper: Tangerine Tango, Whisper White, Whole Lot of Lovely DSP Accessories: Big Shot, Layering Circles Framelits dies, Magnetic Platform, Stampin’ Trimmer, Paper Snips, Stampin’ Scrub, Stampin’ Mist, Tombo Multipurpose Glue, Simply Scored, Clear Block Bundle, Dimensionals, Fast Fuse, Tear & Tape, Bone Folder, Ruler, Pencil, 1¾” circle punch, 2¼” circle punch
Thanks for visiting today.
Don’t forget to email me at craftwithkate@live.com.au to request your copy of any Catalogue or to ask about joining the Art With Heart team.
Now it’s time to follow the blog hop to our next participant, Andrea Roberts.
If you find a broken link or have come to this blog hop from a different entry point, you can view the participants below:
Tonight some of the Art with Heart Stampin’ Up! team girls are sharing some fun and fabulous ideas to inspire you from our brand new Holiday Catalogue available on 1st September until 2nd January 2018. Be sure to request your copy of the catalogue today!
Blog Hops are full circles, so you can start hopping here and then at the end of each post is a link to the next one. There is also a list of participants at the end in case of any broken links. You may have come to me from the very talented, Rachel Palmieri.
Now let’s get started!
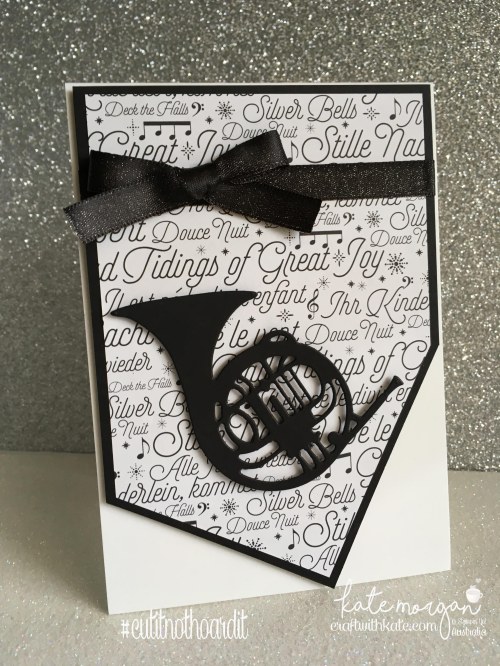
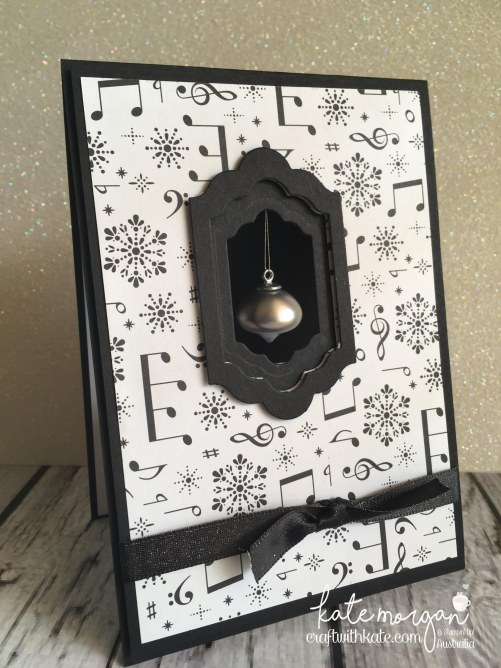
For my projects today I am using the Musical SeasonBundle with the Merry Music Specialty Designer Series Paper.
My projects are fairly simple, using Black, Silver and White! Not my usual Christmas style, but it is classic and I wanted to try something different to what I always use and this Designer Paper just has to be a focal point. #cutitnothhoardit
Check out that Black Shimmer ribbon too, it is just gorgeous and coordinates so well with my cards tonight.
My second card is stepped up with a some extra die cutting, heat embossing and dry embossing using the new Quilt Top Textured Impressions Embossing Folder. The sentiment is silver embossed and heat set on some black card with a piece of Silver Foil behind. The French Horn is also die cut from the Silver Foil.
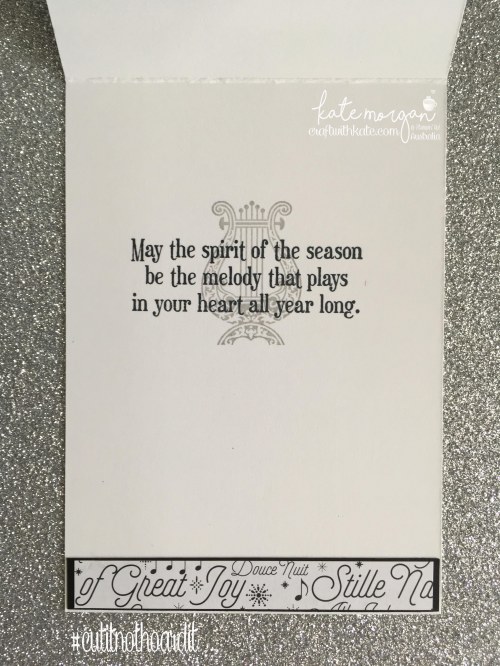
and the inside of both cards I stamped the same sentiment in Black ink with the Lyre behind stamped in Smoky Slate!
This card uses the same Merry Music Specialty Designer Series Paper along with the Carols of Christmas stamp set and coordinating dies, Card Front Builder Thinlits. The border frame is die cut using these thinlits.
The trees and the deer on the front are die cut with the Silver Foil. The black ribbon bow adds a touch of softness to the card. Behind the raised sentiment is a layer of silver glimmer. Not sure if you can see that clearly in the picture.
Here is the inside of my card with the tiny deer and the glimmer Christmas tree set to the bottom right hand side.
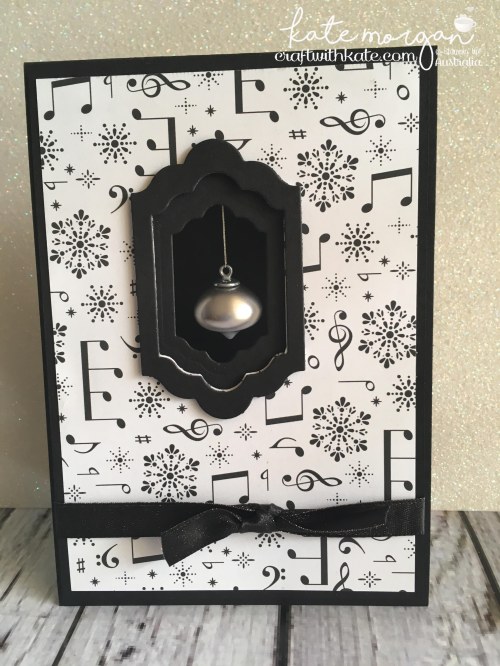
and for my last card today, I have paired these up with the new Mini Ornaments Embellishments, to hang in the centre of this card with the fine silver metallic thread!
I die cut the Lots of Labels framelits in 3 sizes to use to frame the mini ornament embellishment adding dimensionals behind the frames for added layering. The inside of the card I wanted to remain black behind the ornament, however that is not great for writing a greeting, so I cut a square out of the white layer and stamped the sentiment below it.
Products used:
Stamps:Musical Season, Carols of Christmas Inks:Black Archival, Smoky Slate, Versamark Card/Paper: Basic Black,Thick Whisper White, Silver Foil, Silver Glimmer, Merry Music Specialty DSP Accessories: Big Shot, Musical Instruments Framelits, Card Front Builder Framelits, Layering Ovals Framelits, Lots of Labels Framelits, Quilt Top Textured Impressions Embossing Folder, Stampin’ Trimmer, Paper Snips, Stampin’ Scrub, Tombo Multipurpose Glue, Simply Scored, Clear Block Bundle, Dimensionals, Heat Tool, Silver Embossing Powder, Basic Black 3/8″ Shimmer Ribbon, Mini Ornaments Embellishments, Silver Metallic Thread
Thanks for visiting today.
Don’t forget to email me at craftwithkate@live.com.au to request your copy of any Catalogue or to ask about joining the Art With Heart team.
Now it’s time to follow the blog hop to our next participant, Caroline Manwaring.
If you find a broken link or have come to this blog hop from a different entry point, you can view the participants below:


 Mini Striped Ribbon")


 Polka Dot Tulle Ribbon")