Dear Crafters,
The Art with Heart Team ladies are selecting their favourite colour combinations to share with you tonight. Choosing the right colour scheme can be essential to your design and with Stampin’ Up!s stunning collection, there are 50 colours to choose from. There’s sure to be some combinations that work really well together and you can take inspiration from.
Now sit back and enjoy some time out of your day to cruise through our blog hop and soak up some colour explosion eye candy!

Blog Hops are full circles, so you can start hopping here and then at the end of each post is a link to the next one. There is also a list of participants at the end in case of any broken links. You may have come to me from my lovely team member, Amie McIlroy.
Now let’s get started!
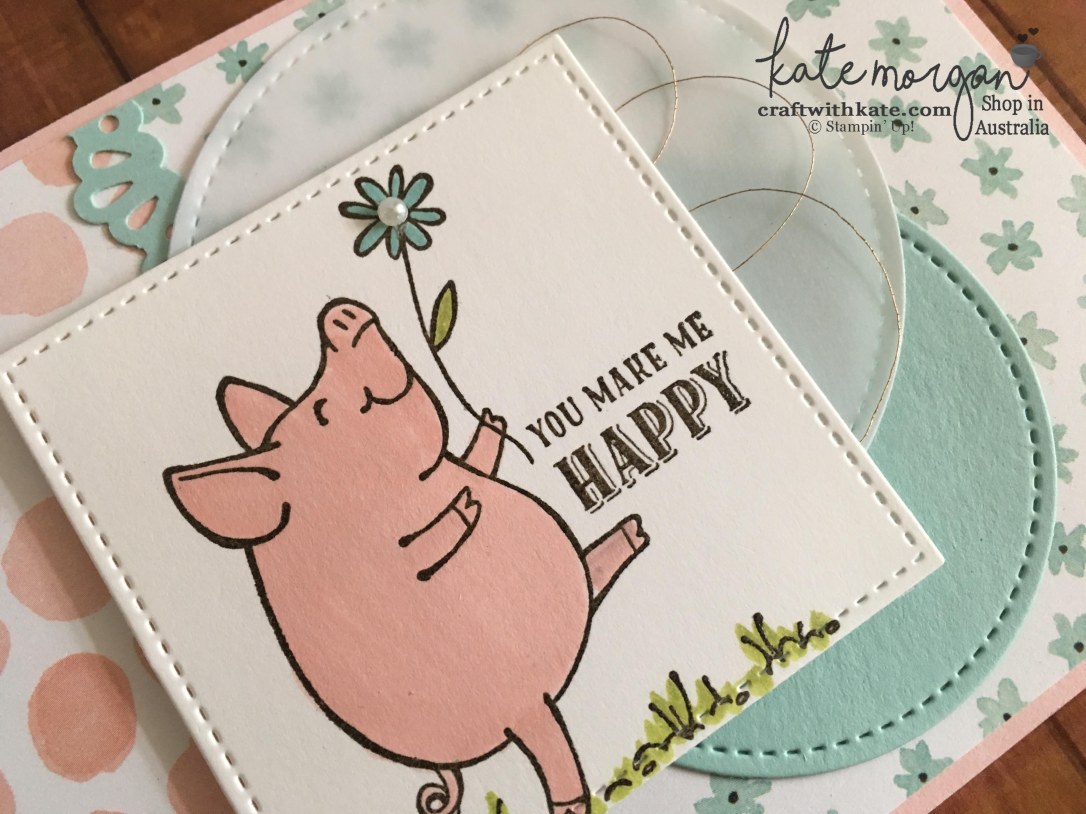
Today, it’s all about our favourite colour combinations and I certainly do love these colours together. In fact, any colour with black can be so striking!

I am using the amazing new embossing paste and Pattern Party Decorative Masks.

I mixed a small drop of Berry Burst ink into the paste and mixed it around thoroughly. I placed the die of the icing from the cupcake Framelits onto white cardstock. Holding it carefully, I applied a liberal amount of the paste, swirling it around to create the icing. I then used a thinner layer on the black card using the mask to create the background, hence it looks lighter in colour. Set these aside to dry.

I die cut the circles using the Stitched Shapes Framelits dies. The sentiment was using the stamps from the Sweet Cupcake stamp set, but you may notice that the word “wishes” is not there. I thought it looked a bit silly saying Sweet Birthday Wish and needed to make it plural, so I carefully inked up the “ess” from the “you happiness” stamp, placed a piece of paper over the last “s” so it didn’t stamp on my card to create wishes!

The cupcake wrapper was stamped in Soft Suede (2nd and 3rd layers stamped off once, then twice) before being die cut and added below the icing. Once the icing was dry, I used paper snips to cut around the whole cupcake and added it to the Berry Burst circle with dimensionals.
I love the touch of gold glimmer to die cut the sentiment and the golf metallic thread added behind the circle layers.
At the very end once all of the layers were stuck down, I went back with the palette knife and added a tiny bit more of the white paste across the raised edges of the icing to add some highlighting and a swirl effect. I just want to eat it!!! At least this cupcake is better for the figure, hehe!
Products used:
Stamps: Sweet Cupcake
Inks: Berry Burst, Sweet Sugarplum, Soft Suede, Black Archival
Card/Paper: Berry Burst, Sweet Sugarplum, Whisper White, Glimmer Paper Gold,Vellum
Accessories: Big Shot, Cupcake Cutouts Framelits, Stitched Shapes Framelits, Gold Metallic Thread, Paper Snips, Stampin’ Scrub, Tombo Multipurpose Glue, Simply Scored, Clear Block Bundle, Dimensionals, Fast Fuse, Embossing Paste, Palette Knives, Pattern Party Decorative Masks
Thanks for visiting today.
Don’t forget to email me at craftwithkate@live.com.au to request your copy of any Catalogue or to ask about joining the Art With Heart team.
Now it’s time to follow the blog hop to our next participant, Catherine Proctor.
If you find a broken link or have come to this blog hop from a different entry point, you can view the participants below:
1. Catherine Proctor
2. Sharon Davern
3. Tina Gillespie
4. Kathryn Ruddick
5. Andrea Roberts
6. Rebecca Jacovou
7. Monika O’Neill
8. Caroline Manwaring
9. Rachel Woollard
10. Kimberly Hern
11. Ros Davidson
12. Amie McIlroy
13. Kate Morgan < you are here>
Happy Hopping!