Celebrate, feminine, Handmade Cards, Mother's Day, Stampin' Up!

Bundle of Love meets Ribbon of Courage

Hello Friends,

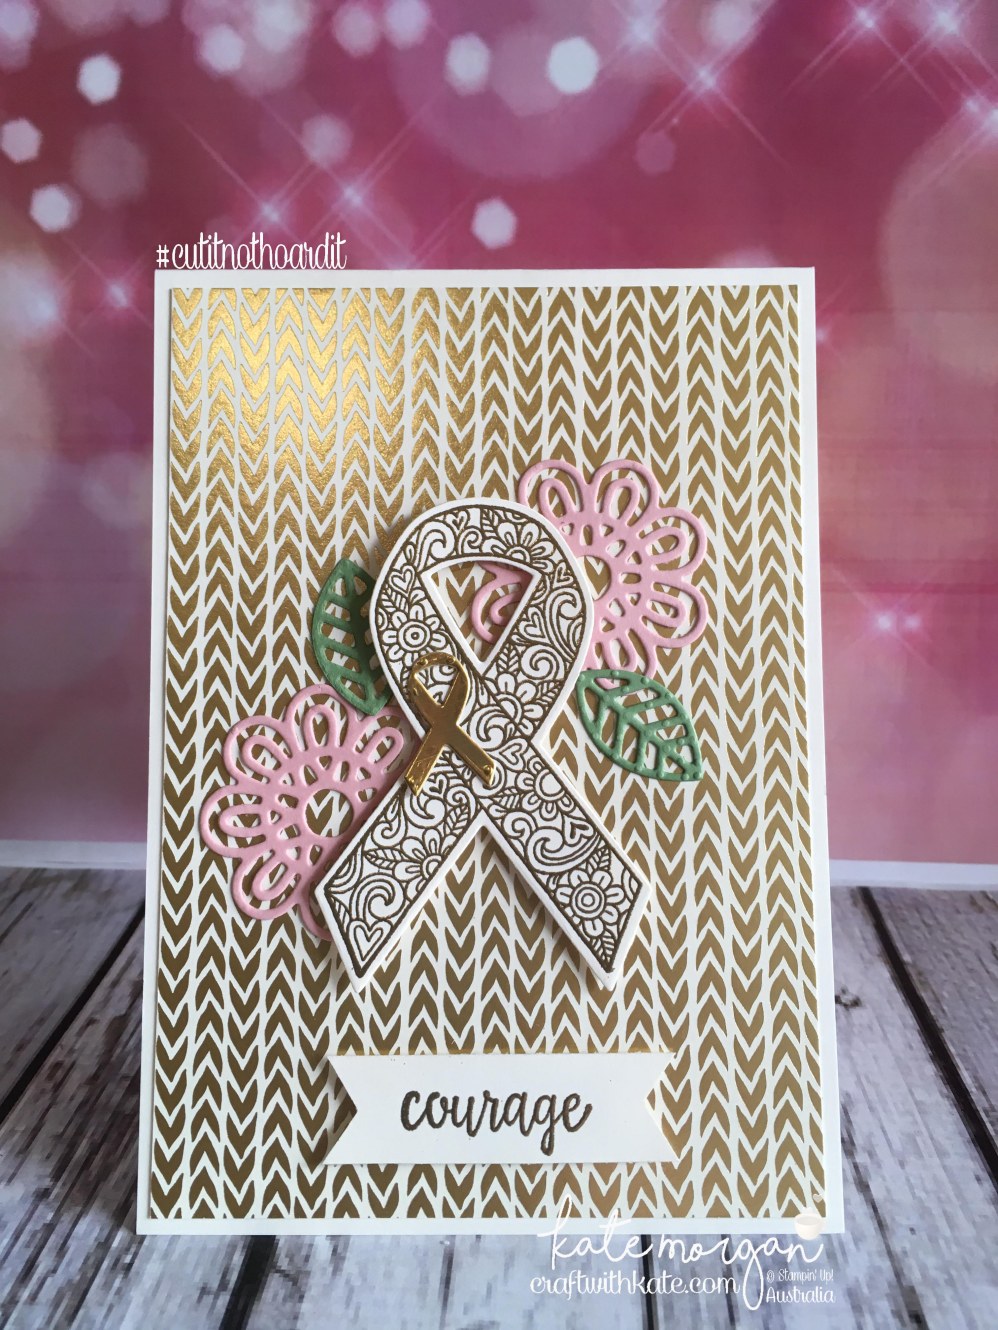
My project today uses the Ribbon of Courage stamp set and coordinating framelits dies, with the stunning Bundle of Love Specialty Designer Series Paper. #cutitnothoardit

TAMS Color Builder - blushing bride, gold, vanilla, wild wasabi.jpg

Ribbon of Courage meets Bundle of Love by Kate Morgan, Independent Stampin Up Demonstrator Australia #cutitnothoardit #cancer.jpg

I love how there are so many uses for this stamp set which was designed by Patty Bennett, a US Stampin’ Up! Demonstrator and million dollar sales achiever!!! Yes, you heard it, she has sold over $1 million of Stampin’ Up! products in her career, and because of that massive achievement, Stampin’ Up! recognise & reward those amazing people with a trip to the home office in Utah and to design their own stamp set. How cool is that?!!! I’m sure there are many other things they also receive, but this is what I love about this wonderful company we work for!

The ribbon image was stamped in versamark ink, gold embossed and heat set before being die cut with the Support Ribbon framelits and popped up with some dimensionals. The flowers and leaves are also from the same framelits set and I added them behind for a little bit of colour!

Using this sentiment, you could give this card to anyone who is going through a tough time and this bundle is perfect for creating cards for those having treatment, whether it be for cancer or any other disease. I know in the future I will be creating some cards for those suffering with Multiple Sclerosis, just like myself 😦  You know, there is nothing better than going to the mailbox and finding some happy mail to cheer you up 🙂

Look at all that gold shining on this card, who wouldn’t want to open an envelope to see this inside?!!!!

Ribbon of Courage meets Bundle of Love by Kate Morgan, Independent Stampin Up Demonstrator Australia #cutitnothoardit #cancer DIY

A full list of product can be found at the end of this post!

Don’t forget to Follow My Blog to receive blog updates and join my Newsletter Subscription for all the latest news and specials!

Blog Button - Catalogue  Blog Button - Shop   Blog Button - Classes  Blog Button - Join my Team  Blog Button - Watermark

Happy Stamping,

Blog Signature

Product List

Handmade Cards, Masculine, Stampin' Up!

Father’s Day Card using Stampin’ Up!s Guy Greetings

Hello Friends,

While I wait for my new Holiday catalogue goodies to arrive, I have some time to focus on some Masculine cards with Father’s Day coming up next month. What better time to make a start on these before the Holiday catalogue goes live on 1st September and we will forget all about Father’s Day, lol.

No one else could fill your shoes Dad Masculine Card using Stampin Ups Guy Greetings by Kate Morgan, Independent Demonstrator Australia. Craft with Kate Father's Day cover

Check out the new Pinewood Planks Dynamic Textured Impressions Embossing Folder!

No one else could fill your shoes Dad using Stampin Ups Guy Greetings by Kate Morgan, Independent Demonstrator Australia. Craft with Kate Masculine card Father's Day angle

I hope you like my card today. I cased it from Heather Heroldt, so thank you Heather!

The full product list can be found at the end of this post!

Don’t forget to Follow My Blog to receive blog updates and join my Newsletter Subscription for all the latest news and specials!

Blog Button - Catalogue  Blog Button - Shop   Blog Button - Classes  Blog Button - Join my Team  Blog Button - Watermark

Happy Stamping,

Blog Signature

Product List

Handmade Cards, Masculine, Stampin' Up!, Techniques & Tutorials

Hats off to You, Masculine Open Panel card with tutorial

Hello Friends,

On Saturday at my class, we focused on Masculine cards with Father’s Day coming up next month. This card I am sharing with you today, is an Open Panel Card!

(you may have received a post already about this last week, but I hadn’t finished writing the post and WordPress was playing funny buggers with me, so here it is again, with all the details)!

Masculine Card for Father's Day, Hats off to you using Stampin Ups Guy Greetings by Kate Morgan, Independent Demonstrator Australia. Craft with Kate #cutitnothoardit

The images were stamped onto Very Vanilla cardstock with Smoky Slate ink. We used some of the retired DSP from the Occasions catalogue, as it was perfect for our masculine project. The base card is Basic Gray cardstock.

Masculine Card for Father's Day, Hats off to you using Stampin Ups Guy Greetings by Kate Morgan, Independent Demonstrator Australia. Craft with Kate #cutitnothoardit angle   Masculine Card for Father's Day, Hats off to you using Stampin Ups Guy Greetings by Kate Morgan, Independent Demonstrator Australia. Craft with Kate #cutitnothoardit inside

The card itself was quite simple to create. Here is how I did it:

I began with half an A4 sheet (29.7 x 10.5cm) folded in half. I cut off the bottom panel measuring 5cm (2″). Then I cut it again allowing for a 3.5cm (1-3/8″) gap in the centre of the card.

The large Gray panel measures 6.5cm x 10.5cm, the Vanilla is 6cm x 10cm

The medium Gray panel is 4.7cm x 7cm, the Vanilla is 4.2cm x 6.5cm

The Sentiment Gray panel is 7.5cm x 1.5cm, the Vanilla is 7cm x 1cm

DSP: 10cm x 6cm & 10cm x 4.5cm

Once you have done all your stamping and mounted those pieces onto the Gray matt pieces of cardstock and added your DSP to the top and bottom panels, hold the bottom panel lining it up with the base of the card so you can add the centre panel. Make sure you only add adhesive to the top and bottom sections of this panel. Then add the other two panels to your card. I also added some Vanilla cardstock to the inside of the card and stamped the hats image in the bottom right corner!

Here are two more of this same style card!

Masculine Card for Father's Day, Hats off to you using Stampin Ups Guy Greetings by Kate Morgan, Independent Demonstrator Australia. Craft with Kate #cutitnothoardit DIY     Masculine Card for Father's Day, Hats off to you using Stampin Ups Guy Greetings by Kate Morgan, Independent Demonstrator Australia. Craft with Kate DIY #cutitnothoardit

I hope you like my cards today.

The full product list can be found at the end of this post!

Don’t forget to Follow My Blog to receive blog updates and join my Newsletter Subscription for all the latest news and specials!

Blog Button - Catalogue  Blog Button - Shop   Blog Button - Classes  Blog Button - Join my Team  Blog Button - Watermark

Happy Stamping,

Blog Signature
Product List

Christmas, Handmade Cards, Holiday Catalogue, Stampin' Up!

Heart of Christmas – Week 9 – Carols of Christmas

Heart of Christmas Stampin Up Art with Heart Team Christmas Inspiration

Hello Friends,

Welcome to Week 9 of the Heart of Christmas: Handmade Inspiration from the Art with Heart team!

My project today uses the brand new Carols of Christmas stamp set and the coordinating Card Front Builder Thinlits (purchased together as a bundle, you save an extra 10%). These will be available in the upcoming Holiday Catalogue released in September but if you join my team, you can get them now. Ask me how!

Carol of Christmas Stamp Set
Carols of Christmas Stamp Set

So here is my card for this week using this stamp set.

Heart of Christmas Week 9 using Stampin Ups Carols of Christmas by Kate Morgan, Independent Demonstrator Australia AWHT Handmade card 3D DIY.JPG

I have used Tranquil Tide and Silver as my colour combination for this card.

Those little deer are stamped in Basic Grey on Whisper White, as I originally die cut them in the silver foil, but it was just too much silver!

Heart of Christmas Week 9 using Stampin Ups Carols of Christmas by Kate Morgan, Independent Demonstrator Australia AWHT Handmade card 3D

The sentiment is embossed in Silver and that ribbon is new in the Annual catalogue too. Isn’t it pretty?

Heart of Christmas Week 9 using Stampin Ups Carols of Christmas by Kate Morgan, Independent Demonstrator Australia AWHT Handmade card 3D DIY inside

The sentiment inside the card is from the Star of Light stamp set and few more die cuts at the bottom. The green piece was on off cut from another project where I used the Lots of Labels Framelits (a full product list is below).

I hope you have enjoyed my Heart of Christmas post and I look forward to sharing more Christmas inspiration with you next Wednesday! If you would like to see what others in our team have created, you can view the participant list over on the blog of our leader, Claire Daly.

Stampin Up Bonus Days 2017 at CraftwithKate

Bonus Day’s are happening this month! For every $90 you spend (or multiples of) between 1–31 July (before postage), you’ll receive 1 or more Bonus Days coupons that you can spend between 1–31 August!!! Order as you normally would and your bonus days coupons will be emailed to you after your order is placed.

19477447_1576680529023492_4549416942942077078_o

Ho, ho, ho! Our Christmas in July promotion makes it easier than ever to sign up to be a demonstrator!

Between 1st and 31st July, every new demonstrator gets an Essentials Gift Pack (worth $86) plus the Carols of Christmas Stamp Set (worth $35) from the upcoming Holiday catalogue added to their starter kit for FREE! This means that new demonstrators will get products and business supplies worth a whopping $356 for just $169 with free shipping!

Here’s what Santa includes in the Essentials Gift Pack:
118485 D Block (X2)
130148 Grid Paper
103579 Paper Snips
104332 SNAIL Adhesive
102300 Bone Folder
144804 Carols Of Christmas (see pic at top of post)
AND spend your Starter Kit dollars ($235) on things like your favourite stamp sets and accessories!

So what are you waiting for? Join up today!

Happy Stamping,

Blog Signature

Product List

Don’t forget to Follow My Blog to receive blog updates and join my Newsletter Subscription for all the latest news and specials!

Blog Button - Catalogue  Blog Button - Shop   Blog Button - Classes  Blog Button - Join my Team  Blog Button - Watermark


Christmas, Handmade Cards, Stampin' Up!

Heart of Christmas Inspiration, Week 8

Heart of Christmas Stampin Up Art with Heart Team Christmas Inspiration

Hello Friends,

Welcome to Week 8 of the Heart of Christmas: Handmade Inspiration from the Art with Heart team!

My project today uses the new At Home with You stamp set and the coordinating At Home Framelits (purchased together as a bundle, you save an extra 10%)!

Heart of Christmas card using Stampin Ups At Home with You by Kate Morgan, Independent Demonstrator, Australia.JPG

The Brick Wall Textured impressions embossing folder was used to create the background with Crumb Cake card and I sponged the edges and across the grout lines with a sponge dauber and coordinating ink.

Check out the red door? Yes, it actually opens! This is super cool and there is a die in the set that actually creates this. I love the wreath and the holly above the door; it really gives that Christmas feel. I can almost imagine a warm fire glowing inside the door!

Heart of Christmas card using Stampin Ups At Home with You by Kate Morgan, Independent Demonstrator, Australia open

The red glimmer paper was punched with the 1/8th Handheld Circle punch and adhered to the little trees with Tombo multipurpose glue. I think these baubles look so pretty in the glimmer! I love the door mat too, which I stamped Merry Christmas in Versamark ink and gold embossed it.

Heart of Christmas card using Stampin Ups At Home with You by Kate Morgan, Independent Demonstrator, Australia closeup

I hope you have enjoyed my Heart of Christmas post and I look forward to sharing more Christmas inspiration with you next Wednesday! If you would like to see what others in our team have created, you can view the participant list over on the blog of our leader, Claire Daly.

Happy Stamping,

Blog Signature

Product List

Christmas, Designer/Patterned/Specialty Papers (DSP), Handmade Cards, Stampin' Up!, Techniques & Tutorials

The Heart of Christmas, Week 7

Heart of Christmas Stampin Up Art with Heart Team Christmas Inspiration

Hello Friends,

Welcome to Week 7 of the Heart of Christmas: Handmade Inspiration from the Art with Heart team!

My project today is a Fancy Fold card (instructions below) using the Star of Light, Cookie-Cutter Christmas & Tabs for Everything stamp sets and the brand new Embossing Paste!

Wow, this embossing paste is fabulous! I loved playing with it, but just a warning, you need to work fairly fast and ensure you clean up straight away before it dries hard onto your masks. The design was completely dry within a few minutes!

Fancy Fold Heart of Christmas card using Stampin Ups Cookie Cutter Christmas & Embossing Paste by Kate Morgan, Independent Demonstrator, Australia DIY.JPG

Here I have mixed in a tiny drop of reinker to colour the paste to coordinate with my colour scheme.

Fancy Fold Heart of Christmas card using Stampin Ups Cookie Cutter Christmas & Embossing Paste by Kate Morgan, Independent Demonstrator Australia.jpg

The Santa was stamped in Black ink and coloured with Stampin’ Write Markers.

Here is the side view so you can see how it folds flat to fit into a standard C6 envelope for posting!

Fancy Fold Heart of Christmas card using Stampin Ups Cookie Cutter Christmas & Embossing Paste by Kate Morgan, Independent Demonstrator, Australia.JPG

You can find the instructions for how to create this fancy fold card from my recent post, Tranquil Tulips.

I hope you have enjoyed my Heart of Christmas post and I look forward to sharing more Christmas inspiration with you next Wednesday!

If you would like to see more Christmas inspiration, check out the other lovely ladies who are participating this week, starting with Sharon Davern.

Happy Stamping,

Blog Signature

Product List

Birthday, Designer/Patterned/Specialty Papers (DSP), feminine, Flowers, Handmade Cards, Stampin' Up!

Tranquil Tulip Fancy Fold card

Hello Crafters,

Today I am featuring the Tranquil Tulips Hostess Stamp Set to create this Fancy Fold card. I really like this style and you can easily make it using 1 sheet of A4 cardstock. I’ll show you that shortly!

Fancy Fold Card using Stampin Ups Tranquil Tulips, Pretty Label Bundle & Wood Grain DSP by Kate Morgan, Independent Demonstrator Australia 3D

Here is how I cut the A4 sheet of card (full instructions at the end of my post).

Fancy Fold Card using Stampin Ups Tranquil Tulips, Pretty Label Bundle & Wood Grain DSP by Kate Morgan, Independent Demonstrator Australia layout

I also love how this card folds flat to fit into a C6 envelope for posting!

Fancy Fold Card using Stampin Ups Tranquil Tulips, Pretty Label Bundle & Wood Grain DSP by Kate Morgan, Independent Demonstrator Australia

I’m also using the the Wood Grain Designer Series paper. #cutitnothoardit

Fancy Fold Card using Stampin Ups Tranquil Tulips, Pretty Label Bundle & Wood Grain DSP by Kate Morgan, Independent Demonstrator Australia DIY

I added a piece of white card to the back to write your message on and stamped a couple more tulips!

What do you think of my version of this fancy fold card?

Here are the instructions:

Coloured Base: 4⅛″ x 10⅞″ (10.5cm x 29.7cm). Score at 6″, 7⅛″, 9″ and 10⅛″ (15cm, 18cm, 23cm and 26cm)
Coloured Front Panel: 3″ x 6″ (7.6cm x 15.2cm). Score at ½″ x 1⅝ (1.3cm and 4.2cm)
Designer Series Paper: TOP: 4″ x 4⅜″ (11.1cm x 10.2cm) BOTTOM: 4″ x 1⅝″ (10.1cm x 4.2cm)
White Backing: 3¾″ x 5⅝″ (9.5cm x 14.3cm)  White Card Front: 2¾″ x 4⅛ (7cm x 10.5cm)

BASIC INSTRUCTIONS:
Burnish the score lines of the Base card. Add the DSP with glue. Add Adhesive to the smaller tab and fold up to adhere to the front.
Fold each of the score lines of the front panel. Add adhesive to the small scored section at the top.  Before sticking it down, turn the cardstock over and place it on the front of the card to see where to place the adhesive on the lower panel. Add adhesive then flip it over, holding the card flat and adhere this panel.
Stamp the two white piece of cardstock and add them to the card with adhesive. Stamp the sentiment on white card and punch out. Punch two further pieces from the coloured card to use as a matt layer. Adhere to the card.

Blog Button - Catalogue  Blog Button - Shop   Blog Button - Classes  Blog Button - Join my Team  Blog Button - Watermark

Don’t forget to Follow My Blog to receive blog updates and join my Newsletter Subscription for all the latest news and specials!

Happy Stamping!

Blog Signature

Product List

Christmas, Flowers, Handmade Cards, Stampin' Up!

The Heart of Christmas, Week 6

Heart of Christmas Stampin Up Art with Heart Team Christmas Inspiration

Hello Friends,

Welcome to Week 6 of the Heart of Christmas: Handmade Inspiration from the Art with Heart team.

My card today is 5-3/4″ square card using the Jar of Love & Christmas Pines stamp sets and the Everyday Jars Framelits.


Heart of Christmas Card using Stampin Ups Jar of Love, Everyday Jars Framelits & Christmas Pines by Kate Morgan, Independent Demonstrator Australia, DIY

Can you believe that I have never inked up the Jar of Love stamp set until now?! True! But… having made this card, I am bound to make many more projects with this amazing stamp set.

The photos don’t do this card justice in showing all the glitter and gold edging, but I hope you can see that I used the Versamark ink pad, and rubbed it along the edges of the cardstock, dipped them in gold embossing powder and heat set it. It’s another way of creating a layered effect without the extra thickness of cardstock!

Heart of Christmas Card using Stampin Ups Jar of Love, Everyday Jars Framelits & Christmas Pines by Kate Morgan, Independent Demonstrator Australia DIY Xmas

The flowers were stamped with the Cherry Cobbler ink, however the solid background colour was stamped off first to give that toned look. The greetings are from the Christmas Pines stamp set.

and here is the inside of the card!

Heart of Christmas Card using Stampin Ups Jar of Love, Everyday Jars Framelits & Christmas Pines by Kate Morgan, Independent Demonstrator Australia inside

I hope you have enjoyed my Heart of Christmas post and I look forward to sharing more Christmas inspiration with you next Wednesday! If you would like to see what others in our team have created, you can view the participant list over on the blog of our leader, Claire Daly.

Happy Stamping,

Blog Signature

Product List

Designer/Patterned/Specialty Papers (DSP), Handmade Cards, Masculine, Stampin' Up!

Nailed It for Father’s Day!

Dear Crafters,

Yes I know, Father’s Day is so far away still, but I have to share this project because this Nailed It Bundle is retiring in a week’s time and I don’t want you to miss out on it!

Nailed It Happy Fathers Day card by Kate Morgan, Independent Demonstrator Rowville

The designer paper is called Urban Underground and it will also be retiring. #cutitnothoardit  Click here to add it to your shopping cart.

Urban Underground Specialty Designer Series Paper

Don’t forget to check out the retiring products at up to 50% off but only until 31st May! Click these links to see all the products; Retiring Stamps / Retiring Bundles / Everything Else. Hurry before they are gone!

Products

Stamps: Nailed It
Inks:  Basic Black, Smoky Slate
Card/Paper:  Very Vanilla, Urban Underground DSP
Accessories:  Big Shot, Build It Framelits, Urban Underground Embellishments, Paper Snips, Stampin’ Scrub, Tombo Multipurpose Glue, Simply Scored, Dimensionals

Blog Button - Catalogue  Blog Button - Shop   Blog Button - Classes  Blog Button - Join my Team  Blog Button - Watermark

Don’t forget to Follow My Blog to receive blog updates and join my Newsletter Subscription for all the latest news and specials!

Happy Stamping!

Blog Signature

Blog Hop/Instagram Hop, feminine, Flowers, Handmade Cards, Memory Keeping/Project Life/Scrapbooking, Stampin' Up!, Techniques & Tutorials

Art With Heart Team Blog Hop: Annual Catalogue Sneak Peeks

art-with-heart-team-blog-hop-logo-currentDear Crafters,

Tonight I am participating in a blog hop along with the super talented ladies in the Art With Heart Team. We thought it  would be fun to share some fabulous ideas to inspire you from our brand new 2017-2018 annual catalogue, which is available 1st June.

Be sure to request your copy of the catalogue today!

Blog Hops are full circles, so you can start hopping here and then at the end of each post is a link to the next one. There is also a list of participants at the end in case of any broken links.

Now let’s get started!

For my projects, I have used the Colorful Seasons suite, Colorful Seasons stamp set and Seasonal Layers thinlits dies (page 147 of new annual catalogue). I love how this bundle has so many items to be able to create a project for any season. There are 24 stamps in this stamp set; sentiments, flowers, leaves, branches, snowflakes and more!

Autumn – I have used Daffodil Delight, Pumpkin Pie, Tangerine Tango and Chocolate Chip. The material of the sun chair was stamped using the kissing technique with the wavy stamp from the set, Work of Art! I stamped the sentiment in Daffodil Delight, but it needed something, so I also stamped in Pumpkin Pie, but slightly offsetting it for a shadow effect.

Autumn - Colourful Season & Seasonal Layers Thinlits by Kate Morgan, Independent Stampin Up demonstrator, Australia

Spring – I have used Powder Pink, Sweet Sugarplum, Chocolate Chip and Whisper White. The blossoms were stamped with Powder Pink and Sweet Sugarplum inks and die cut. The second one is a stamped off version of Sweet Sugarplum! I just love this colour combination and I could certainly see myself sitting on this chair enjoying a drink under the cherry blossoms 🙂

Spring - Colourful Season & Seasonal Layers Thinlits by Kate Morgan, Independent Stampin Up demonstrator, Australia

Winter – I have used Dapper Denim, Soft Sky and Whisper White with some Silver Glimmer of course! The snowflakes are stamped in Dapper Denim and stamped off a 2nd and 3rd time to get the gradient in the colour. I have also used some of the new Glitter Enamel Dots; how stunning are they?!!!!

Don’t forget to email me at craftwithkate@live.com.au to request your copy of any Catalogue or to ask about joining the Art With Heart team.

Now it’s time to follow the blog hop to our next participant, Andrea Roberts.

art-with-heart-team-next-blog-hop-current

If you find a broken link or have come to this blog hop from a different entry point, you can view the participants below:

1. Tina Gillespie
2. Ros Davidson
3. Kathryn Mangelsdorf
4. Kate Morgan
5. Andrea Roberts
6. Rachel Palmieri
7. Alisha Watson
8. Kimberly Hern
9. Monika O’Neill
10. Claire Daly
11. Sharon Davern
12. Rachel Woollard
13. Caroline Manwaring
14. Judy May
15. Catherine Proctor
16. Rebecca Jacovou

Happy Hopping!

Blog Signature