It has been one heck of a hot day today in Melbourne, a top of 38ºc (100.4F), so I’m staying inside with the air-con on. A perfect day for crafting!
The Seaside Bay Bundle and the By the Bay Specialty DSP are perfect for this tunnel card design.

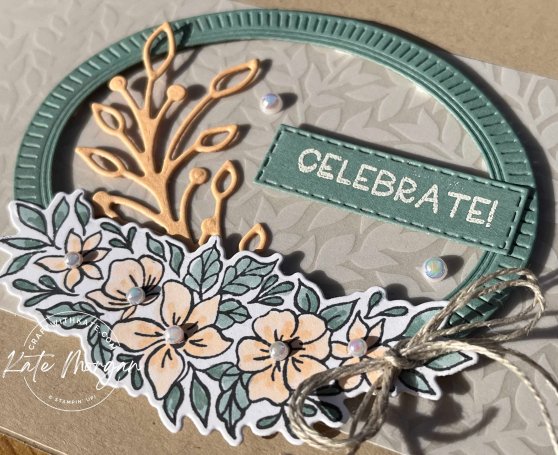
Here is how it looks from the top, once constructed and it folds flat to fit into our C6 envelope!

On the back of the card, I used the die cut circles from the front design, so not to waste them. It creates a beautiful space, don’t you think? I also stamped the sentiment on the White circle to add my message later.

I’ll share another of these cards with an extra layer on Monday, so make sure you come back to see it!

Products:
Seaside Bay Bundle, By the Bay SDSP, Charming Sentiments Bundle, Biggest Wish stamp set, Stylish Shapes dies, Basic White cardstock, Balmy Blue & Night of Navy inks, Trimmer, Glue, Dimensionals, Cut & Emboss Machine, Bone Folder, Daubers
Measurements – Metric
Card Base: 11” x 4¼” score @ 4¼”, 5¼”, 9½”, 10½”
Card inserts: 5” x 4¼” score @ 4⅝” from each end (2)
DSP: 4” x 4” (3) & ¾” x 4” (2)
then follow Susan’s Tutorial below to see how to put it together.
My card today was initially inspired by Susan Campfield, but I needed to make my own Metric measurements to suit. You can follow Susan’s YouTube here.
Thanks for dropping by. I hope you can join me next Wednesday for inspiration using Pear Pizzazz with a fancy fold design for our weekly Colour Creations blog hop!
♥ Click here to see the full list of products used in this project ♥
Join Stampin’ Up! to start getting your products at a 20% discount. I joined almost 10 years ago to get the discounts, little did I know that meeting other like-minded people, who I now call my Stampin’ Up! family! click here


Don’t forget to Follow My Blog to receive blog updates and join my Newsletter Subscription for all the latest news and specials!


 I placed some Adhesive Sheet behind some Navy and White card scraps to allow the die cuts to become stickers without the mess of using glue. Using the H, B, 2 & U dies, place them in a row together – grab some washi tape to hold them in place. It doesn’t have to be perfect, but it’s easier this way when cutting 3 times!