Birthday, Handmade Cards, Masculine, Stampin' Up!, Techniques & Tutorials, Watercolour

Slider card and Smooshing with watercolour technique with Instructions

Tonight I have a couple of techniques with some watercolour smooshing and a slider card!

I taught this to my class ladies earlier this month and they loved it. It’s always great having a masculine themed class and we focused on this bundle mainly. It reminded me that I must do more masculine themed classes in the future.

To create the watercolour background, I put a couple of drops of re-inker, reasonably close together onto a sheet of acetate, spritzed it with water and then lay the Fluid 100 watercolour paper on top and gently pressed down with the finger tips (don’t rub). You don’t want the colours to mix together, just gently blend. You may need to place the paper down again so you cover the entire piece, as the excess we cut away, will be used later. I then put this aside to dry while I stamped the images and the inside of the card.

Slider card & Smooshing Technique using Stampin Up Sailing Home Bundle by Kate Morgan, Australia, 2019.

The lighthouse is stamped in Soft Suede and coloured with Crumb Cake Stampin’ Blends Combo pack to get the darker and lighter shading. The boats are stamped in Night of Navy ink and coloured with Combo Blends of So Saffron and Poppy Parade. I added some Wink of Stella to the water below the boats rather than colouring it.
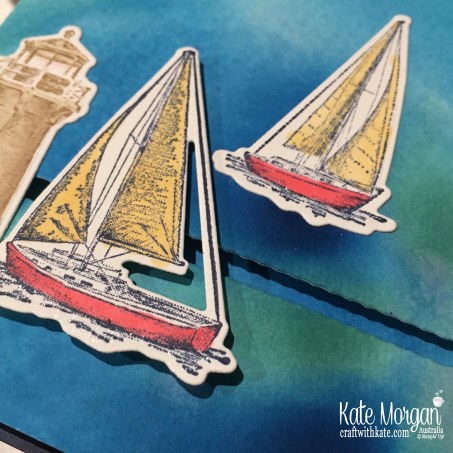
Slider card & Smooshing Technique using Stampin Up Sailing Home Bundle by Kate Morgan, Australia, 2019

On the inside I stamped the sentiment, add a Copper Foil anchor and the rope is part of the leftover pieces from the excess watercolour paper! The straight piece of rope is from the slider mechanism from the front!!!

Slider card & Smooshing Technique using Stampin Up Sailing Home Bundle by Kate Morgan, Australia 2019

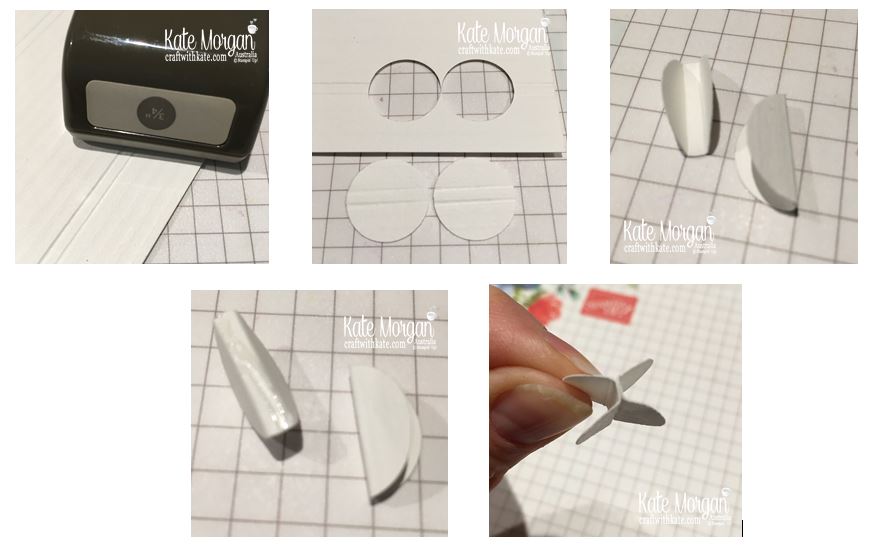
To create the slider card mechanism:slider card mechanism.JPG

Score 2 lines on card, punch 2 circles with lines through the centre. Fold them into a taco shape. Place glue on the bottom of one and glue them together to create the H shape.

Cut the watercolour piece down to the size you require and die cut the rope die across the front where you want the sliding sailing boat to be. With the strip of left over water-coloured paper, glue this to the card base behind where the die-cut rope was so it still looks great and not having the Navy card show through. I did this by placing the paper down the watercolour paper roughly where I wanted it centred on the card and used a pencil to mark on the card base, either end of the rope, as a guide.

Add glue to the flat side and adhere to the larger sailing ship, ensuring that it is the right orientation (scorelines horizontal). Slide this into the slot so each side is facing toward the top and bottom of the card. It is easiest to do this step before you adhere the front panel to the card base. I used Adhesive Foam Strips around the edges of the watercolour layer and then two more strips either side of the mechanism, but ensure you allow enough space for the circles to slide along.
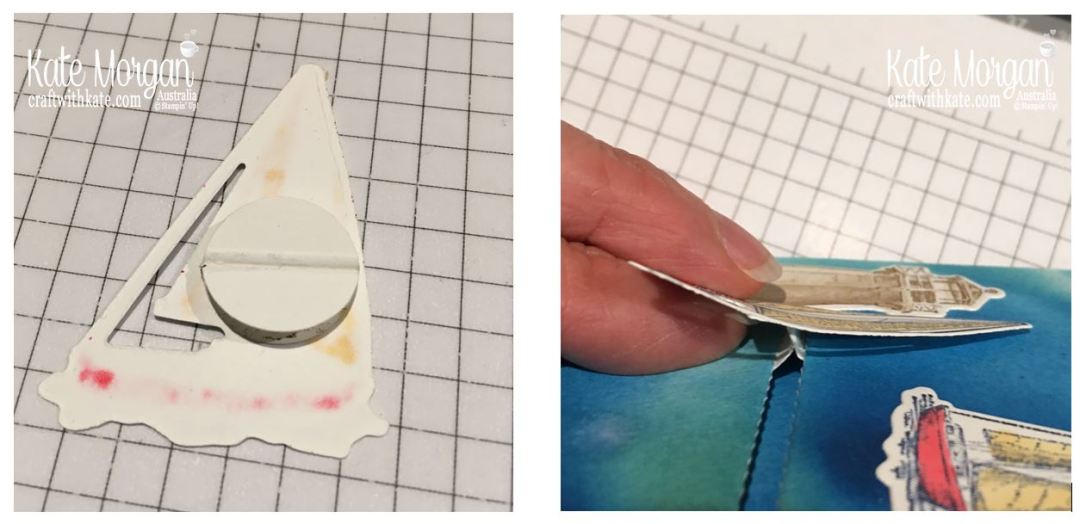
slider card mechanism.

This is not a spinner card, but a slider card, as I didn’t want the sailing boat doing circles on the ocean. If you want it to spin, you would use some washers from the hardware store joined together by a mini dimensional.

I hope these instructions make sense.


2019-2020 Annual Catalogue ends 2 June 2020

Be sure to download a PDF copy from my SU Catalogue Library page today.


Don’t forget to Follow My Blog to receive blog updates and join my Newsletter Subscription for all the latest news and specials!

 Happy Stamping,

Blog Signature

Blog Button - Catalogue  Blog Button - Shop   Blog Button - Classes  Blog Button - Join my Team  Blog Button - Watermark

Product List

Fancy Folds, feminine, Flowers, Handmade Cards, Kids Cards, Punch Art, Stampin' Up!, Techniques & Tutorials

Easy Daisy Slider Card

Tonight’s Slider card is very easy to create without too much fuss and measurements and link are below.

I am using the Daisy Lane suite for my card. The stamp set and mini daisy punch are available as a bundle saving you 10% and there is a special offer below so make sure you keep reading to take advantage of the 11 free tutorials.

Easy Slider Card using Stampin Up Daisy Lane by Kate Morgan, Australia 2019.

I’m using 3 of my favourite new In Colours; Seaside Spray, Purple Posy and Rococo Rose.

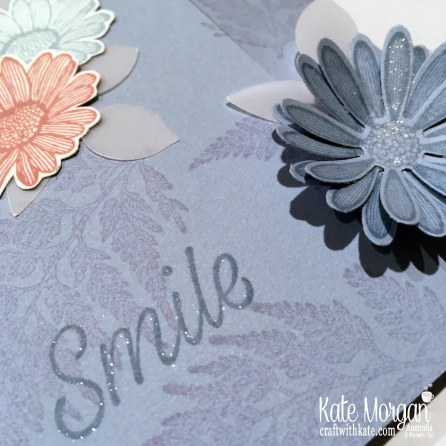
The fern image is stamped in Purple Posy on Seaside Spray cardstock. The medium daisy is all Seaside Spray (ink & card) and the smaller daisies are stamped in the 3 colours on white card and fussy cut. The leaf punch is used with vellum for a softer look.

The circle punch was used to punch the top of the card so you can pull the white card up to reveal the message inside.

Easy Slider Card using Stampin Up Daisy Lane by Kate Morgan, Australia 2019

Of course I had to add some Wink of Stella to the main daisy and over the Smile sentiment.

Easy Slider Card using Stampin Up Daisy Lane by Kate Morgan Australia 2019

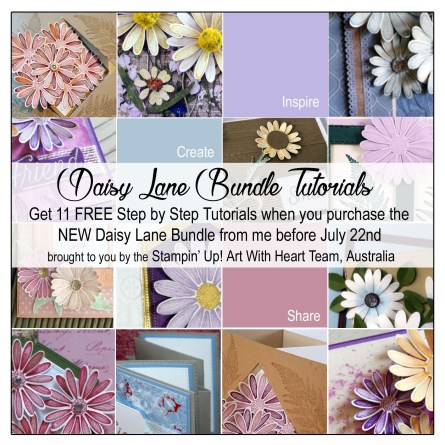
Purchase the Daisy Lane Bundle from me (only $61.00 for the stamp set and medium daisy punch) and I’ll personally email you 11 step-by-step full colour picture Tutorials created by our AWHT ladies, to help you recreate some amazing cards.

Daisy Lane Bundle Tutorials by AWHT & Kate Morgan Stampin Up Australia 2019

I was inspired by Julie Davison and you can watch her video by clicking here to find all the measurements. Thanks Julie!


2019-2020 Annual Catalogue ends 2 June 2020

Be sure to download a PDF copy from my SU Catalogue Library page today.


Don’t forget to Follow My Blog to receive blog updates and join my Newsletter Subscription for all the latest news and specials!

 Happy Stamping,

Blog Signature

Blog Button - Catalogue  Blog Button - Shop   Blog Button - Classes  Blog Button - Join my Team  Blog Button - Watermark

Product List

Flowers, Handmade Cards, Punch Art, Stampin' Up!, Techniques & Tutorials, Watercolour

Water-colouring with Pigment Sprinkles and Daisy Lane

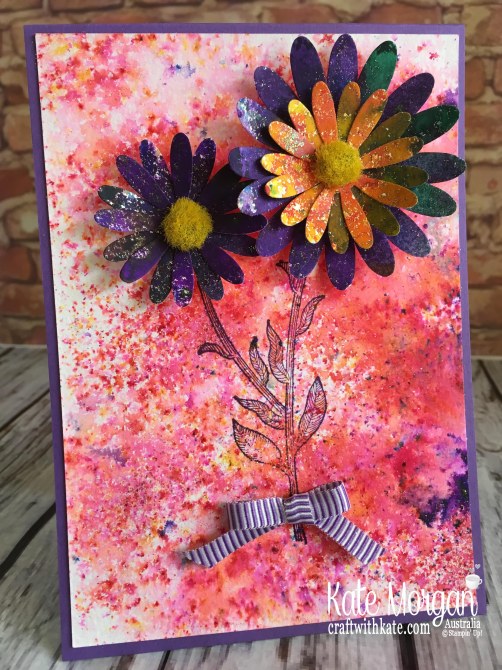
Wow, look at this bright background I’ve created with the new Pigment Sprinkles?!!!

Pigment Sprinkles are watercolour pigment crystals in exclusive Stampin’ Up! colours. Mix them with water to make watercolour backgrounds and washes and use them for other water-colouring techniques.  You get 6 jars – 1 of each of these colours: Bermuda Bay, Daffodil Delight, Granny Apple Green, Gorgeous Grape, Mango Melody, Melon Mambo.

I used the new Fluid 100 water colour paper (amazing quality) and I went it quite liberally with the Stampin’ Spritzer before sprinkling some of the Pigment Sprinkles on top. TIP: make sure you are light handed as a little goes a long, long way…. jut ask me how I know?!!! Then sit back and watch the instant magic happen! You can also spritz a little more water on if you want a more watercolour look (like the daisies).

Daisy Lane stamp set & Pigment Sprinkles, Stampin Up Australia by Kate Morgan 2019

The daisies were also created using this same technique but in 2 colours for each size. Allow the water-colour paper to dry completely before trying to punch them out.  The same with the background piece. I actually used my heat tool to quicken up the drying process as I was a little impatient and wanted to keep going. I stamped the stem in Gorgeous Grape ink so it would stand out on the bright background 😉

Use a bone folder to help curve the petals of the daisies before gluing to the card; just gives a bit more life to them.

Daisy Lane stamp set & Pigment Sprinkles, Stampin Up Australia by Kate Morgan 2019.

How gorgeous are those Perennial Essence Centres? So fussy and they are nice and bright to match perfectly with this card.

Purchase the Daisy Lane Bundle from me (only $61.00 for the stamp set and medium daisy punch) and I’ll personally email you 11 step-by-step full colour picture Tutorials created by our AWHT ladies, to help you recreate some amazing cards.

Daisy Lane Bundle Tutorials by AWHT & Kate Morgan Stampin Up Australia 2019

Are you going to add these Sprinkles to your collection?

A list of products can be found at the end of the post.


2019-2020 Annual Catalogue ends 2 June 2020

Be sure to download a PDF copy from my SU Catalogue Library page today.


Don’t forget to Follow My Blog to receive blog updates and join my Newsletter Subscription for all the latest news and specials!

 Happy Stamping,

Blog Signature

Blog Button - Catalogue  Blog Button - Shop   Blog Button - Classes  Blog Button - Join my Team  Blog Button - Watermark

Product List

Designer/Patterned/Specialty Papers (DSP), feminine, Handmade Cards, Stampin' Up!, Techniques & Tutorials, Thank you

Colour Creations: Terracotta Tile Floating Frame

AWH Colour Creations Blog Hop

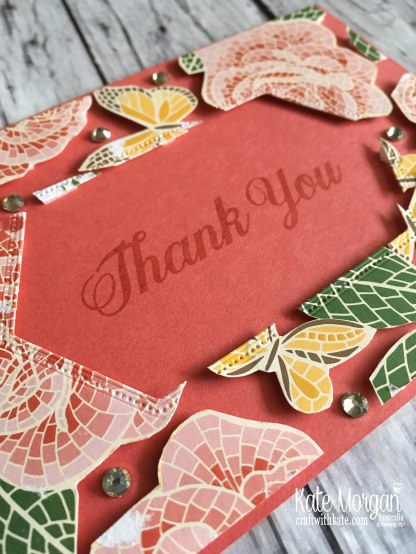
Tonight’s AWHT Colour Creations Blog Hop features Terracotta Tile, the 3rd of our new 2019-2021 In Colours.

This is the Floating Frame Technique that you may have seen everywhere, as it’s been the most popular technique since earlier this year (Google it and you’ll find loads of videos on how to make them).  I was also fortunate enough to have some fellow demonstrator team mates in Auckland early for OnStage Live who were able to purchase a roll of the Glad Press & Seal product to make these projects (it’s not easy to get here in Australia).

Floating Frame technique using Stampin Up Mosaic Mood DSP by Kate Morgan Australia 2019

I decided to fussy cut all the images of a sheet of the Mosaic Mood DSP one evening during our family movie time 🙂

I love the fact that we actually get 2 cards from this technique too!

Doesn’t it look effective?! I love this technique but make sure you have time and not be in a rush. I added some rhinestones and glitter enamel dots to the spaces for some extra sparkle and interest.

This second card doesn’t have a sentiment yet, as I will add the appropriate one at the right time.

Floating Frame technique using Stampin Up Mosaic Mood DSP by Kate Morgan Australia 2019.

If you are going to have a go at this technique, be warned, you need to have loads of dimensionals and patience! Getting those backings off the dimensionals takes time, hehe.

The sentiment is from the Daisy Delight stamp set, inked with Terracotta Tile.

Floating Frame technique using Stampin Up Mosaic Mood DSP by Kate Morgan, Australia 2019.

Head on over to Catherine’s blog where you’ll find the links to other participants.


2019-2020 Annual Catalogue ends 2 June 2020

Be sure to download a PDF copy from my SU Catalogue Library page today.


Don’t forget to Follow My Blog to receive blog updates and join my Newsletter Subscription for all the latest news and specials!

 Happy Stamping,

Blog Signature

Blog Button - Catalogue  Blog Button - Shop   Blog Button - Classes  Blog Button - Join my Team  Blog Button - Watermark

Product List

Blog Hop/Instagram Hop, Designer/Patterned/Specialty Papers (DSP), Handmade Cards, Masculine, Stampin' Up!, Techniques & Tutorials, Thank you

Colour Creations: Tranquil Tide with Cling Wrap Technique

9bdc0-34343751_10157403755198098_7101250458500464640_o

Welcome back to another Art With Heart Team Colour Creations weekly Blog Hop. Today we are featuring our 50th and final Stampin’ Up! colour; Tranquil Tide.  I have to say I have thoroughly enjoyed being part of this blog hop each week and thank Catherine for coordinating it all year long! xx

This card uses the Cling Wrap technique and the Rooted in Nature Suite of products.

The cling wrap technique is using some cling wrap or even an old plastic bag from the supermarket, scrunch it up and drab it into an inkpad and then dab onto the cardstock. Repeat this process with a couple of other colours. I have used Balmy Blue, Coastal Cabana & Soft Sea Foam onto a small piece of Soft Sea Foam cardstock. Once I had the coverage I wanted, I stamped the image & sentiment in Black ink.

Rooted in Nature for Colour Creations Tranquil Tide Blog Hop by Kate Morgan, Stampin Up Australia 2019..

Then I placed the card into my Stampin’ Trimmer and cut it on the diagonal. No special measurement, just sliced it twice. I glued it onto some tranquil tide card leaving a small gap between each section, before mounting onto some black cardstock. Doesn’t it give a great effect?!!!

The 1/2″ Woven Ribbon (retired) was the perfect addition for my Tranquil Tide card.

The card base is Basic Black with a layer of Nature’s Poem Designer Series Paper.

Rooted in Nature for Colour Creations Tranquil Tide Blog Hop by Kate Morgan, Stampin Up Australia 2019.

Once the card was finished, I added some Wink of Stella (my favourite product!) over the tree image and added a couple of rhinestones.

On the inside I had to add a layer of tranquil tide then some whisper white to be able to write on. It looked a little plain, so I added a small strip of the same DSP.

Rooted in Nature for Colour Creations Tranquil Tide Blog Hop by Kate Morgan, Stampin Up Australia 2019 inside

Head on over to Catherine’s blog where you’ll find the links to other participants.

To purchase these products click on the images below in the product list to take you directly to my online store!


2018-2019 Annual Catalogue ends 3 June 2019
2019 Occasions Catalogue ends 3 June 2019
Be sure to download a PDF copy from my SU Catalogue Library page today.


Don’t forget to Follow My Blog to receive blog updates and join my Newsletter Subscription for all the latest news and specials!

 Happy Stamping,

Blog Signature

Blog Button - Catalogue  Blog Button - Shop   Blog Button - Classes  Blog Button - Join my Team  Blog Button - Watermark

Product List

Blog Hop/Instagram Hop, Fancy Folds, feminine, Handmade Cards, Mini Catalogue and Sale-a-bration (SAB), Mother's Day, Stampin' Up!, Techniques & Tutorials

Colour Creations: Real Red Fancy Fold with Tea Together

9bdc0-34343751_10157403755198098_7101250458500464640_o

Welcome back to another Art With Heart Team Colour Creations weekly Blog Hop. Today we are featuring our 42nd colour; Real Red.

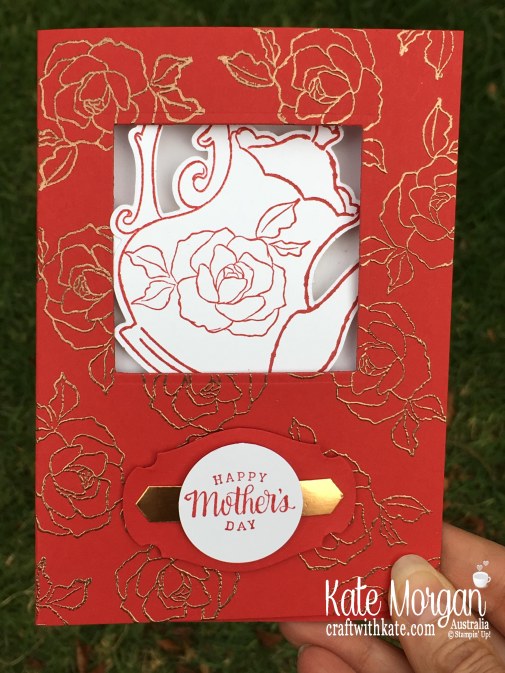
Today’s card was one of the projects at my recent craft class. The front of the card is stamped in Versamark ink multiple times, with Copper Emboss Powder added and heat set with the Heat Tool.

The square window is die cut and the Story Label Punch is used to cut the punched piece behind the sentiment from this scrap square piece of card stock. The Classic Label punch was used with Copper Foil and the sentiment is stamped on White card in Real Red ink and punched out with the circle punch.

Tea Together Mother's Day card for Colour Creations Blog Hop Stampin Up Occasions 2019 by Kate Morgan Australia.

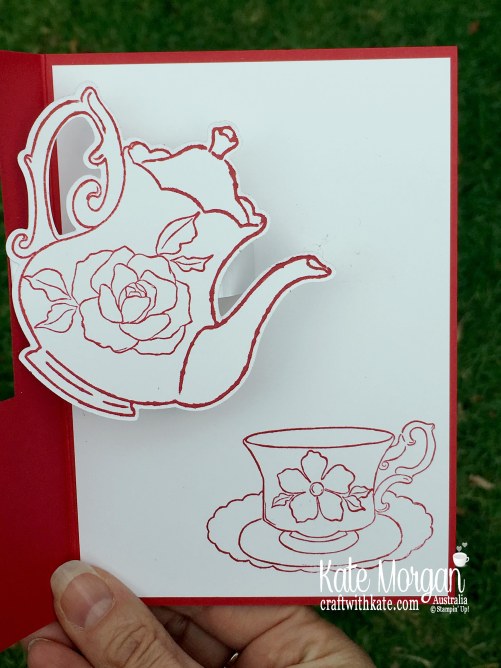
When you open the card, the tea pot is glued to a square hinge that moves as though it’s pouring tea into the cup below! The teapot is stamped using the Mirror Image technique, by using the Stamparatus to stamp the image 3 times onto the Silicone mat, then placing some white card in carefully and stamping the image down again. Carefully remove the card, turn it over and you have the image reversed on the back! Now you can die cut it out using the coordinating framelits.

Tea Together Fancy Fold Mother's Day card for Colour Creations Blog Hop Stampin Up Occasions 2019 by Kate Morgan Australia

Here is another version in Night of Navy & White emboss!

I cased this idea from Cheryl Algie who did a video using a different stamp set Very Vintage.

Head on over to Catherine’s blog where you’ll find the links to other participants.

To purchase these products click on the images below in the product list to take you directly to my online store!


2018-2019 Annual Catalogue ends 3 June 2019
2019 Occasions Catalogue ends 3 June 2019
Be sure to download a PDF copy from my SU Catalogue Library page today.


Don’t forget to Follow My Blog to receive blog updates and join my Newsletter Subscription for all the latest news and specials!
 Happy Stamping,

Blog Signature

Blog Button - Catalogue  Blog Button - Shop   Blog Button - Classes  Blog Button - Join my Team  Blog Button - Watermark

Product List

Blog Hop/Instagram Hop, Designer/Patterned/Specialty Papers (DSP), Easter, Gift Ideas, Kids Cards, Mini Catalogue and Sale-a-bration (SAB), Stampin' Up!, Techniques & Tutorials

Easter Blog Hop for the Art with Heart Team

Easter Blog Hop.jpg

Tonight the Art with Heart team are sharing creative projects with an Easter theme. Don’t forget, Sale-a-bration ends on 31 March! There is still time to earn free product with purchase or even join our Stampin’ Up! team. Ask any of the girls on the hop for more details.

If you’re already hopping, then you just came to me from the talented, Sue Madex. If you’re just joining, great! Use the “next” button at the end of my post to hop all the way around. Blog Hops are full circles, so you can start hopping here and then at the end of each post there is a link to the next one. There is also a list of participants at the end in case of any broken links. Now let’s get started!

My Easter projects tonight have a heavy focus on the soon to retire In Colours 2017-2019.

Stampin’ Up! 2017-2019 In Colours

craftwithkate.com

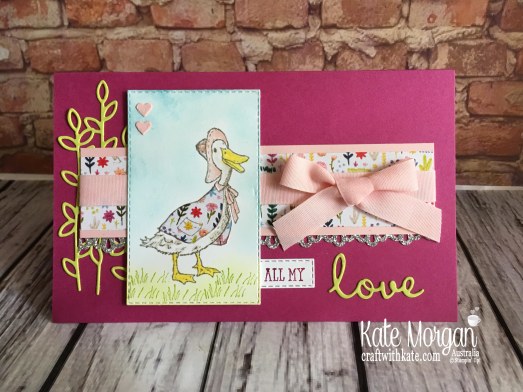
I adore the Fable Friends stamp set and just had to use it for my Easter projects. This card is created using the paper piecing technique. This is where you stamp onto some pretty designer paper and then cut sections of it out and glue to another stamped image. You can see I’ve done it with the ducks jacket and top of her hat! I used the pretty Needlepoint Nook Designer Series Paper. I love the Rectangle stitched framelits and the Silver Glimmer edging was cut with the Decorative Border Punch. The sentiment is created using the Well Said stamp set and coordinating Well Written framelits (purchase these together as the bundle to save 10%).

Easter Blog Hop with Fable Friends Occasions 2019 by Kate Morgan Stampin Up, Australia..jpg

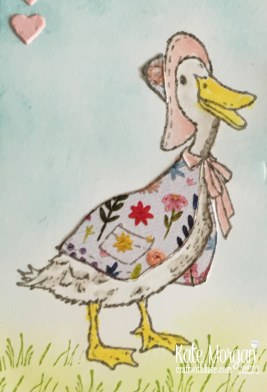
Here’s a closer look!  I used my Blender Pen with the inkpads to add some Gray Granite to her feathers, Pineapple Punch for her beak and feet and Powder Pink for the hat and ribbon around her neck. The grass is stamped with Lemon Lime Twist and then I sponged some of the same colour using a sponge dauber. I also did this for the sky with Balmy Blue ink.

Easter Blog Hop with Fable Friends, Paper Piecing, Occasions 2019 by Kate Morgan Stampin Up, Australia

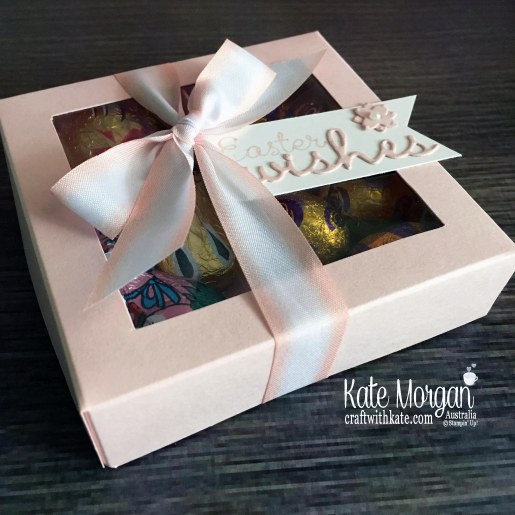
My next project is a Divided Gift Box with 3 sections in it and a window in the top to entice you inside!  The tag was simply created using the Well Said bundle as used in the first project. I had to tie some of this gorgeous variegated ribbon around it too.

Divided Easter Treat Box by Kate Morgan Stampin Up Australia..JPG

Ooh and look what’s inside?!!! I mean, who doesn’t love a little chocolate treat at this time of year?!!!

Divided Easter Treat Box open by Kate Morgan Stampin Up Australia

What you need to make this box:
Base: 14.5cm x 14.5cm, score at 2.5cm on all 4 side
Lid: 14.8cm x 14.8cm, score at 2.5cm on all 4 side
To cut the window in the centre of the lid, place it in your Stampin’ Trimmer lining the left side at 3.8cm. Lift the cutting arm and move the blade to 3.8cm, place down onto the cardstock and cut to 11cm. Rotate & repeat this on the other 3 sides.
Window Sheet: 9cm x 9cm glue to inside of lid once it’s put together.
Insert 1: 14cm x 9.3cm, score at 4.5cm, 7cm, 9.5cm
Insert 2: 14cm x 4.5cm, score at 4.5cm, 7cm, 9.5cm

Thanks for visiting tonight. A full list of products can be found at the end of the post.


Don’t forget to email me at craftwithkate@live.com.au to request your copy of a Catalogue or to ask about joining the Art With Heart team.

Now it’s time to follow the blog hop to our next participant, the lovely, Ros Davidson.

AWHT Blog Hop Next blog button

If you find a broken link or have come to this blog hop from a different entry point, you can view the participants below.

  1. Catherine Proctor
  2. Caroline Manwaring 
  3. Sue Madex
  4. Kate Morgan
  5. Ros Davidson
  6. Kathryn Mangelsdorf
  7. Rachel Palmieri
  8. Rebecca Jacovou
  9. Judy May
  10. Rachel Woollard 
  11. Christina Barnes
  12. Tina Gillespie 
  13. Vicki Boucher 

Happy Hopping!

Blog Signature

Product List

Birthday, Designer/Patterned/Specialty Papers (DSP), feminine, Gift Ideas, Mini Catalogue and Sale-a-bration (SAB), Stampin' Up!, Techniques & Tutorials

Gift Purse with Belly Band with instructions

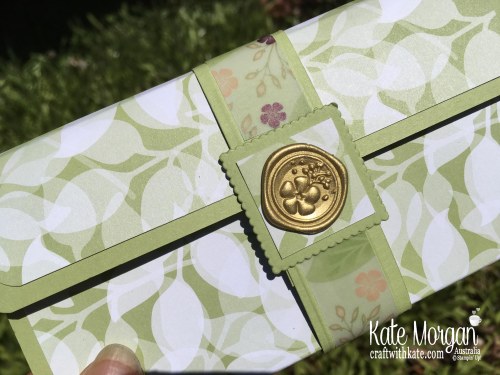
Tonight, I have the cute gift purse with Belly Band closure that I shared with you for our last Blog Hop, but I didn’t provide instructions at the time in such a long post. So here is a refresher on the purse with my tutorial (Australian measurements) at the end of the post.

Gift Purse using Stampin Up Floral Romance DSP Occasions 2019 by Kate Morgan Australia

Gift Purse using Stampin Up Floral Romance DSP Occasions 2019 by Kate Morgan Australia.

How beautiful are these wax seals? Perfect embellishment for the centre of the Belly Band!

Gift Purse using Stampin Up Floral Romance DSP Occasions 2019 by Kate Morgan Australia

and our notes fit perfectly inside!

img_9987

Here’s a copy of my PDF written Gift Purse Tutorial! If you make one, I would love your feedback and to see your design, however please give credit where credit is due if you post yours on social media xx

To purchase these products click on the images below in the product list to take you directly to my online store!


2019 Saleabration Brochure & 2019 SAB 2nd release brochure ends 31 March 2019
2019 Occasions Catalogue ends 3 June 2019
2018-2019 Annual Catalogue ends 3 June 2019

Be sure to download a PDF copy from my SU Catalogue Library page today.


Don’t forget to Follow My Blog to receive blog updates and join my Newsletter Subscription for all the latest news and specials!

 Happy Stamping,

Blog Signature

Blog Button - Catalogue  Blog Button - Shop   Blog Button - Classes  Blog Button - Join my Team  Blog Button - Watermark

Product List

Birthday, Blog Hop/Instagram Hop, Designer/Patterned/Specialty Papers (DSP), feminine, Handmade Cards, Mini Catalogue and Sale-a-bration (SAB), Stampin' Up!, Techniques & Tutorials

Colour Creations: Petal Pink with Needlepoint Nook Bargello Technique

9bdc0-34343751_10157403755198098_7101250458500464640_o

Welcome back to another Art With Heart Team Colour Creations weekly Blog Hop. Today we are featuring our 36th colour; Petal Pink.

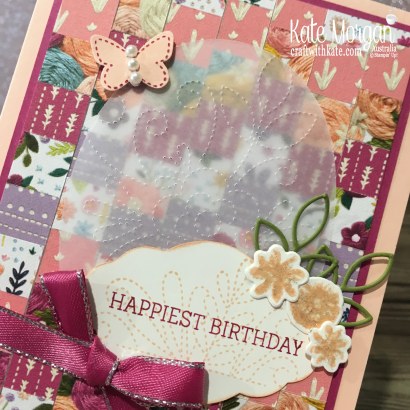
This colour has more of an apricot tone and it is one of the many colours in the Needlepoint Nook Designer Series Paper. I have gone with the Bargello Technique again to create the background. You may have seen me use this Technique in last Friday’s post.

My Colour Combination is: Petal Pink, Berry Burst, Old Olive

Needlepoint Nook Suite Stampin Up Bargello Technique by Kate Morgan Australia, Occasions 2019.JPG

I die cut a Vellum oval and embossed it with the Needlepoint Elements Framelit. I did this so it didn’t totally hide that gorgeous Bargello background.

needlepoint nook suite stampin up bargello technique by kate morgan australia, occasions 2019.

Head on over to Catherine’s blog where you’ll find the links to other participants.

To purchase these products click on the images below in the product list to take you directly to my online store!


2019 Saleabration Brochure & 2019 SAB 2nd release brochure ends 31 March 2019
2019 Occasions Catalogue ends 3 June 2019
2018-2019 Annual Catalogue ends 3 June 2019

Be sure to download a PDF copy from my SU Catalogue Library page today.


Don’t forget to Follow My Blog to receive blog updates and join my Newsletter Subscription for all the latest news and specials!

 Happy Stamping,

Blog Signature

Blog Button - Catalogue  Blog Button - Shop   Blog Button - Classes  Blog Button - Join my Team  Blog Button - Watermark

Product List

Designer/Patterned/Specialty Papers (DSP), Handmade Cards, Kids Cards, Mini Catalogue and Sale-a-bration (SAB), Stampin' Up!, Techniques & Tutorials

Bargello Technique with Fable Friends & All My Love DSP

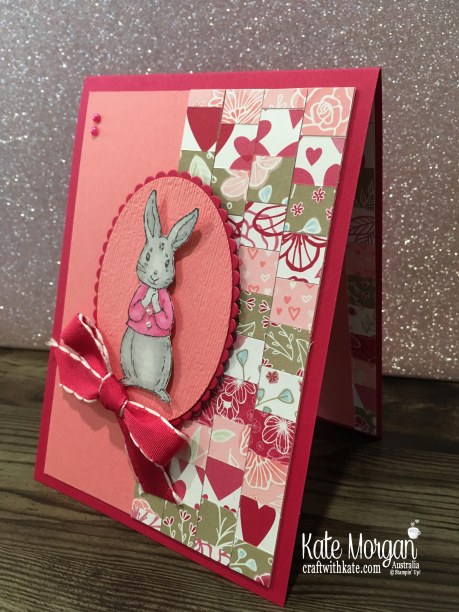
Today, my card uses some left over strips from the Bargello Technique from an ATC card swap share I took part in during January with the Art With Heart Team.

How stunning is this colour combination of Flirty Flamingo, Lovely Lpstick and White?!!!

Fable Friends Bargello Technique by Kate Morgan Stampin Up Australia 2019 Occasions.JPG

I stamped the bunny from the Fable Friends stamp set in Memento black ink and coloured her using Stampin’ Blends markers. I cut her out with paper snips and popped her up on dimensionals on the layering ovals. I added two little pearls to her coat. Isn’t she the cutest?!!!

fable friends bargello technique by kate morgan stampin up australia 2019 occasions.

The pearls in the top corner were coloured with the Lovely Lipstick Stampin’ Blends to coordinate with the card. I adore this Lovely Lipstick ribbon which is part of the All My Love Combo pack.

fable friends bargello technique by kate morgan stampin up australia, 2019 occasions

Click here to see how to create your own Bargello Technique!

To purchase these products click on the images below in the product list to take you directly to my online store!

2019 Saleabration Brochure & 2019 SAB 2nd release brochure ends 31 March 2019
2019 Occasions Catalogue ends 3 June 2019
2018-2019 Annual Catalogue ends 3 June 2019

Be sure to download a PDF copy from my SU Catalogue Library page today.


Don’t forget to Follow My Blog to receive blog updates and join my Newsletter Subscription for all the latest news and specials!

 Happy Stamping,

Blog Signature

Blog Button - Catalogue  Blog Button - Shop   Blog Button - Classes  Blog Button - Join my Team  Blog Button - Watermark

Product List