Birthday, Designer/Patterned/Specialty Papers (DSP), feminine, Flowers, Handmade Cards, Stampin' Up!

Magnolia Blooms in Shimmer White

Tonight’s card is using the Magnolia Blooms stamp set which can be found in the Beginner Brochure and it also coordinates with the Magnolia Suite in the Annual catalogue. This card is reasonably simple to create with a couple of layers of Designer paper adhered to a card base of Petal Pink.

The sentiment is stamped in Memento Black ink and a small piece of ribbon added above it. The flower is stamped in Versamark ink on Basic Black card, Shimmer White Emboss Powder added and heat set with the Heat Tool and watch the magic happen!

Magnolia Blooms in Shimmery White Emboss powder Stampin Up by Kate Morgan, Australia 2019

Can you see that gorgeous Shimmer White Embossing Powder sparkling?!!! Oh my gosh, it looks even better in real life, just stunning. I cut out the image with Paper Snips and popped it up on some dimensionals so it really stands out.

Magnolia Blooms in Shimmery White Emboss powder Stampin Up by Kate Morgan, Australia 2019.

Sit this card on the mantle and in the evening with the light hitting that shimmering magnolia flower, you won’t be able to take your eyes off it!!!

Do yourself a favour and add this Shimmer White Emboss Powder to your next order, you won’t be disappointed (link below)!


2019-2020 Annual Catalogue ends 2 June 2020

Holiday catalogue coming soon (4 September 2019)

Be sure to download a PDF copy from my SU Catalogue Library page today.


Don’t forget to Follow My Blog to receive blog updates and join my Newsletter Subscription for all the latest news and specials!

 Happy Stamping,

Blog Signature

Blog Button - Catalogue  Blog Button - Shop   Blog Button - Classes  Blog Button - Join my Team  Blog Button - Watermark

Product List

Birthday, Designer/Patterned/Specialty Papers (DSP), Handmade Cards, Kids Cards, Masculine, Stampin' Up!, Techniques & Tutorials

Masculine Trifold card to sail home

Tonight’s card is a fancy trifold card using the Sailing Home bundle. Purchase this stamp set and coordinating dies together and save 10%.

don’t you just love these colours together? I sure do and they are Night of Navy, Balmy Blue and Smoky Slate and a Soft Suede wheel!

Trifold card using Stampin Up Sailing Home Bundle by Kate Morgan, Australia, 2019 Fancy Folds

I love using Designer paper as the card base. When they are double sided, you want to show off both sides of the paper and this is a great fold to do this. Don’t you agree?

Trifold card using Stampin Up Sailing Home Bundle by Kate Morgan, Australia, 2019 Fancy Folds open

I popped up the lighthouse and the anchor on dimensionals for added depth and tied a little piece of twine through the anchor.

Trifold card using Stampin Up Sailing Home Bundle by Kate Morgan, Australia, 2019, Fancy Folds

This card was inspired by Jackie Bolhuis however, I used different measurements. You can see her video here.

What I used:
Come Sail Away DSP – 6″ x 12″, score at 1¾”, 4¾”, 7¾”.
Whisper White card – 2¾” x 4″ and 3¾” x 5½”
Balmy Blue card – 2⅞” x 4⅛”

The full list of products are at the end of this post.


2019-2020 Annual Catalogue ends 2 June 2020

Be sure to download a PDF copy from my SU Catalogue Library page today.


Don’t forget to Follow My Blog to receive blog updates and join my Newsletter Subscription for all the latest news and specials!

 Happy Stamping,

Blog Signature

Blog Button - Catalogue  Blog Button - Shop   Blog Button - Classes  Blog Button - Join my Team  Blog Button - Watermark

Product List

Birthday, Handmade Cards, Kids Cards, Stampin' Up!

Yikes, a teenager in the house!

Thirteen years ago my first born arrived (after a 30+ hour labour and 9lbs) into our home turning us into a family!

I cannot believe where the time has gone, but she has been such a joy and gorgeous girl, growing into an amazing teenager. Her favourite colour is Aqua and she is not a girly, girl who likes dresses, pink or sparkles. So today’s card has been quite challenging to create.

All I knew was I needed to start with the colour palette and put 13 somewhere on the card. I got out Soft Sea Foam, Mint Macaron, Coastal Cabana, Bermuda Bay & Pretty Peacock and thought about doing an ombre effect.

I grabbed the Piece of Cake stamp set…. I mean, who doesn’t like cake for their birthday, right?!!!

13th Birthday Card using Stampin Up Piece of Cake by Kate Morgan, Australia 2019  Handmade.JPG

To line up all those 13 cakes, yep, I managed to stamp 13 cakes, did you count them?!! The Stamparatus was the tool to use, because it was the perfect size for the clear plates to move across one notch at at time and re-stamp again and again.

Once I had stamped all those cakes and cut the white card to size, I die cut the numbers into the centre of the cake tower. I layered up the base card of Pretty Peacock, with a layer of the Noble Peacock Foil and then glued the white card front to it. The numbers were left out and Mini dimensionals were used, doubled up for the height, and added so that the foil could shine through.

13th Birthday Card using Stampin Up Piece of Cake by Kate Morgan, Australia 2019  Handmade..JPG

I finished by adding some Wink of Stella to the numbers as well as the cake at the top!

A full list of products can be found at the end of this post!


2019-2020 Annual Catalogue ends 2 June 2020

Be sure to download a PDF copy from my SU Catalogue Library page today.


Don’t forget to Follow My Blog to receive blog updates and join my Newsletter Subscription for all the latest news and specials!

 Happy Stamping,

Blog Signature

Blog Button - Catalogue  Blog Button - Shop   Blog Button - Classes  Blog Button - Join my Team  Blog Button - Watermark

Product List

Birthday, Blog Hop/Instagram Hop, feminine, Flowers, Handmade Cards, Kids Cards, Stampin' Up!, Sympathy, Techniques & Tutorials

Simple Stamping for the AWHT Blog Hop

Simple Stamping Blog Hop.jpg

Tonight the Art with Heart team are sharing creative projects featuring Simple Stamping, which means our projects feature only paper, stamps and ink. It’s a great way to create a quick and easy card for new stampers or for when you need a card at short notice. These projects highlight how Stampin’ Up! ink, paper and card stock coordinates perfectly.

If you would like a copy of the 2019 – 2020 annual catalogue, contact any of the girls on the blog hop and we will get in touch with you.

If you’re already hopping, then you just came to me from the lovely, Christina Barnes. If you’re just joining, great! Use the “next” button at the end of my post to hop all the way around. Blog Hops are full circles, so you can start hopping here and then at the end of each post there is a link to the next one. There is also a list of participants at the end in case of any broken links.

Now let’s get started!

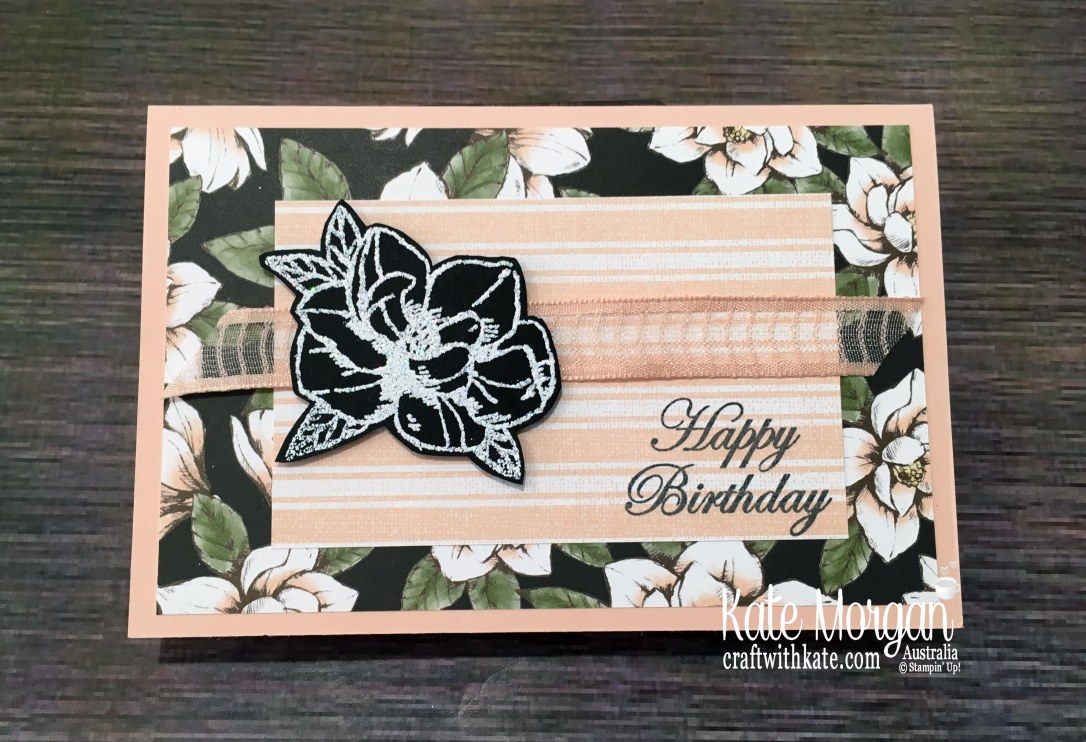
Card 1: This doesn’t have a lot of stamping, just the one sentiment stamped onto vellum, but it showcases some of the stunning Designer papers Stampin’ Up! produce. Just one piece of DSP cut twice evenly and glued to the card. A very simple way to use stamps, ink & paper!

Simple Stamping using Stampin Up Beautiful Friendship & See a Silhouette DSP by Kate Morgan, Australia 2019.JPG

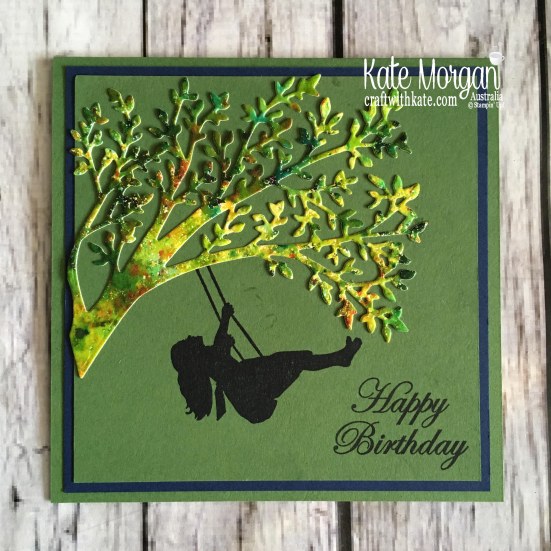
Card 2: created using the Clear Stamp Block ‘E’ as a stamp, pressing it directly onto the stamp pad. I used Daffodil Delight in the centre and then added Balmy Blue at one end and Pear Pizzazz at the other. Then I spritzed it with some water before stamping the block directly onto the Shimmery White card.

Simple Stamping using Stampin Up Silhouette Scenes & Colourful Seasons by Kate Morgan, Australia 2019

While waiting for this to dry, go ahead and fold your Pear Pizzazz card base in half and add a layer of Basic Black card. Now that the ink has dried, stamp the branch & flowers (Colourful Seasons stamp set) and the girl on the swing and sentiment (Silhouette Scenes stamp set) all in Memento Black ink. Glue this layer to the card.

Don’t you just love swinging on a swing? This was one of my “perfect places to be” when I was a kid!!!

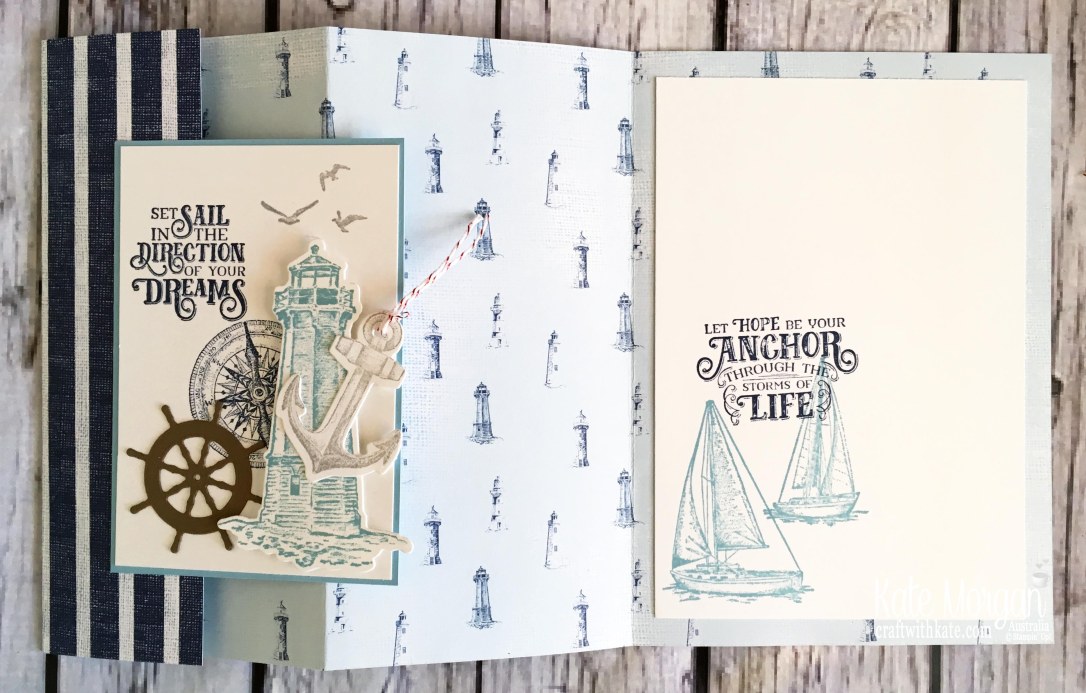
Card 3: uses the gorgeous stamp sets, Beautiful FriendshipI had a piece of paper in the shape of an oval sitting on my desk, so I placed it in the centre of the card and stamped the floral images around it, creating that central focus point.

Simple Stamping using Stampin Up Beautiful Friendship & Kindness & Compassion by Kate Morgan, Australia 2019.

Then I stamped the sentiment using the new Kindness & Compassion stamp set.

Simple Stamping using Stampin Up Beautiful Friendship & Kindness & Compassion by Kate Morgan, Australia 2019

Cards 4&5: are some Thank you cards for my daughter’s netball coaches. Their team are called the ‘Roses’, so I thought Beautiful Friendship was the perfect stamp set to use. The images are stamped in Petal Pink, Flirty Flamingo, Purple Posy, Granny Apple Green for the leaves, sentiment and card base.

Simple Stamping using Stampin Up Beautiful Friendship & Love What You Do by Kate Morgan, Australia 2019.JPG

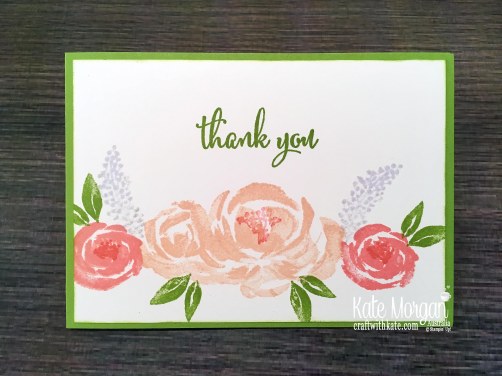
I adore this one with the roses stamped in Mango Melody and Calypso Coral. The other colours are the same as the previous card. The sentiment is from the

Simple Stamping using Stampin Up Beautiful Friendship & Love What You Do by Kate Morgan, Australia 2019..JPG

It certainly was a challenge to create SIP (stamps, ink & paper) cards, but they can be just as effective! Why don’t you give them a go?!!!

A full list of products can be found at the bottom of this post.

Now it’s time to follow the blog hop to our next participant, the talented, Rachel Palmieri.

AWHT Blog Hop Next blog button

If you find a broken link or have come to this blog hop from a different entry point, you can view the participants below.

  1. Tina Gillespie
  2. Kathryn Ruddick
  3. Rebecca Jacovou
  4. Rachel Woollard
  5. Sharon Davern
  6. Vicki Boucher
  7. Christina Barnes
  8. Kate Morgan
  9. Rachel Palmieri
  10. Ros Davidson
  11. Catherine Proctor

Happy Hopping!

Blog Signature

Card 1:
Stamp : Beautiful Friendship Photopolymer Stamp Set
Ink : Blackberry Bliss Classic Stampin’ Pad
Card Stock : See A Silhouette Designer Series Paper , Poppy Parade A4 Cardstock , White Vellum A4 Card Stock

Card 2:
Stamp : Silhouette Scenes Cling Stamp Set , Colorful Seasons Photopolymer Stamp Set
Ink : Daffodil Delight Classic Stampin’ Pad , Balmy Blue Classic Stampin’ Pad , Pear Pizzazz Classic Stampin’ Pad , Tuxedo Black Memento Ink Pad
Card Stock : Basic Black A4 Card Stock , Card Stock A4 Pear Pizzazz , Shimmery White A4 Card Stock
Tools & Adhesive : Clear Block E

Card 3:
Stamp : Beautiful Friendship Photopolymer Stamp Set , Kindness & Compassion Cling-Mount Stamp Set , Purple Posy Classic Stampin’ Pad
Ink : Petal Pink Classic Stampin’ Pad , Flirty Flamingo Classic Stampin’ Pad , Granny Apple Green Stampin’ Pad
Card Stock : Whisper White A4 Card Stock , Flirty Flamingo A4 Cardstock

Cards 4&5:
Stamp : Beautiful Friendship Photopolymer Stamp Set , Love What You Do Photopolymer Stamp Set , Purple Posy Classic Stampin’ Pad
Ink : Petal Pink Classic Stampin’ Pad , Flirty Flamingo Classic Stampin’ Pad , Granny Apple Green Stampin’ Pad , Mango Melody Classic Stampin’ Pad
Card Stock : Calypso Coral A4 Card Stock , Whisper White A4 Card Stock , Granny Apple Green A4 Cardstock

Birthday, feminine, Handmade Cards, Kids Cards, Stampin' Up!

Silhouette Birthday Sprinkled with Pigment!

Tonight I have used the new Pigment Sprinkles and created a real mess 🤣

Pigment Sprinkles


I began with some of the new Fluid 100 watercolour paper, added some sprinkles and spritzed with water…. wow, does it take you by surprise with the brightness of the colours, amazing! I put it aside and while waiting for it to dry, I got out the Silhouette Scenes bundle, Garden Green and Night of Navy cardstock and got started creating the card.

I knew I was going to die cut the tree from the watercolour paper so I worked out where I was going to stamp the image of the girl on the swing and place the sentiment (Magnolia Blooms). I did this in Night of Navy ink using the Stamparatus, so I could re-ink the images multiple times for a darker image.

Silhouette Scenes Bundle using Stampin Up Pigment Sprinkles by Kate Morgan, Australia, 2019 Handmade Birthday Card.JPG

Once the watercolour paper was dry, I die cut it with the tree die and glued it to the card. Check out the colours on it – you couldn’t get that sort of colouring without these pigment sprinkles. You need to get them and play, but a little tip, buy some disposable gloves!!!

Silhouette Scenes Bundle using Stampin Up Pigment Sprinkles by Kate Morgan, Australia, 2019 Handmade Birthday Card.

Measurements:
5″ x 10″ Garden Green card base, folded in half
4¾” x 4¾” Night of Navy
4½” x 4½” Garden Green

Have you tried any of these products yet? If not, make sure you add them to your list today by clicking the images at the bottom of this post!


2019-2020 Annual Catalogue ends 2 June 2020

Be sure to download a PDF copy from my SU Catalogue Library page today.


Don’t forget to Follow My Blog to receive blog updates and join my Newsletter Subscription for all the latest news and specials!

 Happy Stamping,

Blog Signature

Blog Button - Catalogue  Blog Button - Shop   Blog Button - Classes  Blog Button - Join my Team  Blog Button - Watermark

Product List

Birthday, Handmade Cards, Masculine, Stampin' Up!, Techniques & Tutorials, Watercolour

Slider card and Smooshing with watercolour technique with Instructions

Tonight I have a couple of techniques with some watercolour smooshing and a slider card!

I taught this to my class ladies earlier this month and they loved it. It’s always great having a masculine themed class and we focused on this bundle mainly. It reminded me that I must do more masculine themed classes in the future.

To create the watercolour background, I put a couple of drops of re-inker, reasonably close together onto a sheet of acetate, spritzed it with water and then lay the Fluid 100 watercolour paper on top and gently pressed down with the finger tips (don’t rub). You don’t want the colours to mix together, just gently blend. You may need to place the paper down again so you cover the entire piece, as the excess we cut away, will be used later. I then put this aside to dry while I stamped the images and the inside of the card.

Slider card & Smooshing Technique using Stampin Up Sailing Home Bundle by Kate Morgan, Australia, 2019.

The lighthouse is stamped in Soft Suede and coloured with Crumb Cake Stampin’ Blends Combo pack to get the darker and lighter shading. The boats are stamped in Night of Navy ink and coloured with Combo Blends of So Saffron and Poppy Parade. I added some Wink of Stella to the water below the boats rather than colouring it.

Slider card & Smooshing Technique using Stampin Up Sailing Home Bundle by Kate Morgan, Australia, 2019

On the inside I stamped the sentiment, add a Copper Foil anchor and the rope is part of the leftover pieces from the excess watercolour paper! The straight piece of rope is from the slider mechanism from the front!!!

Slider card & Smooshing Technique using Stampin Up Sailing Home Bundle by Kate Morgan, Australia 2019

To create the slider card mechanism:slider card mechanism.JPG

Score 2 lines on card, punch 2 circles with lines through the centre. Fold them into a taco shape. Place glue on the bottom of one and glue them together to create the H shape.

Cut the watercolour piece down to the size you require and die cut the rope die across the front where you want the sliding sailing boat to be. With the strip of left over water-coloured paper, glue this to the card base behind where the die-cut rope was so it still looks great and not having the Navy card show through. I did this by placing the paper down the watercolour paper roughly where I wanted it centred on the card and used a pencil to mark on the card base, either end of the rope, as a guide.

Add glue to the flat side and adhere to the larger sailing ship, ensuring that it is the right orientation (scorelines horizontal). Slide this into the slot so each side is facing toward the top and bottom of the card. It is easiest to do this step before you adhere the front panel to the card base. I used Adhesive Foam Strips around the edges of the watercolour layer and then two more strips either side of the mechanism, but ensure you allow enough space for the circles to slide along.

slider card mechanism.

This is not a spinner card, but a slider card, as I didn’t want the sailing boat doing circles on the ocean. If you want it to spin, you would use some washers from the hardware store joined together by a mini dimensional.

I hope these instructions make sense.


2019-2020 Annual Catalogue ends 2 June 2020

Be sure to download a PDF copy from my SU Catalogue Library page today.


Don’t forget to Follow My Blog to receive blog updates and join my Newsletter Subscription for all the latest news and specials!

 Happy Stamping,

Blog Signature

Blog Button - Catalogue  Blog Button - Shop   Blog Button - Classes  Blog Button - Join my Team  Blog Button - Watermark

Product List

Birthday, Fancy Folds, Kids Cards, Stampin' Up!

Metallic Pull Tab Slider Card

Tonight, I’m sharing a Slider card with a pull tab, using some new products from the Annual catalogue; Heirloom Frames dies and 3D embossing folder with the Noble Peacock Foil sheets!

Pull Tab Slider Card using Stampin Up Heirloom Frames, Peacock Foil, Piece of Cake  by Kate Morgan, Australia 2019.JPG

Pull the tab to reveal a hidden message

Pull Tab Slider Card using Stampin Up Heirloom Frames, Peacock Foil, Piece of Cake by Kate Morgan, Australia 2019 open

On the inside of the card, add another lovely sentiment in coordinating colours.

Pull Tab Slider Card using Stampin Up Heirloom Frames, Peacock Foil, Piece of Cake by Kate Morgan, Australia 2019 inside

Would you give this technique a try? Just google Slider cards and you’ll find loads of videos. No point me reinventing the wagon!!!

A full list of products is at the bottom of this post.


2019-2020 Annual Catalogue ends 2 June 2020

Be sure to download a PDF copy from my SU Catalogue Library page today.


Don’t forget to Follow My Blog to receive blog updates and join my Newsletter Subscription for all the latest news and specials!

 Happy Stamping,

Blog Signature

Blog Button - Catalogue  Blog Button - Shop   Blog Button - Classes  Blog Button - Join my Team  Blog Button - Watermark

Product List

Birthday, Designer/Patterned/Specialty Papers (DSP), feminine, Flowers, Handmade Cards, Stampin' Up!

Colour Creations: Purple Posy Fancy Fold

AWH Colour Creations Blog Hop

Here we are at the end of the AWHT Colour Creations Blog Hops showcasing every Stampin’ Up! colour, ending with the 5th new In Colour; Purple Posy.

This is a centre step fold card using the Floral Essence Bundle (stamp set and punch) and Perennial Essence Designer Series Paper.

Floral Essence in Purple Posy handmade card, Stampin Up Australia by Kate Morgan..JPG

I love a bundle; not only does it save you 10% purchasing the 2 products together, but punch bundles make it very affordable and easy to use without the added expense of a die cutting machine.

Floral Essence in Purple Posy handmade card, Stampin Up Australia by Kate Morgan

and the inside looks like this:

Floral Essence in Purple Posy handmade card, Stampin Up Australia by Kate Morgan inside

Because this is the final Colour Creations blog hop, I’ve made a second card!

This one uses the Beautiful Friendship stamp set. The front of the card is quite simply stamped on whisper white cardstock, some Purple Tricolour ribbon wrapped around, layered on top of some Petal Pink card embossed with the Subtle dynamic TIEF on a Purple Posy card base.

Beautiful Friendship feminine card by Kate Morgan, Australia, 2019 Colour Creations Purple Posy.

My colours are: Purple Posy, Highland Heather, Soft Sea Foam, Flirty Flamingo & Petal Pink.

The inside of the card is also stamped to reflect a couple of the same images from the front of the card.

Beautiful Friendship feminine card by Kate Morgan, Australia, 2019 Colour Creations, Purple Posy

A big thank you to Catherine for hosting the 55 weekly Colour Creations blog hops xx

Head on over to Catherine’s blog where you’ll find the links to other participants.


2019-2020 Annual Catalogue ends 2 June 2020

Be sure to download a PDF copy from my SU Catalogue Library page today.


Don’t forget to Follow My Blog to receive blog updates and join my Newsletter Subscription for all the latest news and specials!

 Happy Stamping,

Blog Signature

Blog Button - Catalogue  Blog Button - Shop   Blog Button - Classes  Blog Button - Join my Team  Blog Button - Watermark

Product List: Project 1

Product List: Project 2

Birthday, Blog Hop/Instagram Hop, Designer/Patterned/Specialty Papers (DSP), feminine, Handmade Cards, Handy Tips, Memory Keeping/Project Life/Scrapbooking, Stampin' Up!

Blog Hop: In Colours 2018-2021

Blog Hop InColour

Tonight the Art with Heart team are sharing creative projects featuring In Colour theme. Check out the new 2019-2021 In Colours and lets not forget the current 2018-2020 In Colours.

If you would like a copy of the 2019-2020 Annual Catalogue, contact any of the girls on the blog hop and we will get in touch with you.

If you’re already hopping, then you just came to me from the talented, Ros Davidson. If you’re just joining, great! Use the “next” button at the end of my post to hop all the way around. Blog Hops are full circles, so you can start hopping here and then at the end of each post there is a link to the next one. There is also a list of participants at the end in case of any broken links.

Now let’s get started!

My first project is a 12″ x 12″ Scrapbook page and each of the daisies [Daisy Lane stamp set] in one of the 10 current In Colours. I kept this page very simple in design as I wanted the colours to shine through. The sentiment is stamped in Versamark ink, white emboss powder applied and heat set. I cut it in half with scissors, so I had an even balance above and below the photo. The centres of the daisies is silver glimmer paper and I love that sparkle!

Scrapbook page using Stampin Up Daisy Lane by Kate Morgan AWHT Blog Hop In Colours 2019.JPG

My next project is a card using the Wonderful Moments stamp set and the Mosaic Mood DSP and coloured with Stampin’ Blends Markers. I stamped the image in Soft Suede as it’s not as harsh as the black ink which most people stamp images with.

Tip: when using Stampin’ Blends markers (alcohol markers) you can actually stamp your images using any of the Stampin’ Up! Classic inks (water based).

Mosaic Mood & Wonderful Moments for 60th Birthday by Kate Morgan Stampin Up Australia 2019

This card uses Terracotta Tile as the base and this colour is also in the Mosaic Mood designer papers. Did you see the scallop shaped DSP on the right? I cut around the scallop edge with Paper Snips for extra detail.

The Stampin’ Blends Combo Markers used are: Mint Macaron, Mango Melody, Crumb Cake and Cherry Cobbler.

Mosaic Mood & Wonderful Moments for 60th Birthday by Kate Morgan Stampin Up Australia 2019.

My last project uses the Bird Ballad stamp set, Woven Threads designer series paper and the Heirloom Frames Dies and 3D Embossing folder. The Frame is the new Seaside Spray card with a strip of Rococo Rose card behind layered with some Very Vanilla Scallop Lace Trim.

Bird Ballad meets Heirloom Woven Threads by Kate Morgan Stampin Up Australia 2019 In Colour Blog Hop.JPG

The birds are coloured with Stampin’ Blends Markers and some Wink of Stella applied to the chest of each bird for added sparkle.

Bird Ballad meets Heirloom Woven Threads by Kate Morgan, Stampin Up Australia 2019 In Colour Blog Hop.

A full list of products can be found at the bottom of this post.

Now it’s time to follow the blog hop to our next participant, the lovely, Rachel Woollard.

AWHT Blog Hop Next blog button

If you find a broken link or have come to this blog hop from a different entry point, you can view the participants below.

  1. Rebecca Jacovou
  2. Sharon Davern
  3. Christina Barnes
  4. Tina Gillespie
  5. Vicki Boucher
  6. Ros Davidson
  7. Kate Morgan < you are here >
  8. Rachel Woollard
  9. Catherine Proctor
  10. Kathryn Mangelsdorf
  11. Caroline Manwaring

Happy Hopping!

Blog Signature

Product List

Birthday, Kids Cards, Punch Art, Stampin' Up!

Floating Balloons

I shared this technique on Tuesday in the Terracotta Tile and Mosaic Mood DSP, and this one was a little easier that I taught at my last class.

We just used the Balloon Bouquet Punch in cardstock colours; Crushed Curry, Granny Apple Green, Pacific Point & Poppy Parade.

This was a lovely bright colour scheme to suite either feminine or masculine occasions. Wouldn’t any child love this one?!!

Floating Frame technique using Balloons, Stampin Up by Kate Morgan Australia 2019

Once we had the balloons all stuck down, we covered them with the Wink of Stella for that gorgeous shimmer.

Floating Frame technique using Balloons, Stampin Up by Kate Morgan Australia 2019.

The sentiment is from the Special Celebrations stamp set and inked in Pacific Point.

Floating Frame technique using Balloons, Stampin Up by Kate Morgan, Australia 2019.

Would you like to give this technique a try? Just google Floating Frame Technique and you’ll find loads of videos! No point me reinventing the wagon!!!


2019-2020 Annual Catalogue ends 2 June 2020

Be sure to download a PDF copy from my SU Catalogue Library page today.


Don’t forget to Follow My Blog to receive blog updates and join my Newsletter Subscription for all the latest news and specials!

 Happy Stamping,

Blog Signature

Blog Button - Catalogue  Blog Button - Shop   Blog Button - Classes  Blog Button - Join my Team  Blog Button - Watermark

Product List