Birthday, Blog Hop/Instagram Hop, Designer/Patterned/Specialty Papers (DSP), Fancy Folds, Handmade Cards, Kids Cards, Markers for Colouring, Mini Catalogue and Sale-a-bration (SAB), Stampin' Up!, Techniques & Tutorials

Lost Lagoon: Fancy Fold with Bee Mine & Fluffiest Friends

2023-2024 AWH Colour Creations header

Each week some of the Art With Heart team are joining  the Colour Creations Blog Hop to bring you creative inspiration showcasing our range of 50+ gorgeous Stampin’ Up! colours.

Week 31 – Lost Lagoon

This week, I have a sneak peek of some new Designer Series Paper to be released in the new January-April Mini Catalogue. I am also featuring product from the Online Exclusives, the Fluffiest Friends Bundle. I love this furry bear with his big red pot of golden honey, it just makes me smile and I had a ball colouring it in. But more about that later.

Bee Mine Fluffiest Friends Fancy Fold card Stampin Up Mini catalogue 2024 by Kate Morgan, Australia Online Exclusives 2023

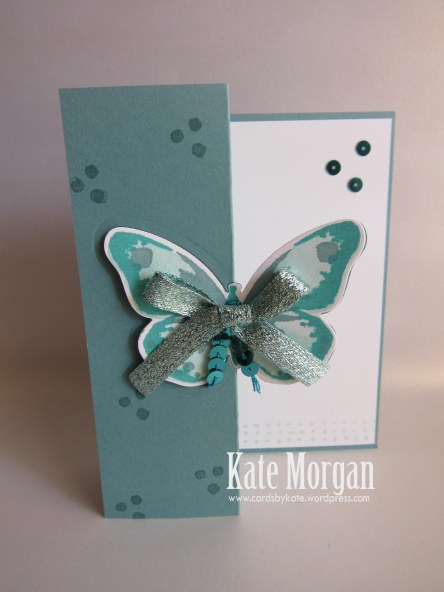
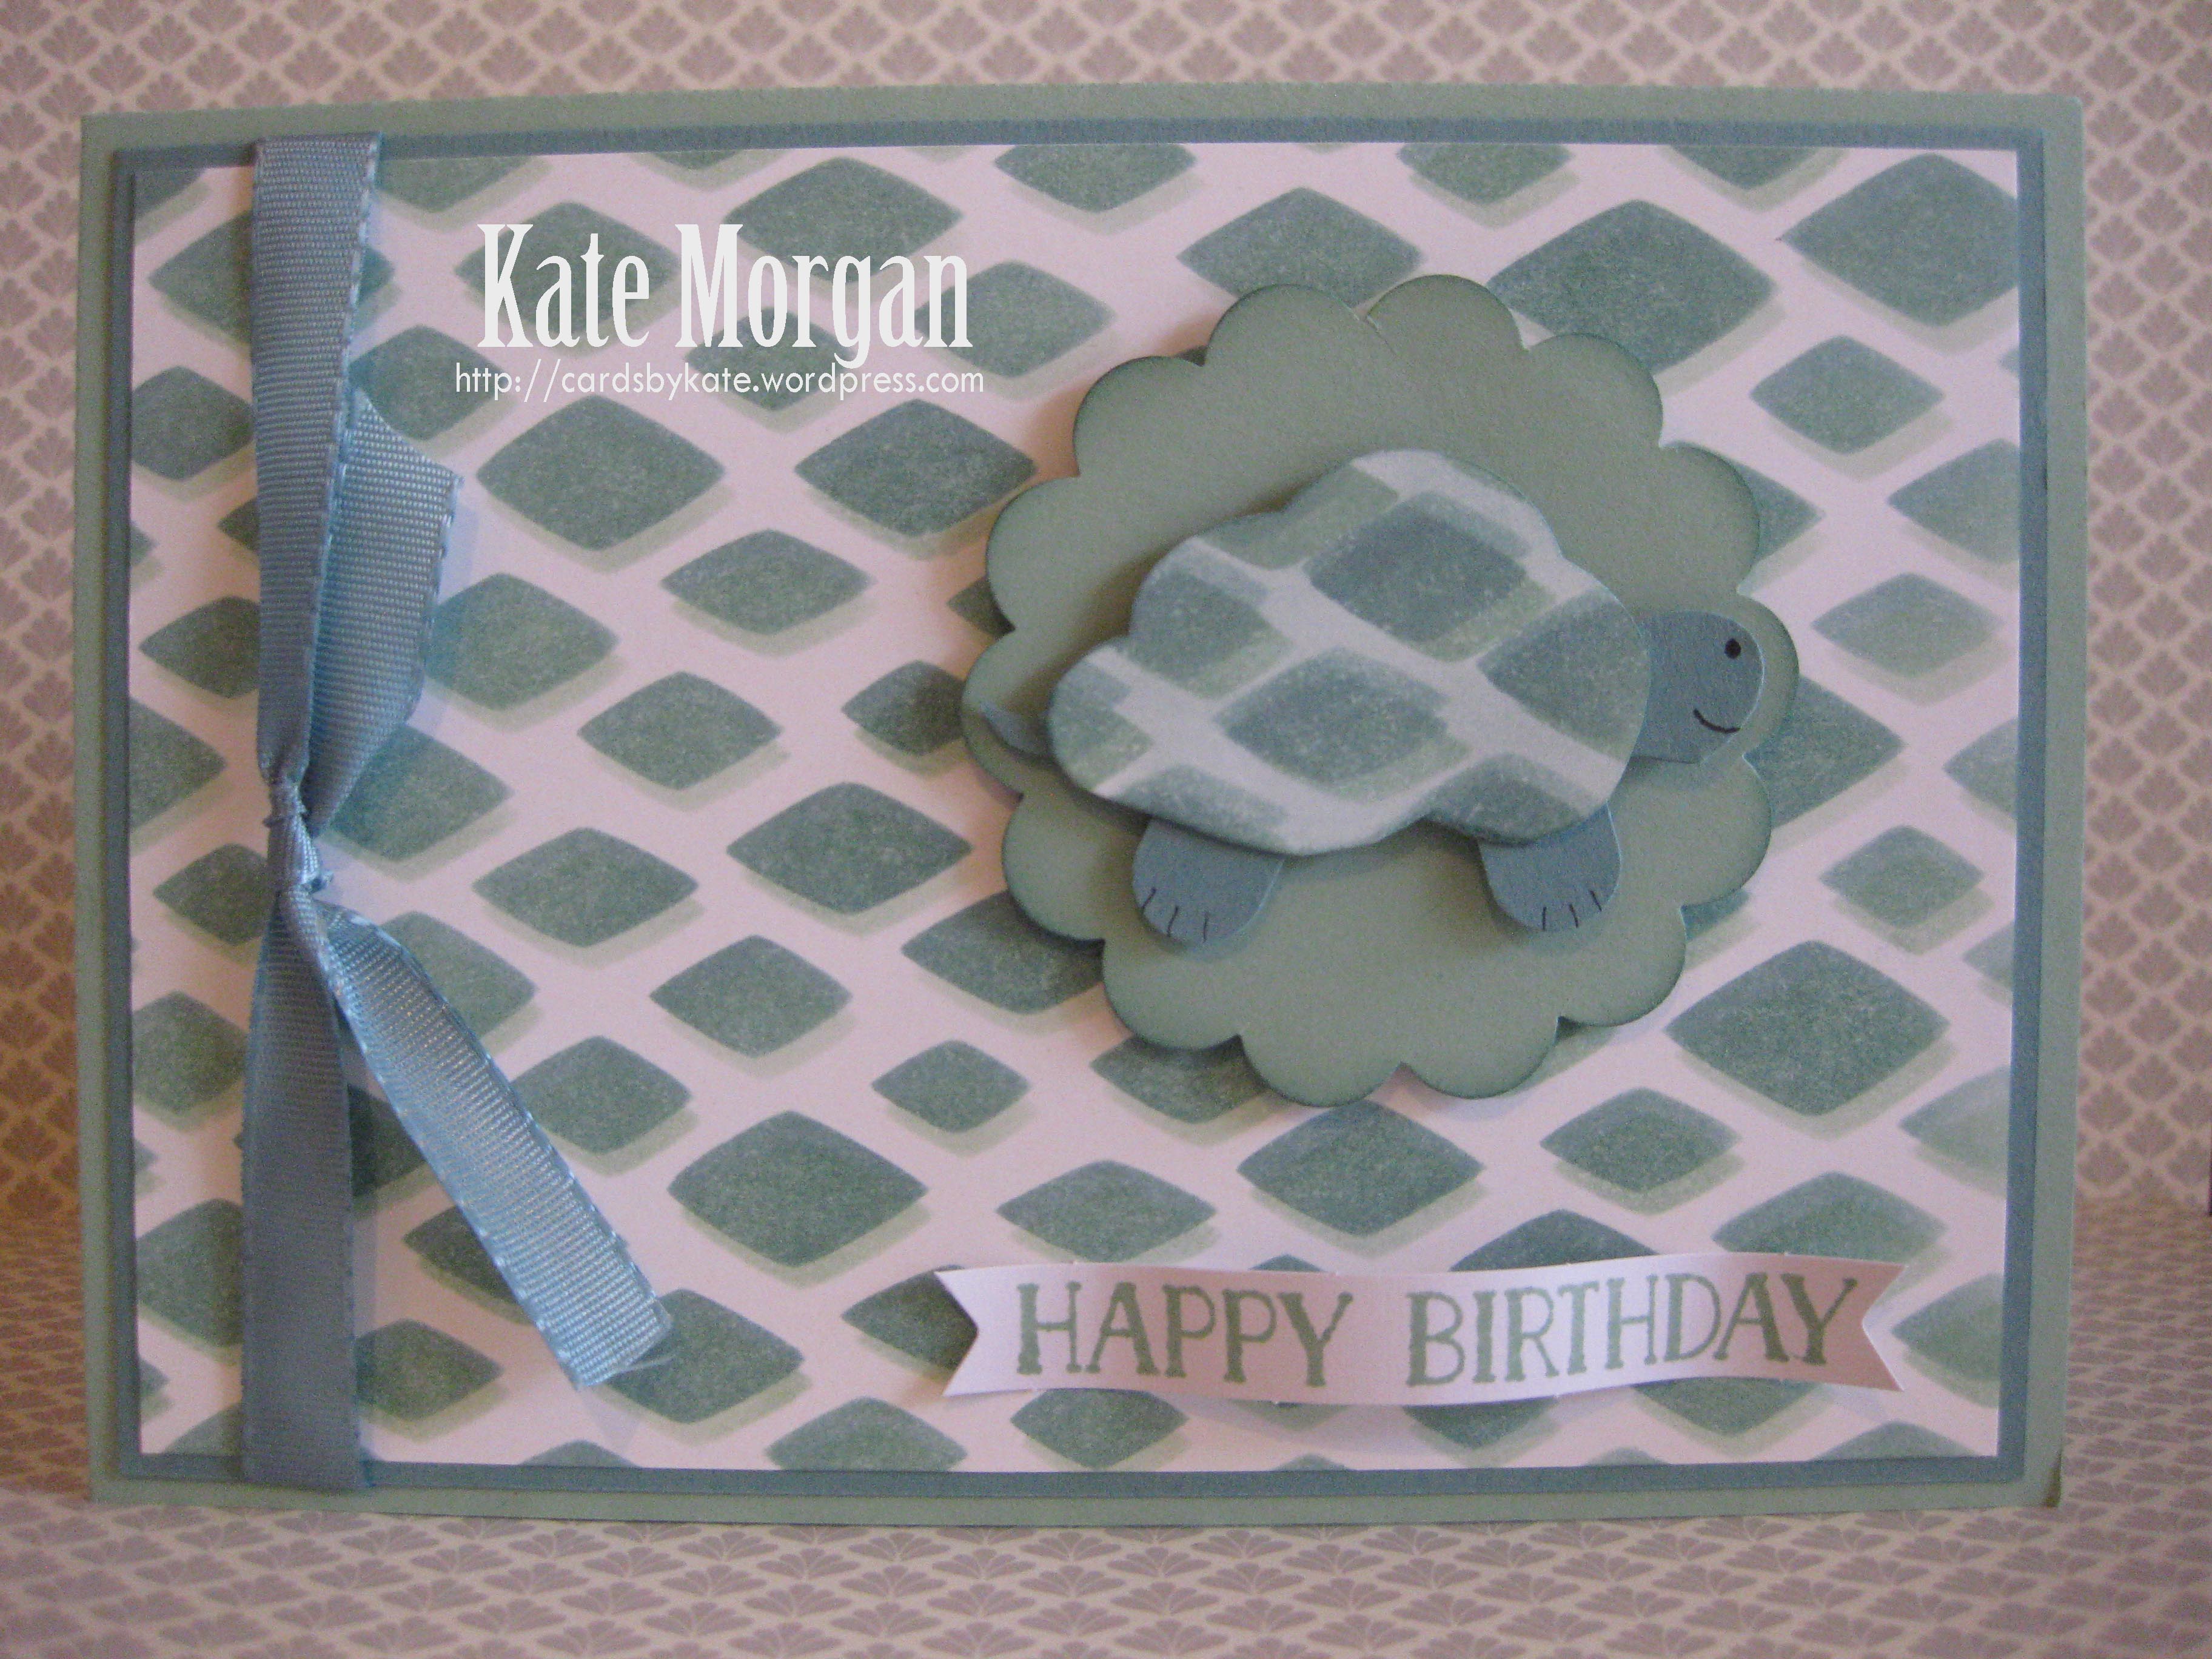
I realise Lost Lagoon isn’t one of the colours in the Bee Mine Designer Series Paper, but I felt it was a great grounding colour.  I embossed a strip and glued it to the left side and two different patterns of the DSP to the right. The Sweet Sorbet Ribbon & bow was added along with some Adhesive-backed Hearts. The sentiment from the Something Fancy stamp set, was stamped and cut with Paper Snips and added on dimensionals.

Bee Mine Fluffiest Friends Fancy Fold card Stampin Up Mini catalogue 2024 by Kate Morgan, Australia Online Exclusives 2023 close

The bear is stamped in Smoky Slate ink and coloured using Blends Combo Markers; Gray Granite (D), Crumb Cake (L, D), Daffodil Delight (L, D), Real Red (L, D).  Then using my 35 year old Derwent Pencils, I added the texture of the fur & surrounds. Alisa Tilsner has a paid class on how to do this, but I definitely need a lot more practise.  I die cut it using the Stylish Shapes die.

Bee Mine Fluffiest Friends Fancy Fold card Stampin Up Mini catalogue 2024 by Kate Morgan, Australia Online Exclusives 2023 standing

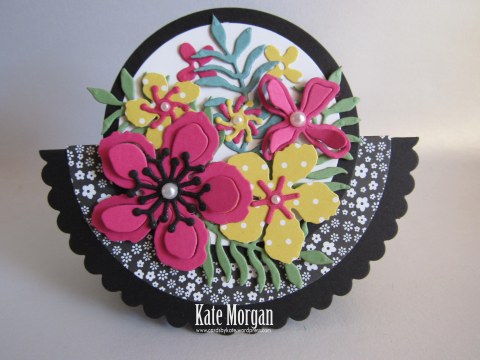
The front and back panels of the card are our standard A5 size. The card is suspended on the centre mechanism that is scored 3 times to have 4 panels. The Scalloped Contour dies were used to cut the 3 white scalloped panels, the white tag and the scallop border where the white tag fits into.  Some more of the DSP is added to the panels and the 3 jars are cut directly from the patterned paper.

Bee Mine Fluffiest Friends Fancy Fold card Stampin Up Mini catalogue 2024 by Kate Morgan, Australia Online Exclusives 2023 fully open

Thanks for dropping by. I hope you join me next Wednesday for inspiration using Melon Mambo.

Please hop across to our next participant and enjoy the wonderful inspiration of Tina Gillespie.

2023-2024 Next blog button AWH Colour creations

If you come across a broken link or have come from a different entry point, a full list of participants can be viewed on Cathy’s blog.

Product List
Stamps: 
Fluffiest Friends, Something Fancy
Dies: Stylish Shapes, Scalloped Contours
Paper: Basic White, Lost Lagoon, Bee Mine DSP
Inks: Smoky Slate, Lost Lagoon
Other: Adhesive-backed Hearts & Flowers, Sweet Sorbet Bordered Ribbon, Tear & Tape, Stampin’ Blends Combo (Crumb Cake, Gray Granite), Basics 3D Embossing Folder, Paper Snips, Multipurpose Glue, Stampin’ Dimensionals, Stampin’ Cut & Emboss Machine, Paper Trimmer, Simply Shammy, Bone Folder, Glue Dots, Derwent Pencils
* can be purchased together as a bundle to save 10%

Shop Online Craft with Kate10-yr-anniversary-badge


Be sure to download a PDF copy of current catalogues from my SU Catalogue Library page.

Don’t forget to Follow My Blog to receive blog updates and join my Newsletter Subscription for all the latest news and specials!

Butterflies, feminine, Stampin' Up!

Butterfly Wings

Dear Crafters,

Today I have a pop through style card. I love butterflies and we have so many to choose from in our current range, but this one is stunning. It is a triple stamp, but it’s photopolymer, so it’s very easy to line them up.

I started with some Lost Lagoon card stock, folding it in half and the the front in half again, but back on itself. Then I die cut the large butterfly framelit but only to the scoreline, as I only wanted the first panel to be cut.

Then I stamped the butterfly two times and cut them out with the coordinating framelits. The first one, I glued to the 2nd panel so the left wing is free through the cut panel.

IMG_5576

You can see I have glued the second butterfly on the inside!

IMG_5578

The next step was to stamp the dots and with Lost Lagoon ink and add some Bermuda Bay sequins. Lastly, I added some Bermuda Bay Sequin trim and a Pool Party Glitter ribbon bow to the butterfly on the front of the card.


What do you think?

All Catalogues, Clearance Rack & Weekly Deals are available online here! They are full of amazing new products and wonderful full colour picture inspiration. It is a must have for anyone interested in Ink, Paper and Stamps!

Shop Online 24/7 for products

Don’t forget to Follow My Blog to receive blog updates and join my Newsletter Subscription for all the latest news and specials!

Enjoy the many perks of being a Demonstrator (even just for yourself as a Hobby Demonstrator) by joining my friendly team, click HERE for details.

Happy Stamping!

Blog Signature-001

feminine, Flowers, Mother's Day, Stampin' Up!

Circle Fancy Fold card

Dear Crafters,

Today I have a circle fold card. I had seen one on a Facebook page that I am a member of, but there were no instructions, so I went about creating my own.

I started by die cutting the large scallop circle framelit from Lost Lagoon card stock and folding it in half. Then I die cut a smaller circle from the 2014-2016 In Colour DSP stack.

IMG_5570

I then die cut smaller circles again out of Lost Lagoon and Whisper White and adhered these together and then onto the bottom fold of the card.

The next step was die cutting all the leaves and flowers using the Botanical Builder Framelits with Lost Lagoon, Mint Macaron, Blushing Bride and So Saffron card stock, glued them together. I added some with dimensionals.

Lastly, I added Wink of Stella to the centres of the flowers, I think you can see it in the photos?! I also added some basic pearls to 2 of the smaller flowers.

IMG_5572

Isn’t this different? I love trying new things and not just our usual A5 cards all the time, but it still fits into our C6 envelopes….bonus!

And here is another one I made in black, white and the brights!

IMG_5584IMG_5585

What do you think?

All Catalogues, Clearance Rack & Weekly Deals are available online here! They are full of amazing new products and wonderful full colour picture inspiration. It is a must have for anyone interested in Ink, Paper and Stamps!

Shop Online 24/7 for products

Don’t forget to Follow My Blog to receive blog updates and join my Newsletter Subscription for all the latest news and specials!

Enjoy the many perks of being a Demonstrator (even just for yourself as a Hobby Demonstrator) by joining my friendly team, click HERE for details.

Happy Stamping!

Blog Signature-001

Birthday, Kids Cards, Punch Art

Turtle time

Dear Crafters,

Today I share a card made using the Happy Patterns Decorative Masks, not only to create my background, but also it reminded me of the shell of a turtle. So that is what I did!

Stampin Up Turtle Happy Patterns

I have used Lost Lagoon and Mint Macaron as my colour scheme. I inked over the mask in the lighter colour first, then slightly moved the mask and inked with the darker shade.

My turtle shell is the Tree Builder punch, his legs and head are the Word Window punch.

Isn’t he just the cutest?!!!!!

Stampin Up Turtle Happy Patterns

Please leave a comment below if you like my card.

All Catalogues, Clearance Rack & Weekly Deals are available online here! They are full of amazing new products and wonderful inspiration. It is a must have for anyone interested in Ink, Paper and Stamps!

Shop Online 24/7 for products

Don’t forget to Follow My Blog to receive blog updates and join my Newsletter Subscription for all the latest news and specials!

Happy Stamping,
Name Banner
Masculine, Techniques & Tutorials

Water Wash By The Tide

Dear Crafters,

Water Wash Technique with By The Tide

Today I share a masculine card created with the Water Wash technique, something I haven’t done a lot of experimenting with, but had some fun in the process.

Most of the cards I have seen using this technique have been feminine cards, so my challenge to myself, was to create a masculine card.

By the Tide

I stamped the images and embossed them all with clear embossing powder and heat set them. This was so that when I added the watercolour over the top, the images didn’t run. I used Pool Party for the first wash over the entire card, then went back and added colour from the bottom with Lost Lagoon. This added the depth to the card. I also added a little (diluted) colour of each of the images over the top and around them to give them a “glow”.

The ink pads I used for the images were: Coral (Versamark & dabbed Calypso Coral), Seahorse (Hello Honey), Fish (Mossy Meadow), Crayfish (Cajun Craze).

By the Tide

I added the splatter by tapping the brush with the Lost Lagoon ink. I used my heat tool to dry it so it didn’t run too much. I stamped happy birthday then used the Word Window punch before attaching it with dimensionals.

I love how this coral has a glow because I used the Versamark ink then dabbed the Calypso Coral over the top before pressing it onto the white watercolour card stock.

Once the card was dry, I also ran the Lost Lagoon Stampin’ Write Marker around the edge of the card, not only to define the border, but also to colour the side edges of the white card. This is a handy tip instead of adding another layer of card stock!

By the Tide

Don’t forget to decorate the inside of your card and your envelope! Do you do this? Because I can never send a card in the mail that has a nude envelope!!!

By the Tide

I would love you to comment below with your thoughts on this card.


Sale-a-bration, 6th January – 31st March 2015

If you wish to place an order between now and the 31st March, you may be entitled to some FREE Sale-a-bation items.

If you order $90 in product, you choose 1 item FREE

If you order $180 in product, you choose 2 items FREE

If you order $300 in product, you choose 3 items FREE and get $50 to spend on anything in any catalogue

If you order $400 in product, you choose 4 items FREE and get $100 to spend on anything in any catalogue

All Catalogues, Clearance Rack & Weekly Deals are available online here! They are full of amazing new products and wonderful inspiration. It is a must have for anyone interested in Ink, Paper and Stamps!

Shop Online 24/7 for products

Don’t forget to Follow My Blog to receive blog updates and join my Newsletter Subscription for all the latest news and specials!

Happy Stamping,

Name Banner

Challenges, JAI, Kids Cards

JAI#220 Sketch Challenge

Hello Crafters,

Today I finally get back into some crafting after a week or two on the sidelines so to speak!

I thought the best way to start, was with a challenge at Just Add Ink. So, the challenge this week is a Sketch Challenge JAI#220.

I am also using 2 of the new 2014-2015 In Colours; Blackberry Bliss, Lost Lagoon, Mossy Meadow, Hello Honey & Tangelo Twist.

My dear sister is pregnant with her 3rd child and already has two girls, so when they found out she was having a boy, I almost went in to melt down! This will be the 5th grandchild, but the first boy, on my side of the family.

Baby We've Grown

So I need loads of practice with masculine/boy cards and what better way than to start with a Oh Baby Boy card.

I have left the very top of the card above the ribbon with a bit of space, so once the baby is born (and I get my new alphabet framelits from the new annual catalogue, available 1 July!), I will be able to add his name!

Baby We've Grown

I stamped the Oh Baby image from the Baby We’ve Grown Stamp set in the new In Colour, Lost Lagoon. The base card is also Lost Lagoon and the Designer Series paper is from the new stack, Moonlight.

The scallop circle is die cut from Hello Honey cardstock… do you think it looks a bit like a bib?!!! I hope so, because that was the intention!

I find that these two colours coordinate so well and the ribbon is to die for! Below is another picture showing this divine ribbon!

IMG_4875

You may also notice the punched stars, part of a new punch pack of 3 (which also includes a flower and a heart), all of which I couldn’t wait to get my hands on.

Why don’t you give a challenge a go, they are so much fun. Head across to the Just Add Ink page for more inspiration and see how the designers interpreted this challenge.


The new 2014-2015 Annual Catalogue goes live on 1 July, so make sure you return to my blog to view it online. This catalogue is full of amazing new products and wonderful coloured pictures for ideas. It is a must have for anyone interested in Ink, Paper and Stamps!

Don’t forget to check the retired stamps and accessories lists, there are sure to be products to please, but hurry, only available while stocks last and ends 30 June!

Shop Online 24/7 for products

Don’t forget to Follow My Blog to receive blog updates and join my Newsletter Subscription for all the latest news and specials!

Happy Stamping,

Name Banner