Birthday, Blog Hop/Instagram Hop, Designer/Patterned/Specialty Papers (DSP), Fancy Folds, feminine, Flowers, Handmade Cards, Markers for Colouring, Stampin' Up!

Cherry Cobbler: Flowerpot Easel card

Welcome to the Colour Creations Instahop. You can follow us on Instagram starting  @craftwithkate. Each week we will showcase the Stampin’ Up! colours in alphabetical order.

Week 15 – Cherry Cobbler

This handmade card features the Coneflower Celebrations Bundle (stamp set and coordinating dies) and the Woven Textures Designer Series Paper (DSP).

This is the card sitting for display.

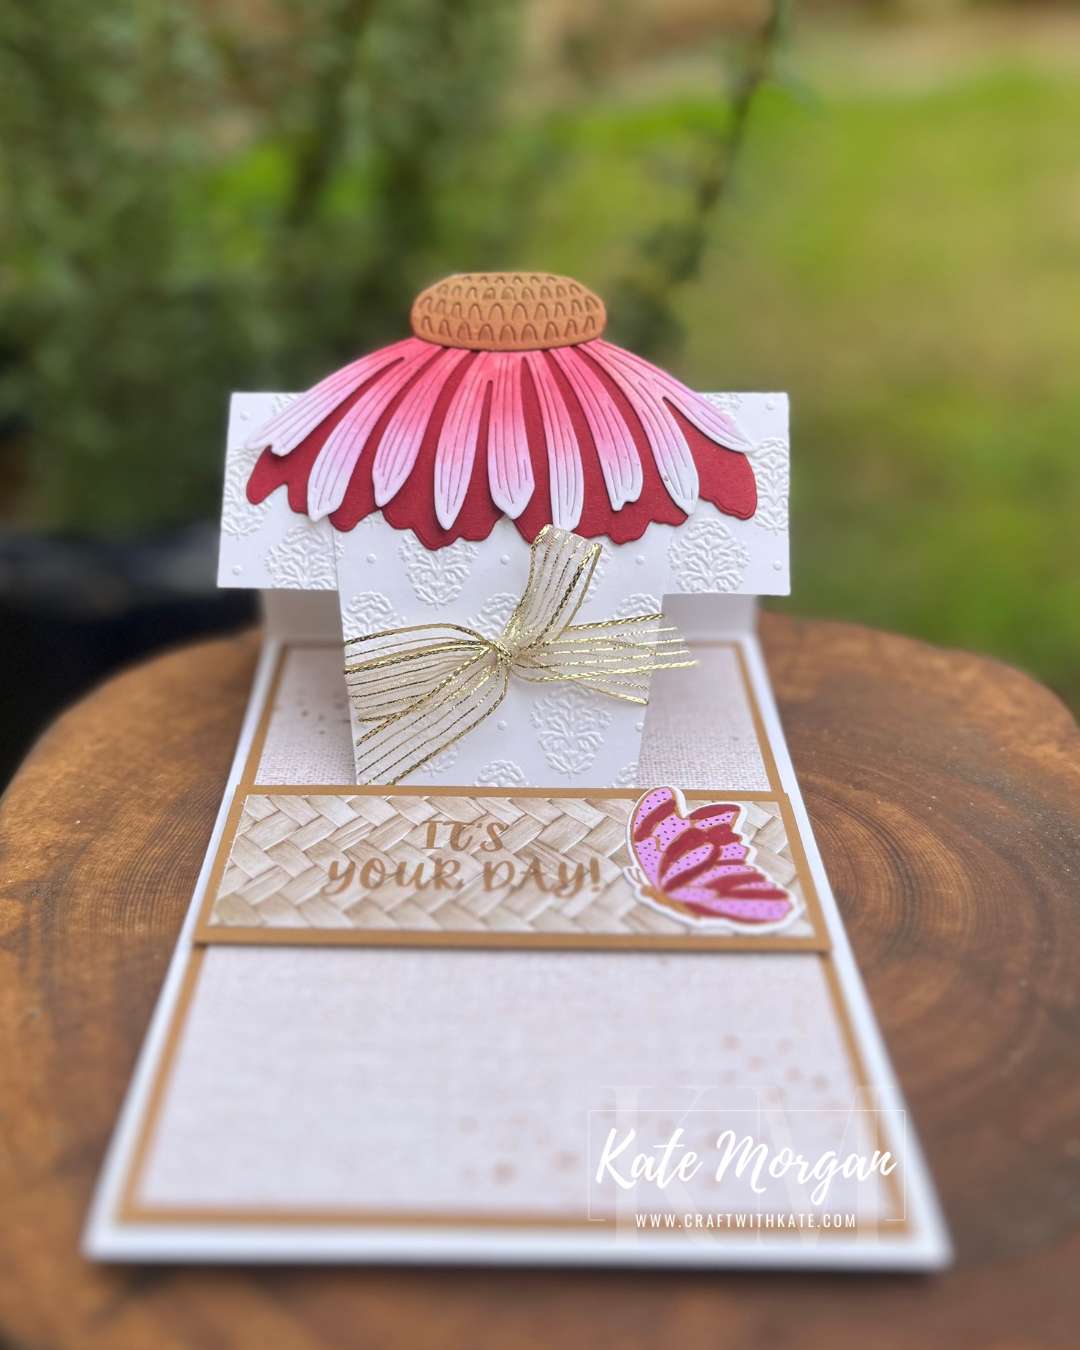
Here you can see how the card sits flat to fit into an envelope. You can also see close up of the Damask Designs Embossing Folder on the flowerpot. The flower itself is Cherry Cobbler with a Basic White layer that has been gently inked using a Blending Brush. The top is Pecan Pie. Wink of Stella is added over the ink blending for sparkle.

The same piece of doubled sided patterned paper is used. The A side with the photographic rattan texture side and the ‘B’ side/reverse, is the more subdued linen texture. I added some stamped splatter to this in Pecan Pie ink with the same cardstock as matt layers. The strip across the centre is added on Dimensionals, so that the flowerpot sits behind it to display. The butterfly is stamped in Pecan Pie and coloured using Stampin’ Write Markers; Cherry Cobbler, Fresh Freesia and Pecan Pie.

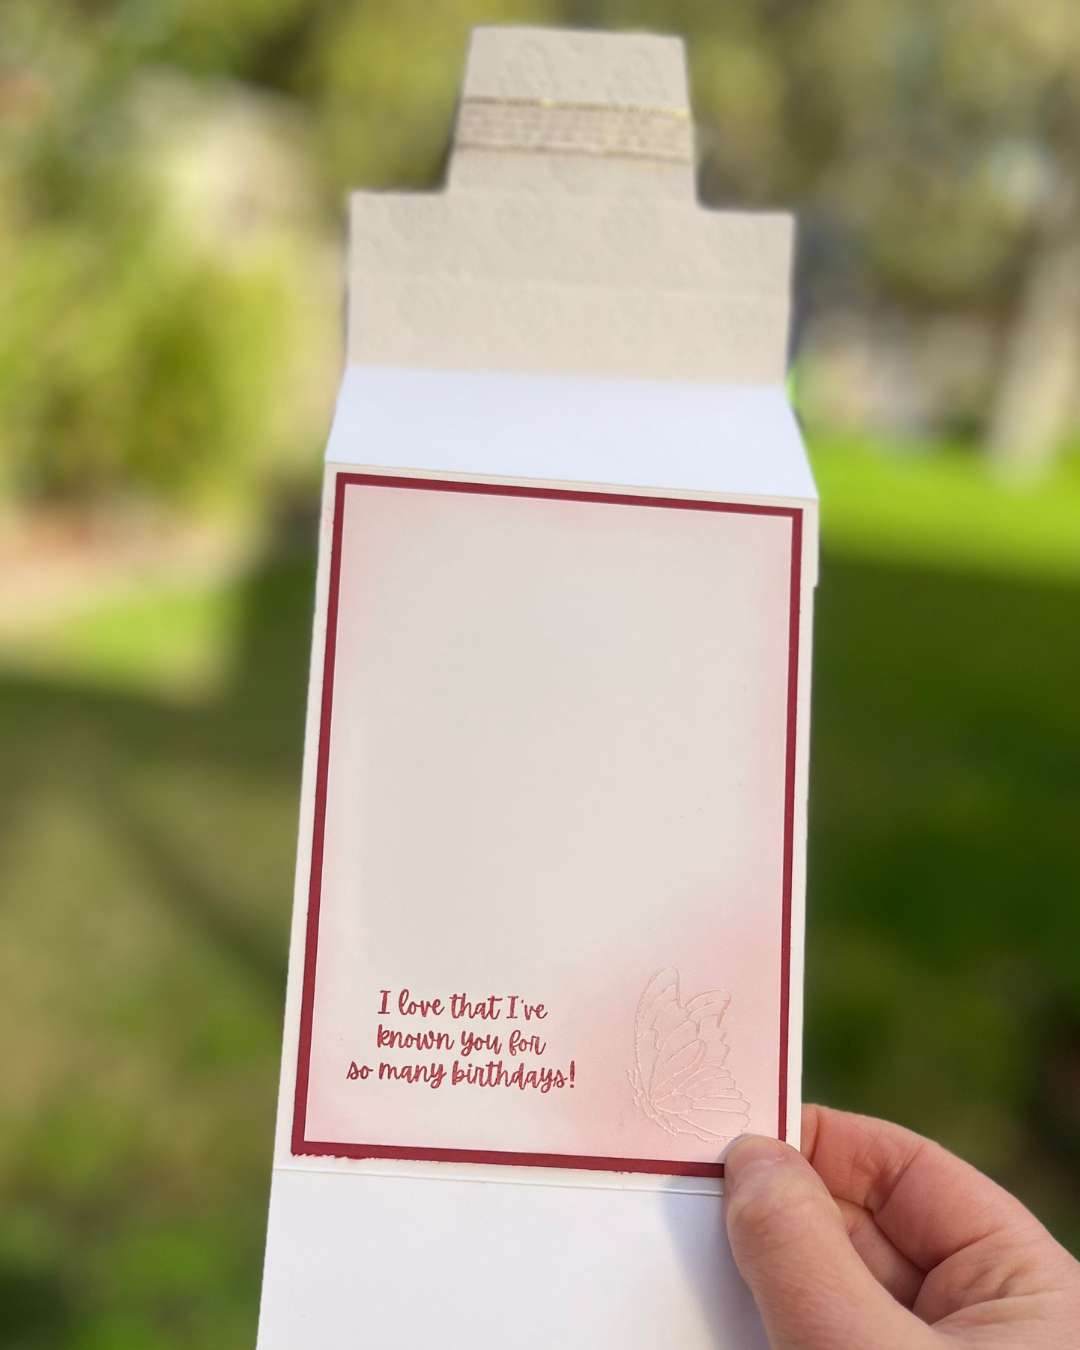
Opening the above layer, is the hidden panel for writing your message. The same butterfly was stamped in the bottom corner with Versamark ink, White WOW Emboss Powder added and melted with my Heat Tool. Some light ink blending was then added and a sentiment stamped next to it in Cherry Cobbler ink.

Thanks for dropping by. I hope you join me next Wednesday for Coastal Cabana inspiration.

Product List @stampinupofficial
Stamps:
Coneflower Celebrations*
Dies: Coneflower Celebrations*
Ink: Versamark, Cherry Cobbler,Fresh Freesia, Pecan Pie
Paper: Basic White, Cherry Cobbler, Pecan Pie, Woven Textures DSP, Basic White C6 Envelopes
Stampin’ WriteMarkers:  Cherry Cobbler, Fresh Freesia, Pecan Pie
Other: Gold Striped Mesh, Wink of Stella, White WOW Emboss Powder, Journaling Pens, Damask Designs Embossing Folder, Acrylic Blocks, Paper Snips, Bone Folder, Paper Trimmer, Multipurpose Glue, Mini Stampin’ Dimensionals, Glue Dots, Tear & Tape, Stampin’ Cut & Emboss Machine, Take Your Pick Tool, Simply Shammy, Heat Tool.
*can be purchased together as a bundle to save 10%

Shop with Kate Morgan


Be sure to download a PDF copy of current catalogues from my SU Catalogue Library page.

Don’t forget to Follow My Blog to receive blog updates and all the latest news and specials!

Birthday, Blog Hop/Instagram Hop, Fancy Folds, Handmade Cards, Kids Cards, Markers for Colouring, Mini Catalogue and Sale-a-bration (SAB), Stampin' Up!

Jungle Pals Easel Card

Saleabration is soon to end on 29 February 2024 and today I feature the Jungle Pals stamp set (free with $90+ order) and the Jungle Pals dies (free with $180+ order) which have been a favourite of mine this Saleabration.

This easel card is easy to make and doesn’t it look great with this jungle scene?!!! Here is the card laying flat as though you have just taken it out of the envelope.

Jungle Pals Easel card Saleabration by Kate Morgan Stampin Up Australia 2024

Open it up and place the front of the card behind the sentiment so it sits open!

Jungle Pals Easel card Saleabration by Kate Morgan Stampin Up Australia 2024 open

This may give you a better perspective – you can see there is a piece of Window Sheet/Acetate across the front when some of the animals added with glue dots.

Jungle Pals Easel card Saleabration by Kate Morgan Stampin Up Australia 2024 side

The animals are all stamped with Black Memento ink and fussy cut or die cut with the Jungle Pals dies then coloured using Stampin’ Blends Combo Markers (alcohol):
Toucan – Poppy Parade, Pumpkin Pie, Granny Apple Green, Daffodil Delight & Basic Black
Lemur – Smoky Slate, Gray Granite & Colour Lifter
Sloths – Crumb Cake
Alligator – Granny Apple Green & Daffodil Delight

When the card is fully open, there are more animals to see lurking in the jungle!

Jungle Pals Easel card Saleabration by Kate Morgan Stampin Up Australia 2024 inside

Thanks for dropping by.

Product List
Stamps: 
Jungle Pals (SAB), Seasonal Branches
Dies: Jungle Pals (SAB), Perennial Postage, Happy Little Things
Paper: Basic White, Granny Apple Green, Lemon Lime Twist, Garden Green, Pecan Pie, Window Sheet
Inks: Black Memento, Garden Green
Stampin’ Blends Combo Markers: Basic Black, Crumb Cake, Daffodil Delight, Granny Apple Green, Gray Granite, Poppy Parade, Pumpkin Pie, Smoky Slate, Colour Lifter
Other:  Glass Mat Studio, Paper Snips, Multipurpose Glue, Glue Dots, Mini Stampin’ Dimensionals, Stampin’ Cut & Emboss Machine, Paper Trimmer, Simply Shammy, Bone Folder
* can be purchased together as a bundle to save 10%


Be sure to download a PDF copy of current catalogues from my SU Catalogue Library page.

Don’t forget to Follow My Blog to receive blog updates and join my Newsletter Subscription for all the latest news and specials!

Blog Hop/Instagram Hop, Designer/Patterned/Specialty Papers (DSP), Fancy Folds, feminine, Flowers, Handmade Cards, Stampin' Up!, Techniques & Tutorials

Introducing Moody Mauve

2023-2024 AWH Colour Creations header

Each week some of the Art With Heart team are joining  the Colour Creations Blog Hop to bring you creative inspiration showcasing our range of 50+ gorgeous Stampin’ Up! colours.

Week 3 – Moody Mauve

Today brings us to the third new In Color, Moody Mauve. I have two cards today and my first one uses the Patchwork Pieces dies, Radiating Stitches dies, Wanted to Say dies and the Fresh as a Daisy Designer Series Paper.

Patchwork Pieces Fresh as a Daisy card by Kate Morgan stampin Up Australia 2023 Moody Mauve

A Moody Mauve card base with a Bubble Bath layer cut with the Radiating Stitches die is added. The heart is also from this same die pack. The next layer is Very Vanilla. The Patchwork dies are cut from Bubble Bath card and again with some Fresh as a Daisy patterned paper. These are adhered alternating to get this beautiful Patchwork effect. The Wanted to Say dies cut both layers of the ‘celebrate’ and how good do they look?!!! I added a double bow of Linen Thread adhered to the heart and some In Color Dots to finish it off.

Patchwork Pieces Fresh as a Daisy card by Kate Morgan stampin Up Australia 2023 Moody Mauve celebrate

On the inside, I added a Very Vanilla piece with some of the extra Patchwork pieces and a heart in the corner, still leaving plenty of room for your message. Can you believe that I haven’t used any ink or stamps on this card?!

Patchwork Pieces Fresh as a Daisy card by Kate Morgan stampin Up Australia 2023 Moody Mauve inside

My next card I have used the Countryside Corners dies to make an Easel card. The Cheerful Daisies bundle is a beauty and you can see lots of it used on this fun fancy fold card.

Cheerful Daisies Easel Card by Kate Morgan, Stmpin Up Australia 2023

I have had a few people recently ask me how I created these card bases using these dies, so here you go – I hope you can follow this!

To create the card base, fold your cardbase in half. Take the largest die from the Countryside Corners dies and place the folded edge on top of the die, so the cutting edge is outside the card (see image below). It’s best to use some washi tape to hold it in place.  Carefully place your top acrylic cutting plate and run through your die cutting machine.

Cheerful Daisies Easel Card by Kate Morgan, Stmpin Up Australia 2023 cutting tip

Now you have your card base. Open it up and place it in your Trimmer and using the scoring blade, score a line down the centre of one side (see image below). Fold this in half (valley fold) and this is the top of your card. Cut another piece of card using the same large die. Add glue to the bottom half only of the front panel and attach this extra die cut to create the easel.

Cheerful Daisies Easel Card by Kate Morgan, Stmpin Up Australia 2023 easel mechanism

Here is a look at it from the side.

Cheerful Daisies Easel Card by Kate Morgan, Stmpin Up Australia 2023 side

On the inside, you can see a layer of Bubble Bath behind the Basic White, a stamped flower and silver foil foliage. The sentiment is popped up on dimensionals so the card front sits behind it creating the easel effect!

Cheerful Daisies Easel Card by Kate Morgan, Stmpin Up Australia 2023 inside

Thanks for dropping by. I hope you can join me next Wednesday for inspiration using another of our new In Colors, Pebbled Path.

Please hop across to our next participant and enjoy the wonderful inspiration of Di Furniss.

2023-2024 Next blog button AWH Colour creations

If you come across a broken link or have come from a different entry point, a full list of participants can be viewed on Cathy Proctor’s blog.

Click here to see the full list of products used in card 1♥
Click here to see the full list of products used in card 2 ♥

Shop Online Craft with Kate10-yr-anniversary-badge


Be sure to download a PDF copy of current catalogues from my SU Catalogue Library page.

Don’t forget to Follow My Blog to receive blog updates and join my Newsletter Subscription for all the latest news and specials!

Christmas, Designer/Patterned/Specialty Papers (DSP), Fancy Folds, Holiday Catalogue, Stampin' Up!

Square Easel Card with Dashing Deer and the rich Joyous Noel papers

Today I share a card that my ladies made in yesterday’s Christmas class!

It’s an Easel card that measures 4⅛” x 4⅛” when closed. I made it this size so that I could get 2 cards from 1 sheet of card stock.

Easel Card using Stampin Up Dashing Deer & Joyous Noel by Kate Morgan Australia Christmas 2018

I stamped the reindeer image and the floral image on the front of the card in Tranquil Tide ink as well as the sentiment on the inside. This is how the card looks when laying flat to fit into an envelope.

Easel Card using Stampin Up Dashing Deer & Joyous Noel by Kate Morgan Australia Christmas 2018..JPG

The Starburst Punch was used the cut some of the Joyous Noel Glimmer paper behind the deer. Doesn’t it add a gorgeous sparkle?!!

Easel Card using Stampin Up Dashing Deer & Joyous Noel by Kate Morgan Australia Christmas 2018 close

When the card is open and laying flat it looks like this from the front

Easel Card using Stampin Up Dashing Deer & Joyous Noel by Kate Morgan Australia Christmas 2018 open

and this on the inside. You can see the scoreline of the front and how it folds to sit up to display. I placed some Gray Granite card on the inside with a strip of the DSP and some more glimmer paper. The sentiment is stamped and punched out with the Tailored Tag punch and sits on dimensionals so the front of the card forms the Easel!

Easel Card using Stampin Up Dashing Deer & Joyous Noel by Kate Morgan Australia Christmas 2018 flat

To purchase these products click on the images below in the product list to take you directly to my online store!


2018-2019 Annual Catalogue ends 3 June 2019
2018 Holiday Catalogue ends 2 January 2019
Be sure to download a PDF copy from my SU Catalogue Library page today.


Don’t forget to Follow My Blog to receive blog updates and join my Newsletter Subscription for all the latest news and specials!

 Happy Stamping,

Blog Signature

Blog Button - Catalogue  Blog Button - Shop   Blog Button - Classes  Blog Button - Join my Team  Blog Button - Watermark

Product List

Birthday, Calendar Card, Stampin' Up!

Easel Calendar Card

Dear Crafters,

Today I share another card using the Sweet Cupcake Bundle but it has been created as more of a gift that the recipient can keep all year long!

I’ve made this card for my husband’s aunt who loves my calendar cards and seeing as her birthday is on 1 December, it is perfect timing to send it to her with the 2017 calendar!

So today I have used the same colour scheme as Monday’s card; Watermelon Wonder, Peekaboo Peach, Whisper White. She wears a lot of orange so I thought this was perfect for her!

cupcake-wish-easel-calendar-card-using-stampin-up-sweet-cupcake-confetti-2016-by-kate-morgan-independent-demonstrator-classes-in-rowville-diy

The ‘sweet’ is die cut using the Cupcake Cutout Framelits in the Gold Glimmer paper.

cupcake-wish-easel-calendar-card-using-stampin-up-sweet-cupcake-confetti-2016-by-kate-morgan-independent-demonstrator-classes-in-rowville-craft-with-kate

The card front is embossed using the Confetti Textured Impressions Embossing Folder. The Peekaboo Peach & white ovals are die cut using the Layering Ovals Framelits.

cupcake-wish-easel-calendar-card-using-stampin-up-sweet-cupcake-confetti-2016-by-kate-morgan-independent-demonstrator-classes-in-rowville-diy-craft-with-kate

The icing is a 3-step stamping process using photopolymer stamps, so you can easily line them up. The first layer is So Saffron then Peekaboo Peach before the final layer of Watermelon Wonder. I also used the Clear Wink of Stella over the top for a shiny glazed effect! I stamped a die cut two of these cupcakes, one for the front and one for inside the card!

cupcake-wish-easel-calendar-card-using-stampin-up-sweet-cupcake-confetti-2016-by-kate-morgan-independent-demonstrator-classes-in-rowville

The mini calendar is placed at the bottom of the inside of the card, as this creates the easel.

Don’t forget to decorate inside your card and stamp on the envelope!

What do you think of this card?

Products Used:

Stamp Sets: Sweet Cupcake
Cardstock: Peekaboo Peach, Watermelon Wonder & Whisper White and retired DSP
Inks: So Saffron, Peekaboo Peach, Watermelon Wonder, Sahara Sand, Crumb Cake, Tip Top Taupe
Other: Big Shot, Confetti TIEF, Cupcake Cutout Framelits, Layering Ovals Framelits, Wink of Stella Clear, Paper Snips, Dimensionals, Glue Dots, Tombo Multipurpose Glue, Trimmer, Stampin Scrub, Simply Scored, Clear Blocks, Mini Calendar

shop-online-copyget-a-catalogue-free-copy  classes-in-rowville-copy  join-my-team-copy  watermark-purchase

Don’t forget to Follow My Blog to receive blog updates and join my Newsletter Subscription for all the latest news and specials!

Happy Stamping!

Blog Signature-001

Calendar Card, Christmas, Owl Punch

Yesterday’s Craft Class

Hello Stampers,

We had an epic Craft Class yesterday with 4 ladies thoroughly enjoying themselves and we had many many laughs along the way!

Here was the first card that we made ~ a Twisted Easel Tea Light Candle Card.

Tea Light Candle Card

and don’t fret, the tea light candle is battery operated, so no homes will burn down!!!

The next card we made included a mini calendar and post it note

Mini Calendar & Post it note Card

Then we some spare time at the end and the ladies were having so much fun, they wanted to make another mini calendar card but this time, a smaller one that I created myself. It also folds flat to be able to be mailed!

mini calendar card

One of the ladies who attended said “I don’t have a crafty bone in my body” but she was so proud of her achievements and so were the rest of us. So next time I hold a craft class, be sure to come along!

Happy Stamping,

Kate


Calendar Card, Owl Punch

Easel Calendar Card

Hello Stampers,

I recently got some small calendars that you tear off month by month and so I thought it would be nice to be able to use them to make a special gift for the upcoming Christmas season. These would make lovely gifts for the kids teachers too!

Easel Calendar Card
Easel Calendar Card

Stampin’ Up! products used:

Cardstock: Raspberry Ripple, Crumb Cake, Summer Smooches DSP (r)

Tools: Simply Scored, Paper Snips, Owl Builder Punch, 1 3/4″ Scallop Circle Punch

Accessories:  Tombo Glue, Dimensionals, Wiggly Eyes, Pearl Jewel, Raspberry Ripple Ribbon, Calendar (not SU)


To purchase most of these items, be sure to visit my online store!

Happy stamping,

Kate