Welcome back to another Art With Heart Team Colour Creations weekly Blog Hop. Today we are featuring our 47th colour; So Saffron.
I have gone with a patchwork design this week, using up some soon to retire Designer series paper, Garden Impressions.
I was inspired by a bag that my gorgeous Mother-in-law made for me recently. Isn’t is stunning?!!! I’m such a lucky girl.
I have used the Around the Corner stamp set with the Garden Impressions DSP. It is just some simple squares and cutting to put it all together. The Night of Navy ink looks fab with So Saffron!
The background of the card base, I actually embossed with the SubtlesTextured Impressions Embossing folder through the Big Shot.
On the inside I added some Whisper White card and cut a couple of squares of the DSP and then cut them in half again on the diagonal to glue into each corner.
Head on over to Catherine’s blog where you’ll find the links to other participants.
To purchase these products click on the images below in the product list to take you directly to my online store!
Today is the day that demonstrators can pre-order product from the new upcoming Annual catalogue! If you can’t wait to get your hands on these new products, why not join my team and add these gorgeous items to your Starter Kit?!!
Here are a couple of the cards we made at the recent OnStage Live event in New Zealand for demonstrators. It is always such a buzz and we get to play and see loads of new product, through presentations as well as play and stamp with them ourselves!
This first one is the Free as a Bird Bundle. Check out that beautiful Designer paper and the stamp is coloured with Blends markers. How adorable.
The Sailing Home Bundlewas a huge hit with its masculine images and DSP. I think it will be a huge seller for sure. How cool does it look with the watercolour wash and anchor embellishment?!!
The It Starts With Art Bundleis a vibrant and playful bundle.
The Floral Essence Bundle is a favourite of mine. This stamp set has two coordinating punches; the new Perennial Flower punch and the current Leaf punch!!! How cool is that? Look at those centres for the flowers that are a new item and the Monet inspired DSP is stunning!
This is a card from the soon to be released Shelli Kit from Paper Pumpkin! Paper Pumpkin is currently only available in the US as a subscription, but this kit is a one off Worldwide release…. so exciting! This kit will be $37 and available online from 15th May but only while supplies last; in other words, once they’re gone, they’re gone!
The Everything is Rosy Product Medley is also available while stocks last. This exclusive, limited-time collection of coordinating, petal-packed products has everything you need to let your creativity bloom. These products are definitely my colour palette and will be hard to resist my many, I’m sure!
Just look at those amazing colours!! Click this next picture to see the video with all the limited edition products!
The Everything Is Rosy Product Medley includes these exclusive products:
Everything Is Rosy Photopolymer Stamp Set—18 stamps; suggested blocks: a, b, c,
Everything Is Rosy Dies—10 dies; largest die 2-7/8″ x 1″ (7.3 x 2.5 cm)
6″ x 6″ (15.2 x 15.2 CM) Designer Series Paper Stack—48 sheets; 8 each of 6 double-sided designs
6″ x 6″ (15.2 x 15.2 CM) rose gold foil paper—8 sheets
Printed die cuts—2 sheets
Rose gold die cuts—4 sheets; 2 each of 2 designs
Rose gold adhesive backed mirror embellishments—60 embellishments; 1/4″ (6.4 mm)
Melon Mambo 1/4″ (6.4 mm) Ruched Ribbon—10 yards (9.1 m)
Night of Navy/Rose Gold 3/8″ (1 cm) Metallic –Edge Ribbon—10 yards (9.1 m)
Rose Gold Shimmer Paint—1/2 oz. (15 ml)
Only $139 (#150059)
Make sure you place your order today as it’s only available while stocks last!
Are you excited about the new catalogue? What will be the first item on your shopping list?
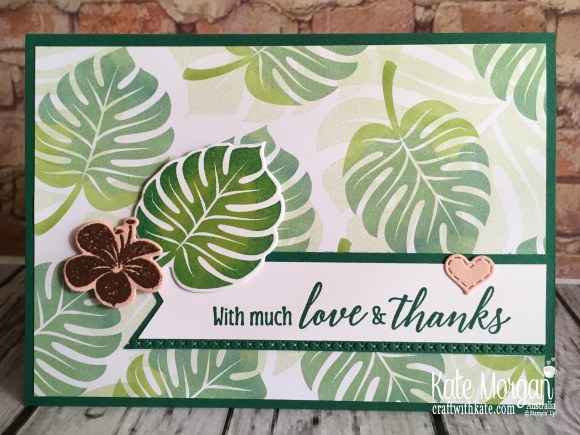
Welcome back to another Art With Heart Team Colour Creations weekly Blog Hop featuring our 45th colour; Shaded Spruce. Wow, can you believe there are only 5 more colours to go?!
How cool is this tropical card using lots of the Tropical Escape DSP, some simple stamping and some embossing to add some shine!
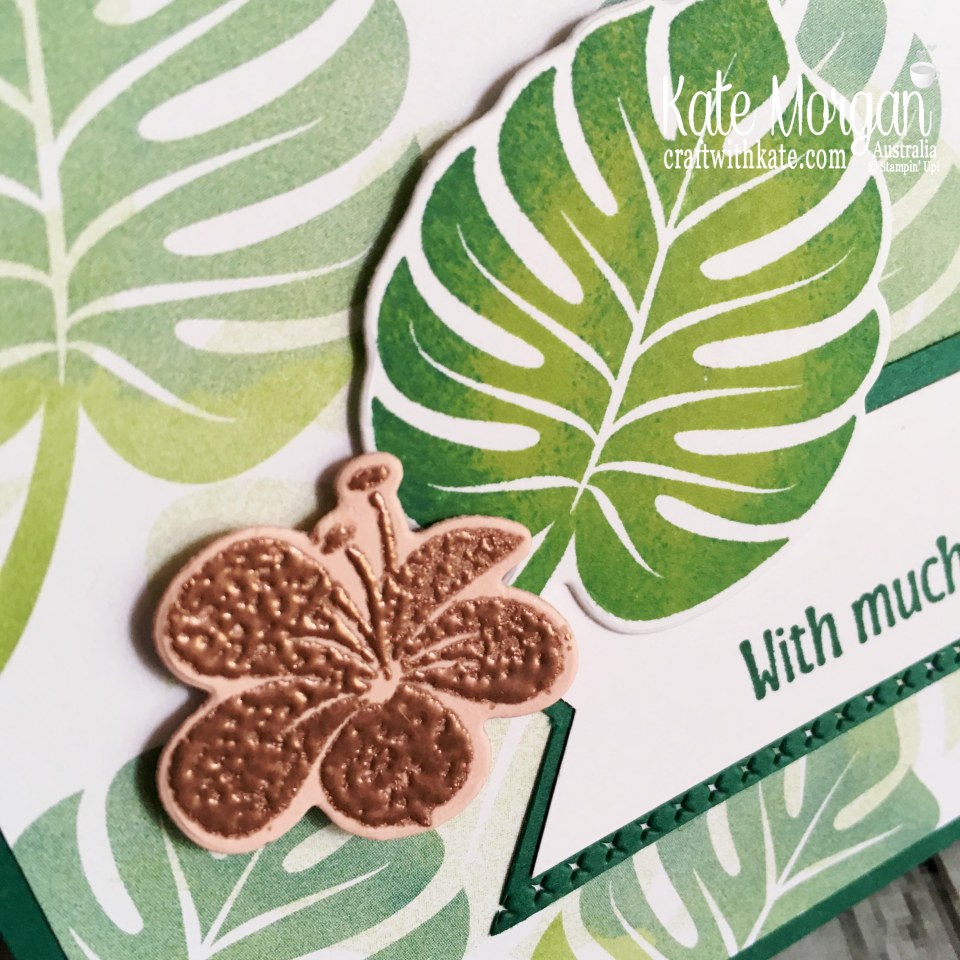
That large leaf is stamped in Granny Apple Green ink and then I used a sponge dauber to add some extra tone with Shaded Spruce ink around the edges before stamping it onto some White card.
How beautiful does that copper embossed flower look on the Petal Pink card stock? It looks even better in real life, as the card stock has similar tones! I have popped these stamped pieces up on dimensionals.
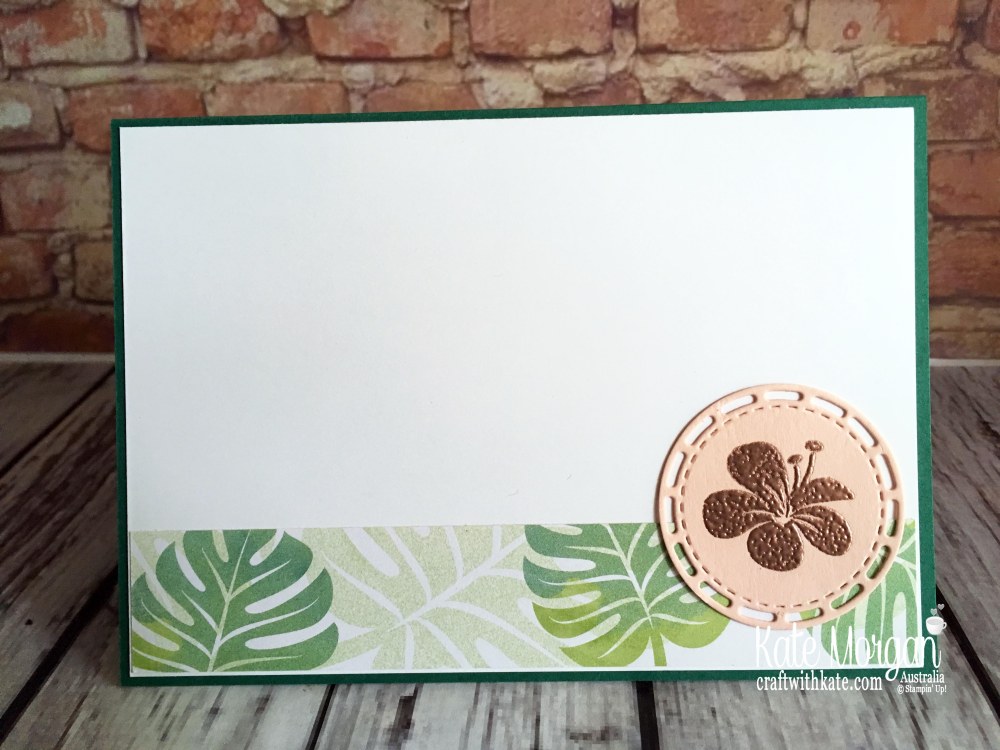
and because that copper embossed flower looked so good, I did another one for the inside with some more DSP!
Head on over to Catherine’s blog where you’ll find the links to other participants.
To purchase these products click on the images below in the product list to take you directly to my online store!
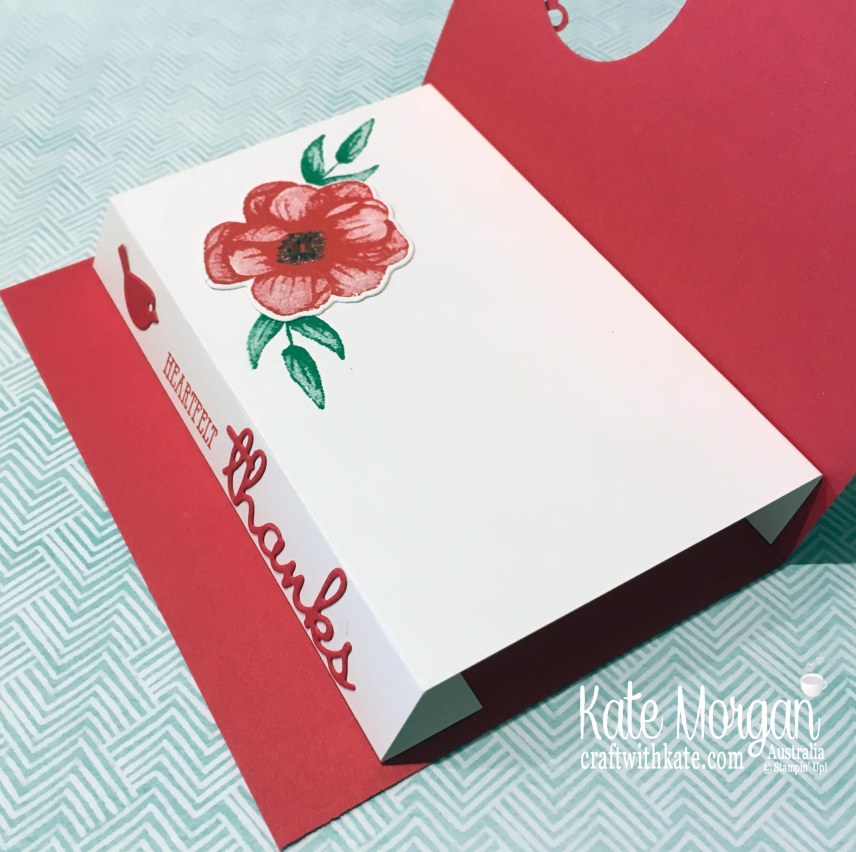
Tonight’s card is the same style as the one I showed you recently. You can see it here. However this one opens in landscape, rather than portrait, but it is the same concept!
I began with Poppy Parade card: 21cm x 14.8cm folded in half.
The DSP Layer: 10cm x 14.3cm is glued to the card front and then the circle punch is used to punch the window. The sentiment is stamped and a few different punches were used to layer it. The Subtle Dynamic Textured Impressions Embossing folder was used for added interest on the Poppy Parade Story Label punched piece.
The inside panel is 5 1/2″ x 5 1/2″, scored at 3/4″, 2 3/4″, 3 1/2″. Before adhering it into the card, I added a little die cut bird and ‘thanks’ and stamped Heartfelt in Poppy Parade ink. I also stamped the leaves directly onto the insert card. Then I stamped two of the flower images and die cut them before gluing them down.
Here is another angle so you can see how the inside works. I love how the sentiment sits on that panel when you open the card!
To purchase these products click on the images below in the product list to take you directly to my online store!
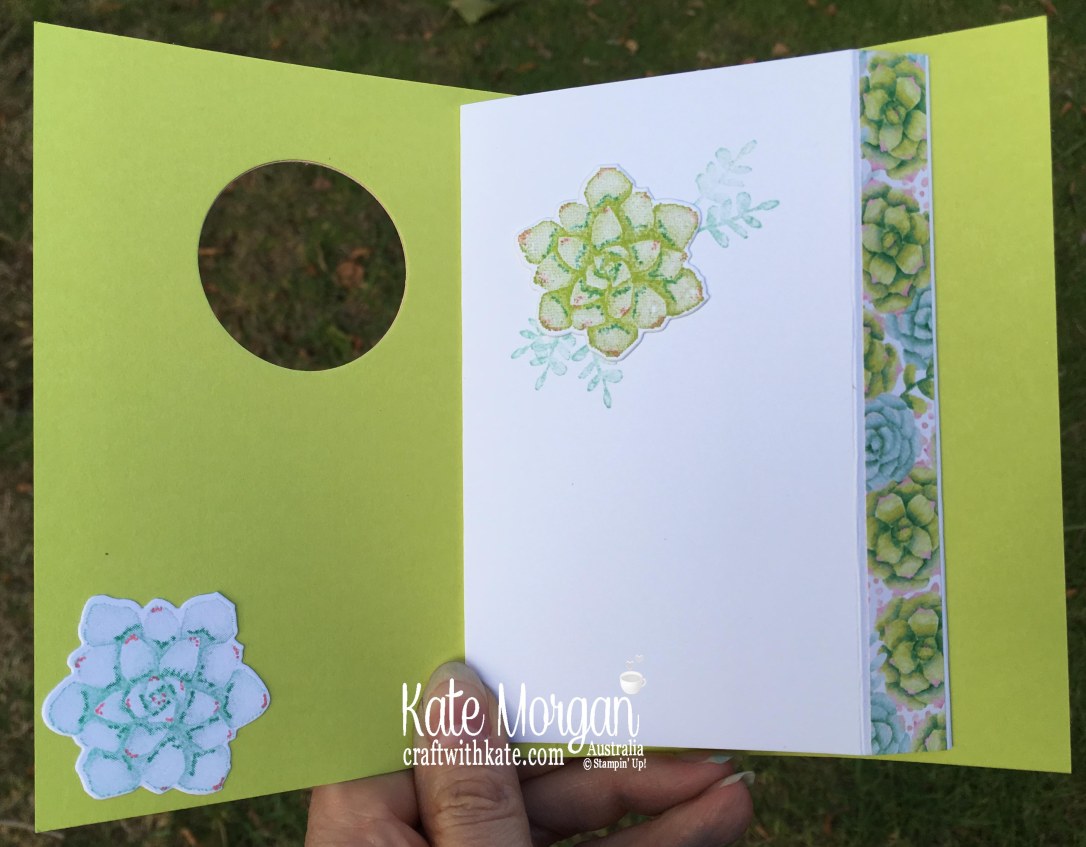
Tonight I have this pretty Lemon Lime Twist card created with the Painted Seasons Bundle. The paper is so beautiful with all the succulents. I created the window in the front using the 1 3/4″ circle punch and then framed it with Powder Pink scallop circle, die cut with the Layering Circle Framelits.
Lemon Lime Twist card: 21cm x 14.8cm folded in half.
Powder Pink Layer: 10cm x 14.3cm
DSP Layer: 9.5cm x 13.8cm
The succulent flower is inked with Lemon Lime Twist and then I used the Flirty Flamingo and Call Me Clover Stampin’ Write Markers to add some detail to the stamp before stamping it onto the white card. The one on the inside left of the card was initially stamped with Pool Party ink and the same markers to add the detail. The sentiment is die cut 3 times and layered together slightly offsetting each one, then adding some Wink of Stella on top!
When you open the card it has this fancy fold inside!
The inside panel is 5 1/2″ x 5 1/2″, scored at 3/4″, 2 3/4″, 3 1/2″. I added a strip of DSP down the right side and stamped the leaves and added the succulent so it appears through the circle window on the front.
Tomorrow I fly out to New Zealand for the Stampin’ Up! OnStage Live Event in Auckland; a 3 day event full of fun and catching up with my other demonstrator friends, who are like family to me and I can’t wait!
But in the meantime, we still have a Colour Creations blog hop to share with you and tonight we are featuring our 43rd colour;Rich Razzleberry and it is one of my favourites.
I have used the stunning, Share What You Love Specialty Designer Series Paper from the Annual catalogue and coordinated it with the Tea Togetherstamp set.
The tea cup and flower images were stamped lightly in Sahara Sand ink onto Whisper White card and then I coloured them using the Watercolour Pencils and a Blender Pen.
The four tiny Rich Razzleberry die cut flowers and the sentiment have Wink of Stella on them, can you see it? Then I placed a small Pearl into the centre of each flower. I also added some of the Velvet Ribbon behind the Tea Cup.
Head on over to Catherine’s blog where you’ll find the links to other participants.
To purchase these products click on the images below in the product list to take you directly to my online store!
This is your last chance to get this gorgeous, sweet stamp set Hello Cupcake as it’s a Sale-a-bration FREEBIE. By placing a $90 order you can select this stamp set for FREE. The best part is that there are coordinating framelits so no more fussy cutting!
This is a normal A5 card, but as you can see it also has another slimmer card attached to the front and opens up!
How adorable are the pretty designer papers? I love this appropriately named All My Love DSPdown the sides and the Wood Textures DSP for the cake stand!
How cool is that?!!!
I love these colours together: Soft Sea Foam, Flirty Flamingo, Crumb Cake and Whisper White!
and a simple stamped sentiment on the inside
and here are two other colours made by my class ladies earlier this month:
To purchase these products click on the images below in the product list to take you directly to my online store!
Tonight the Art with Heart team are sharing creative projects with an Easter theme. Don’t forget, Sale-a-bration ends on 31 March! There is still time to earn free product with purchase or even join our Stampin’ Up! team. Ask any of the girls on the hop for more details.
If you’re already hopping, then you just came to me from the talented, Sue Madex. If you’re just joining, great! Use the “next” button at the end of my post to hop all the way around. Blog Hops are full circles, so you can start hopping here and then at the end of each post there is a link to the next one. There is also a list of participants at the end in case of any broken links. Now let’s get started!
My Easterprojects tonight have a heavy focus on the soon to retire In Colours 2017-2019.
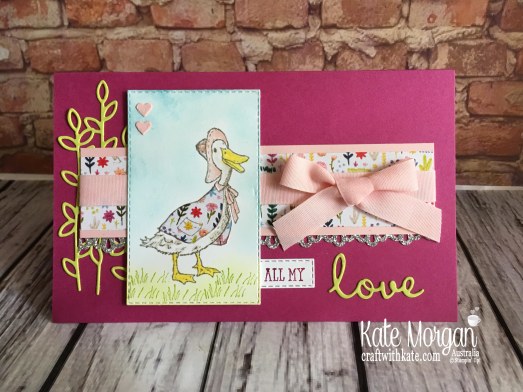
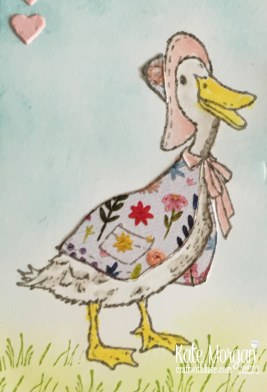
I adore the Fable Friends stamp set and just had to use it for my Easter projects. This card is created using the paper piecing technique. This is where you stamp onto some pretty designer paper and then cut sections of it out and glue to another stamped image. You can see I’ve done it with the ducks jacket and top of her hat! I used the pretty Needlepoint Nook Designer Series Paper. I love the Rectangle stitched framelits and the Silver Glimmer edging was cut with the Decorative Border Punch. The sentiment is created using the Well Said stamp set and coordinating Well Written framelits (purchase these together as the bundle to save 10%).
Here’s a closer look! I used my Blender Pen with the inkpads to add some Gray Granite to her feathers, Pineapple Punch for her beak and feet and Powder Pink for the hat and ribbon around her neck. The grass is stamped with Lemon Lime Twist and then I sponged some of the same colour using a sponge dauber. I also did this for the sky with Balmy Blue ink.
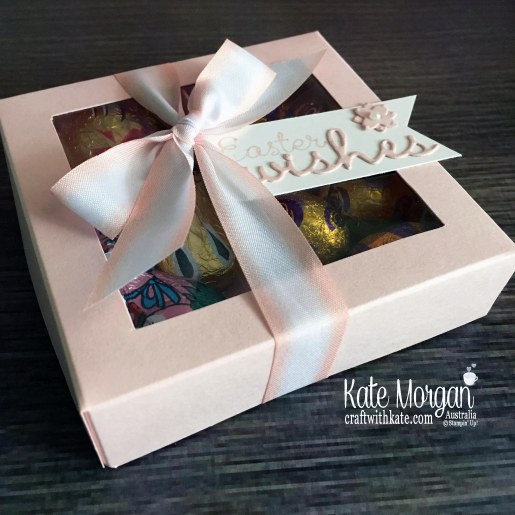
My next project is a Divided Gift Box with 3 sections in it and a window in the top to entice you inside! The tag was simply created using the Well Said bundle as used in the first project. I had to tie some of this gorgeous variegated ribbon around it too.
Ooh and look what’s inside?!!! I mean, who doesn’t love a little chocolate treat at this time of year?!!!
What you need to make this box: Base:14.5cm x 14.5cm, score at 2.5cm on all 4 side Lid: 14.8cm x 14.8cm, score at 2.5cm on all 4 side To cut the window in the centre of the lid, place it in your Stampin’ Trimmer lining the left side at 3.8cm. Lift the cutting arm and move the blade to 3.8cm, place down onto the cardstock and cut to 11cm. Rotate & repeat this on the other 3 sides. Window Sheet: 9cm x 9cm glue to inside of lid once it’s put together. Insert 1: 14cm x 9.3cm, score at 4.5cm, 7cm, 9.5cm Insert 2:14cm x 4.5cm, score at 4.5cm, 7cm, 9.5cm
Thanks for visiting tonight. A full list of products can be found at the end of the post.
Don’t forget to email me at craftwithkate@live.com.au to request your copy of a Catalogue or to ask about joining the Art With Heart team.
Now it’s time to follow the blog hop to our next participant, the lovely, Ros Davidson.
If you find a broken link or have come to this blog hop from a different entry point, you can view the participants below.
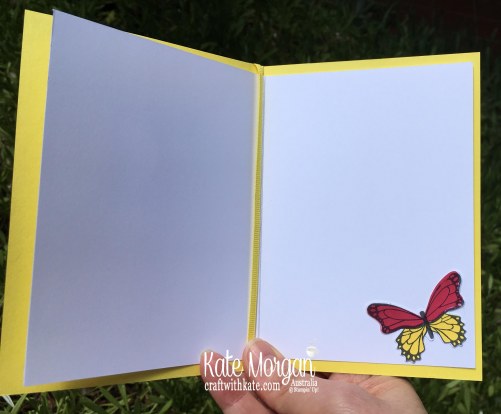
Today is my mum’s 70th birthday, and we will have a lovely celebration this weekend for her but in the meantime, HAPPY BIRTHDAY MUM! I can’t share her card with you just yet either, so I have a design we made at my recent class using the Butterfly Gala Suite.
This Gingham Gala paper is super versatile, you can use it for any type of project; masculine or feminine!
On the inside I simply glued a piece of gingham paper and another small stamped butterfly. I would also add a sentiment of Happy Birthday or Thinking of You, but I haven’t worked out who I am giving it to just yet.
If you would like to see how I made the origami window fold, visit Keenan Kreations video by clicking here.
To purchase these products click on the images below in the product list to take you directly to my online store!
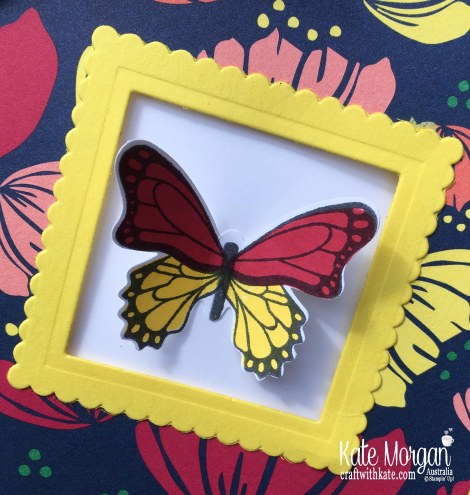
Welcome back to another Art With Heart Team Colour Creations weekly Blog Hop. Today we are featuring our 37th colour; Pineapple Punch.
I love this vibrant and bright colour and it is one of the many colours in the Happiness Blooms Designer Series paper and so I had to use this in my project today.
First, I glued the DSP to the front of the card before using the layering squares framelits to cut the window. Then I used that same die with the larger scallop die to cut out the Pineapple Punch frame to glue on top of the DSP around the window.
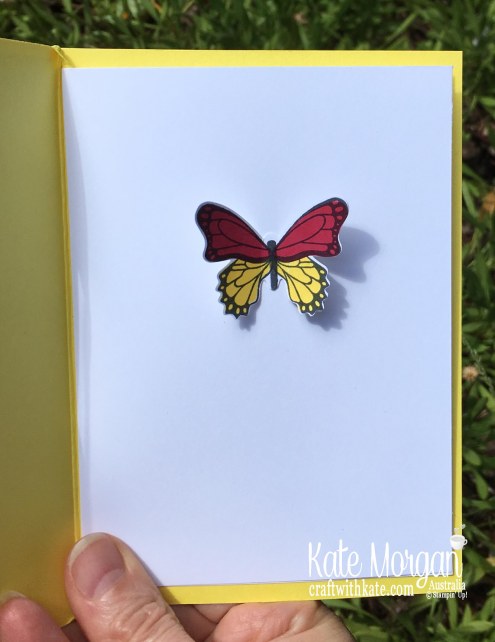
I stamped and punched out the large butterfly from the Butterfly Gala stamp set and coordinating Butterfly Duet Punch.
Inside the card, I added a smaller white card, folded in half. I placed glue only on the bottom panel, so the top panel could stay like this when you open the card. Once this was in place, I closed the card and glued the butterfly onto the white card through the window so I could centre it perfectly.
When the card is fully open, it looks like this!
I added another butterfly to the corner of the card and will add a sentiment when the time is right for the occasion. I tied a piece of the Pineapple Punch Grosgrain ribbon through the centre of the card and tied it in a bow at the front.
Head on over to Catherine’s blog where you’ll find the links to other participants.
To purchase these products click on the images below in the product list to take you directly to my online store!


 Designer Series Paper")


 Designer Series Paper")


 Velvet Ribbon")


 Designer Series Paper")


 Designer Series Paper")


 Designer Series Paper")


 Grosgrain Ribbon")

