Blog Hop/Instagram Hop, feminine, Flowers, Handmade Cards, Markers for Colouring, Stampin' Up!

Sending Love with Blackberry Bliss

2023-2024 AWH Colour Creations header

Each week some of the Art With Heart team are joining  the Colour Creations Blog Hop to bring you creative inspiration showcasing our range of 50+ gorgeous Stampin’ Up! colours.

Week 13 – Blackberry Bliss

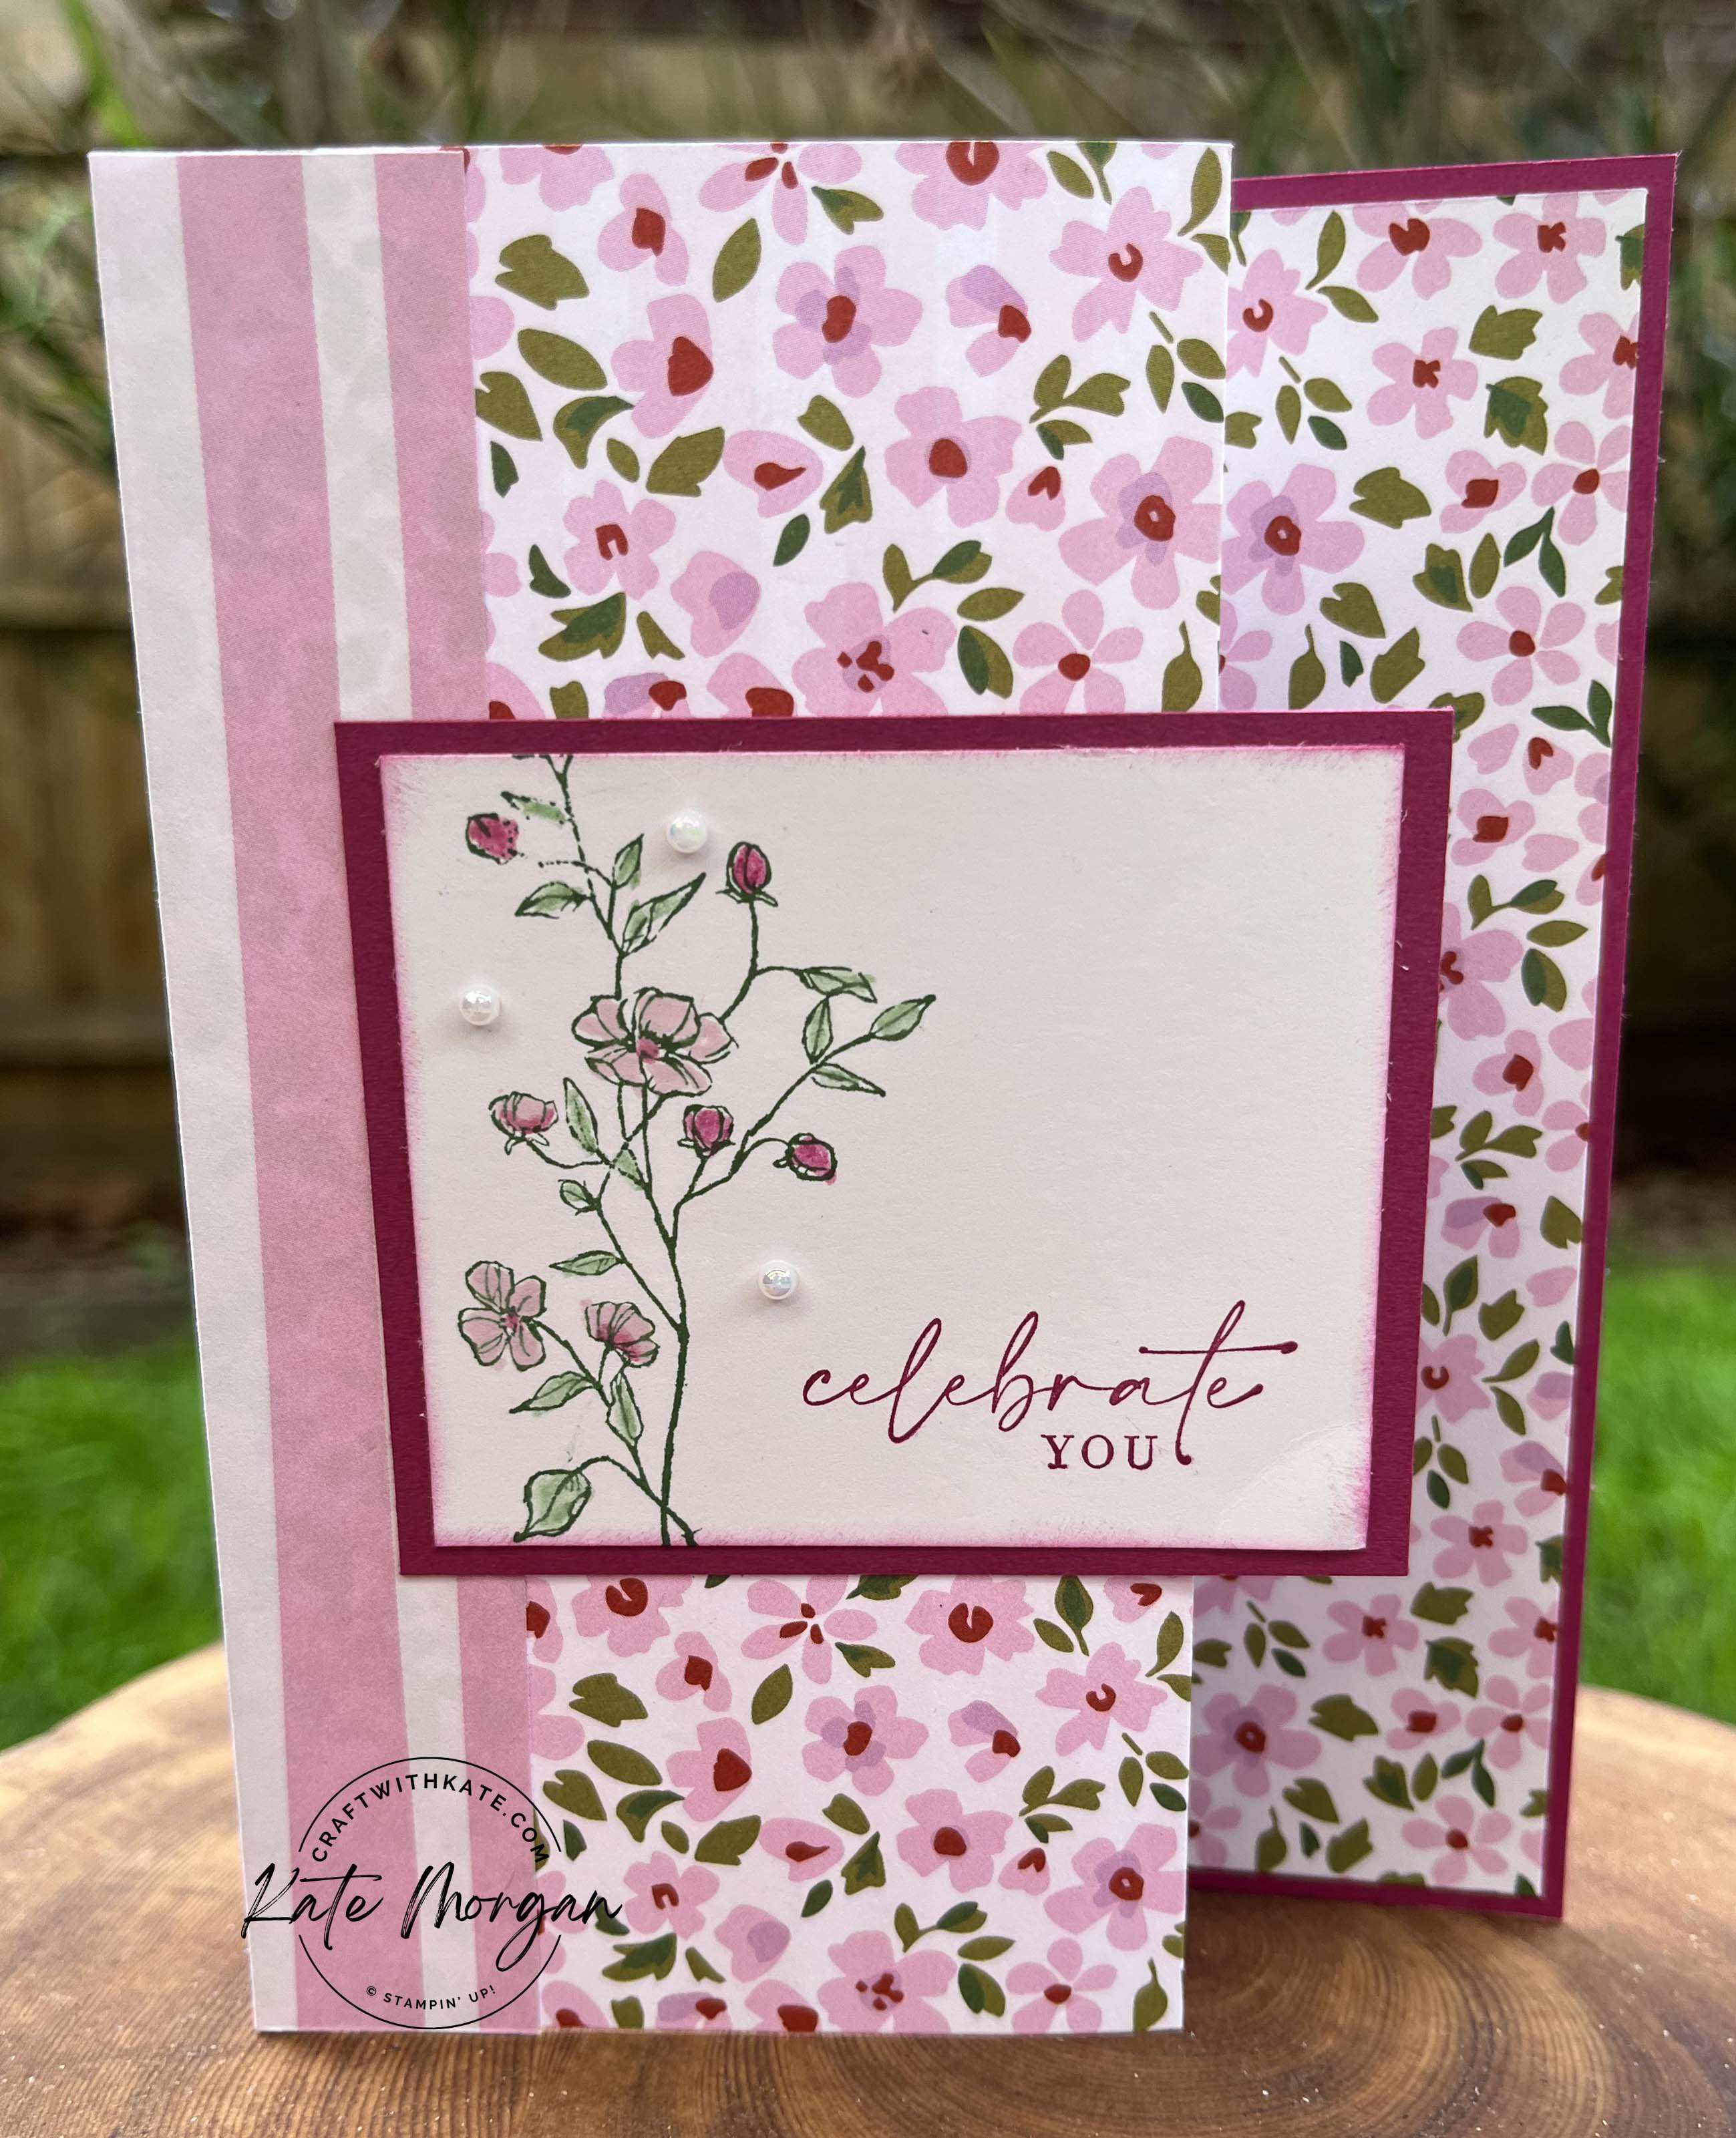
Blackberry Bliss is a very dark tone and sometimes I find it hard to know where to start with using it.

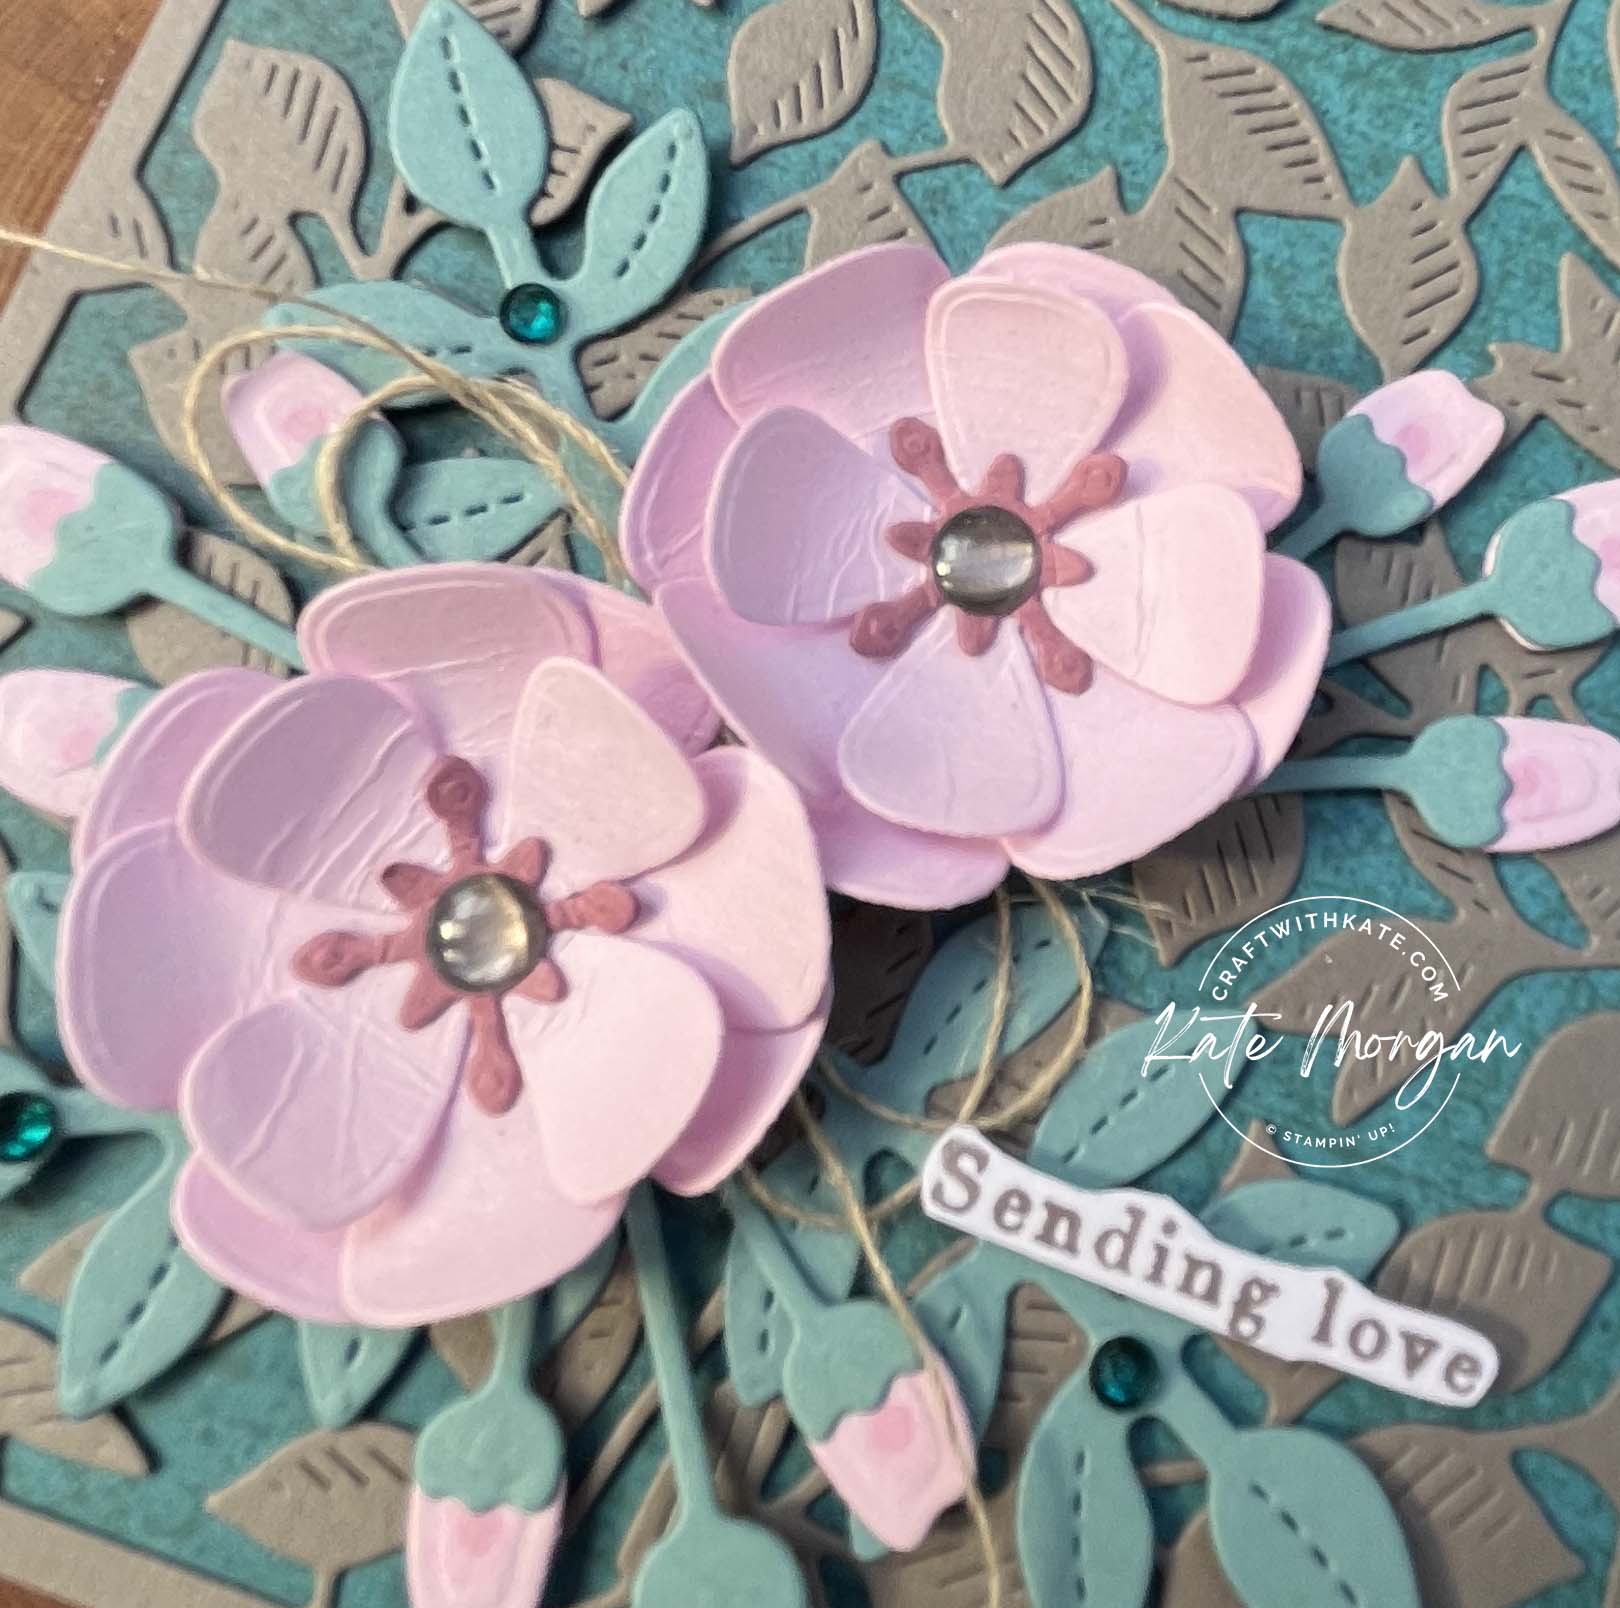
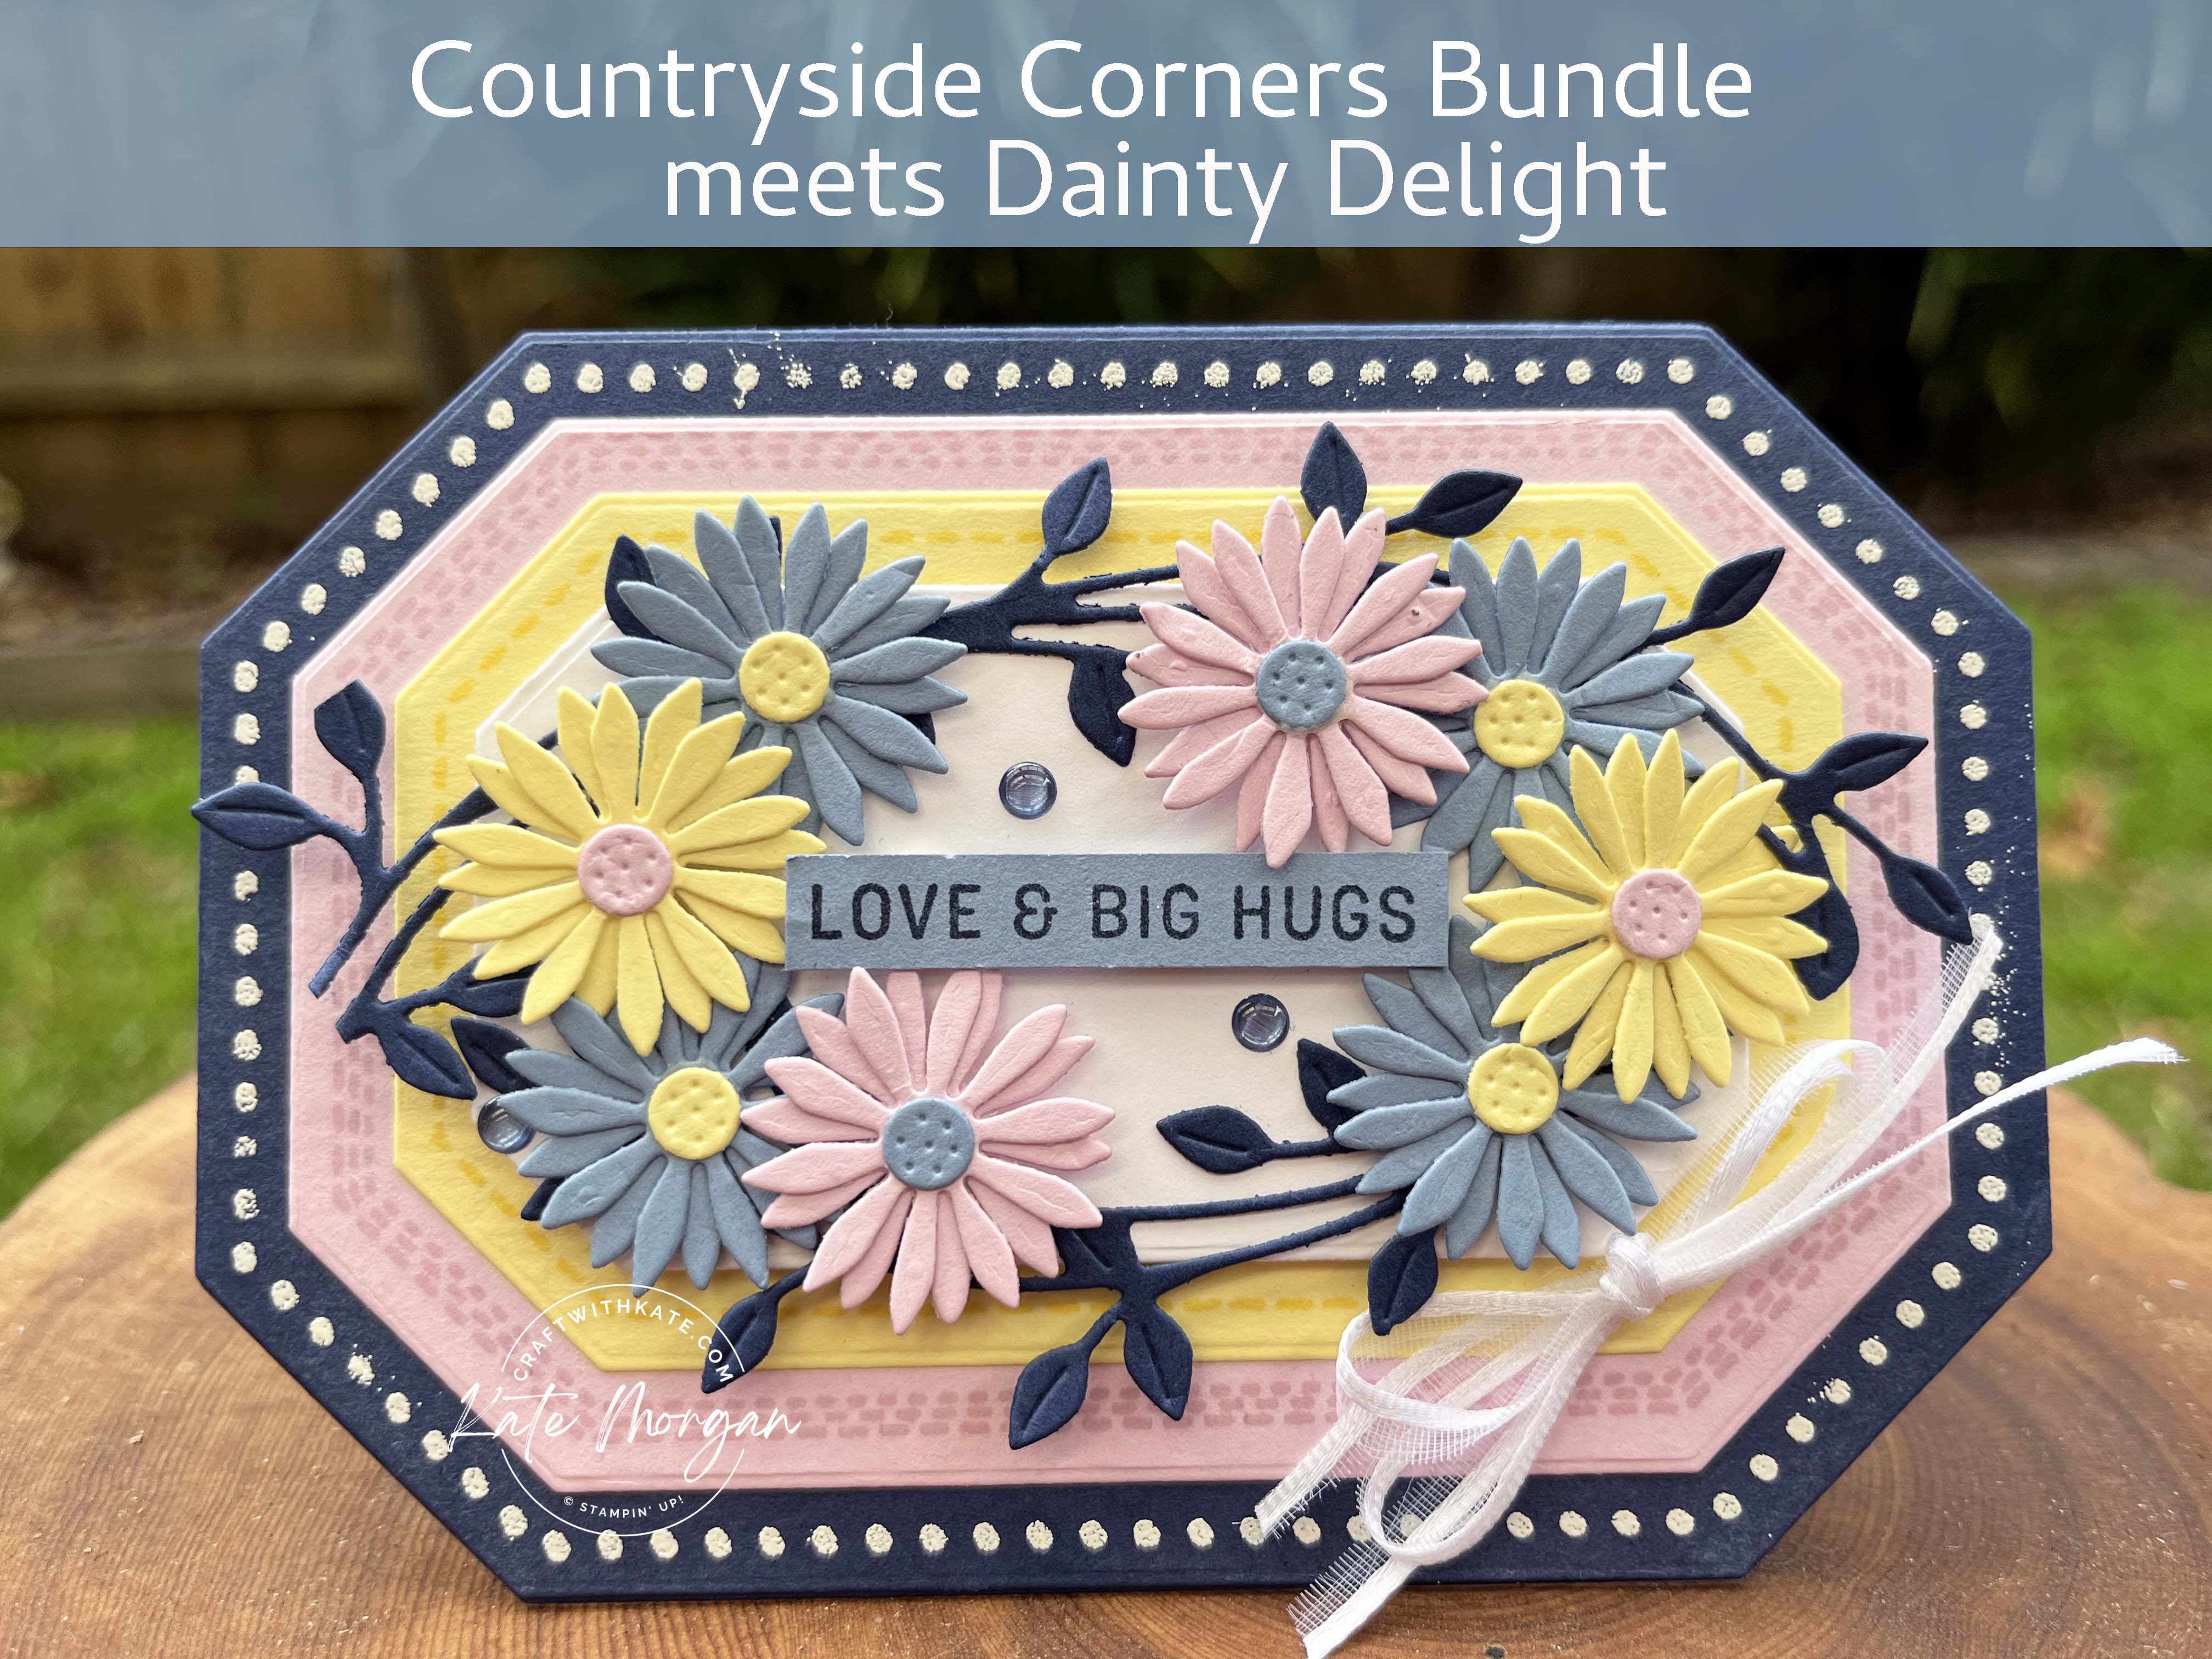
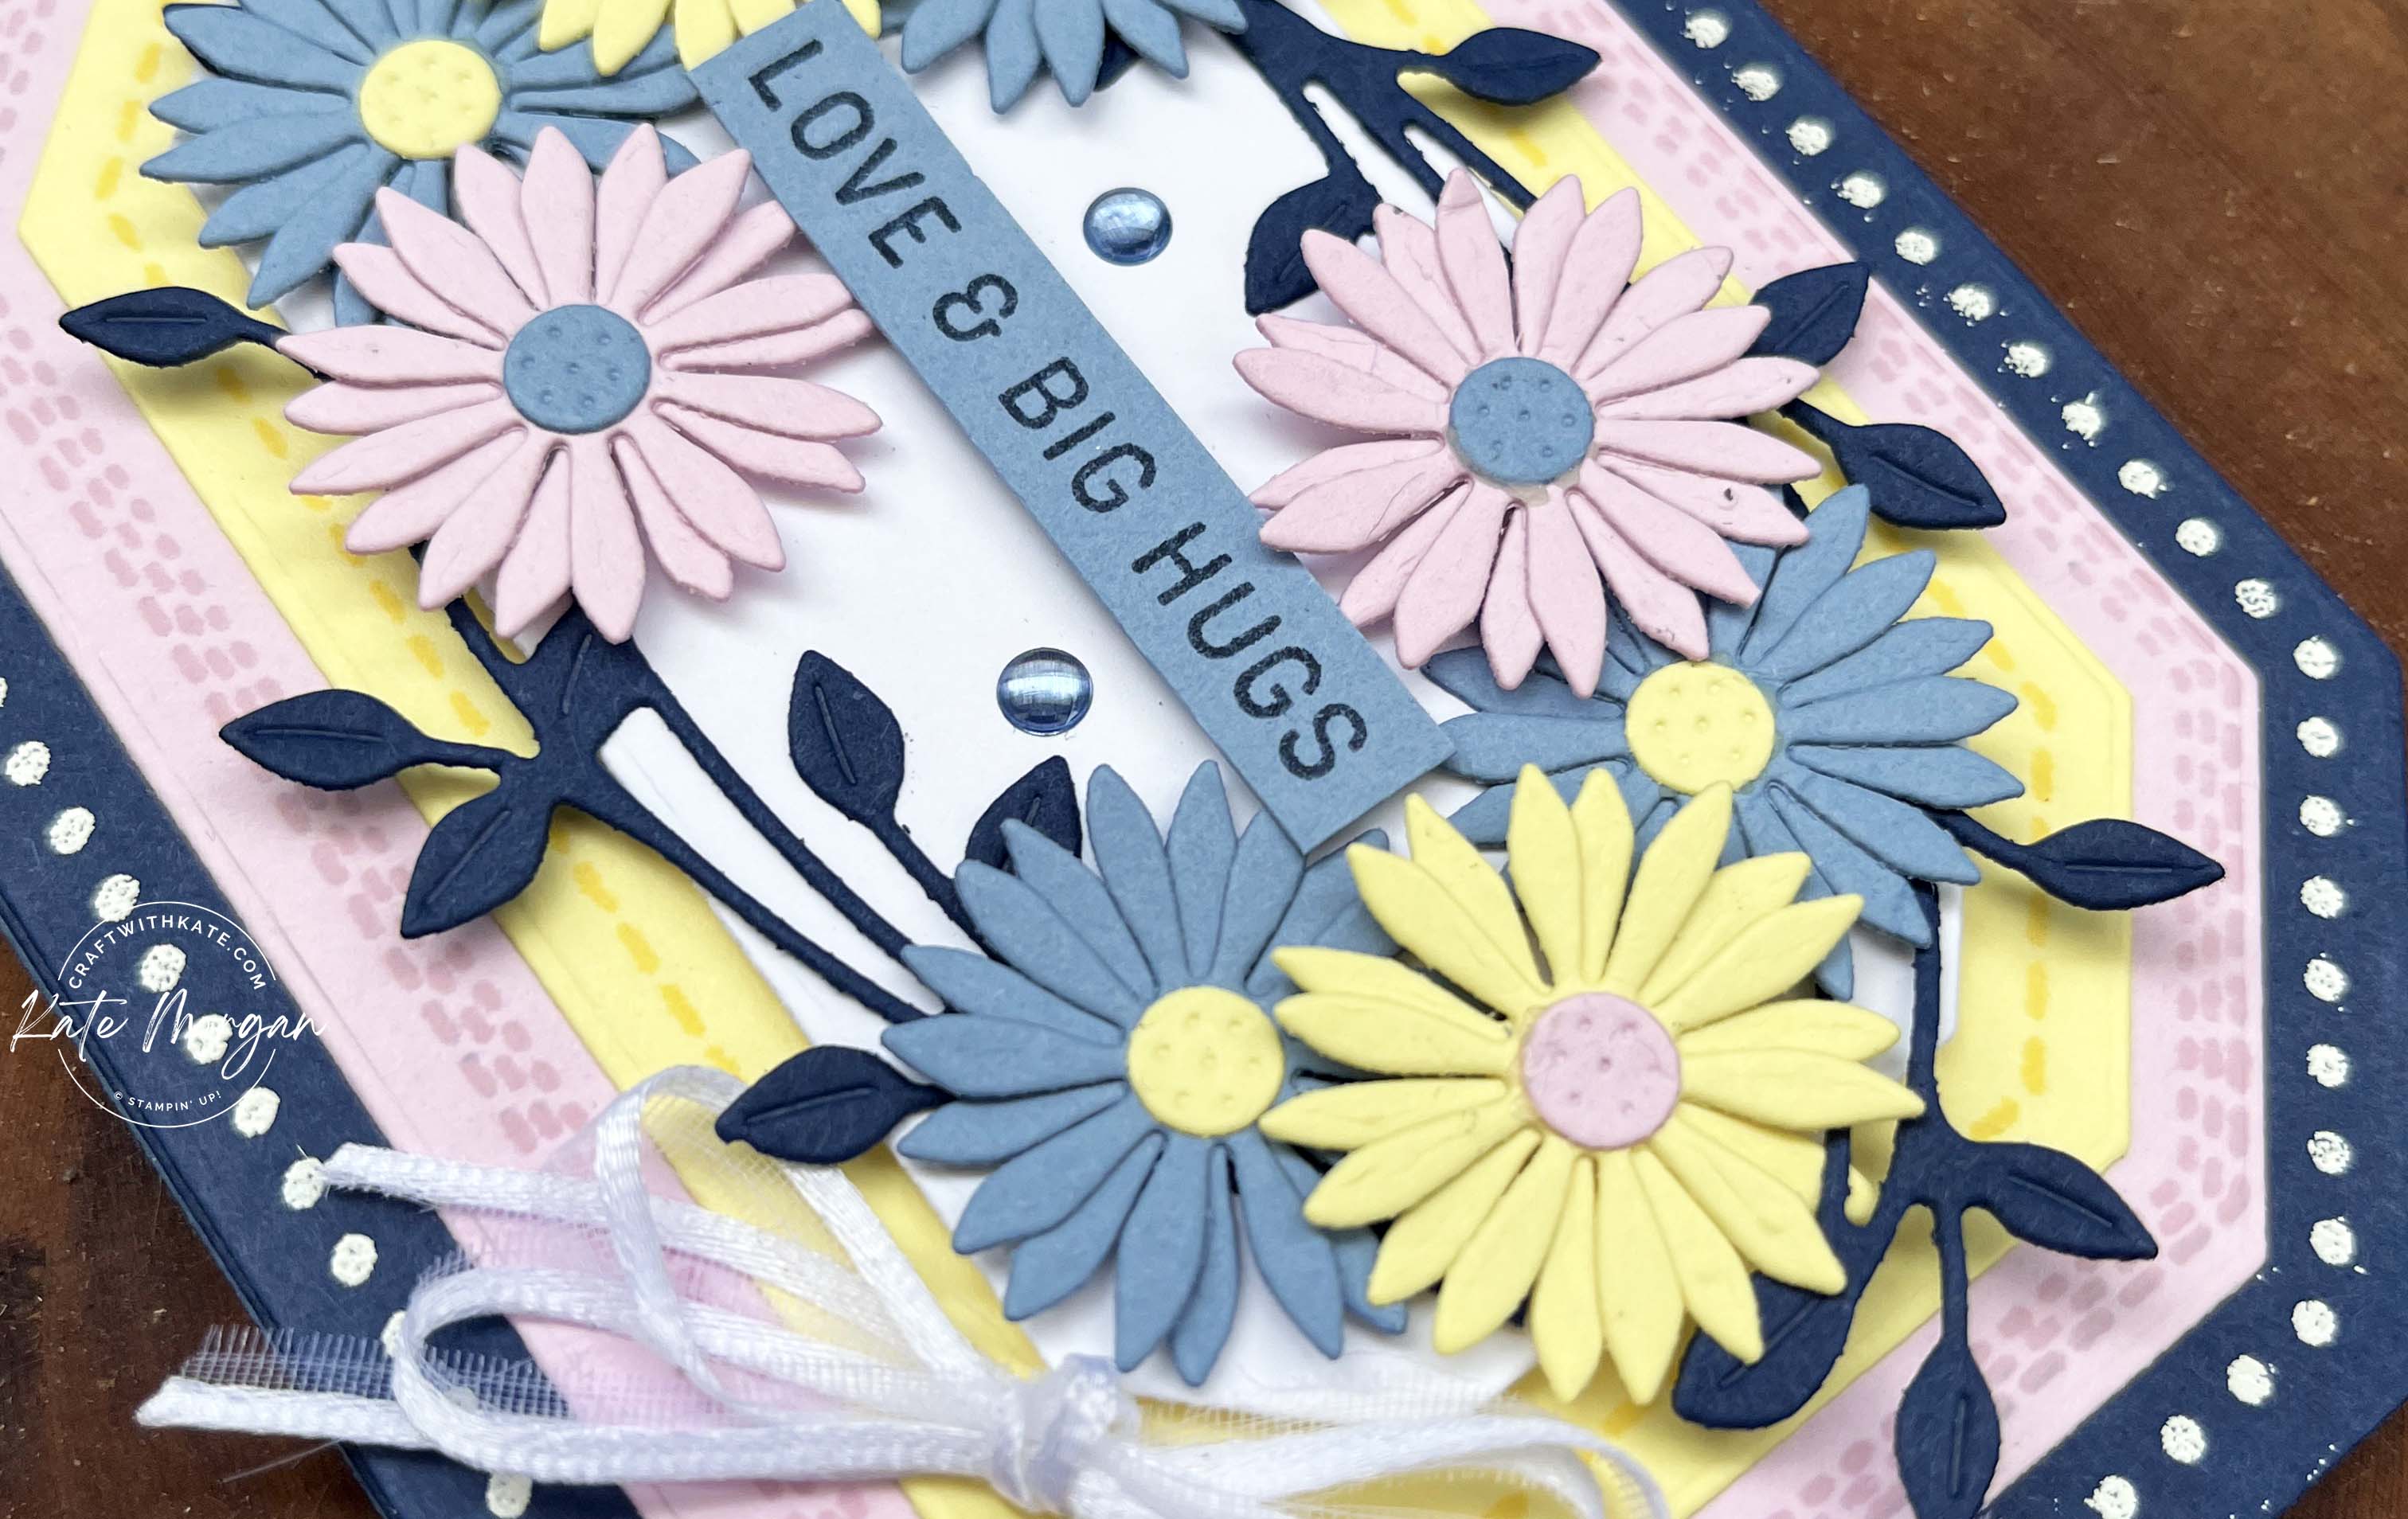
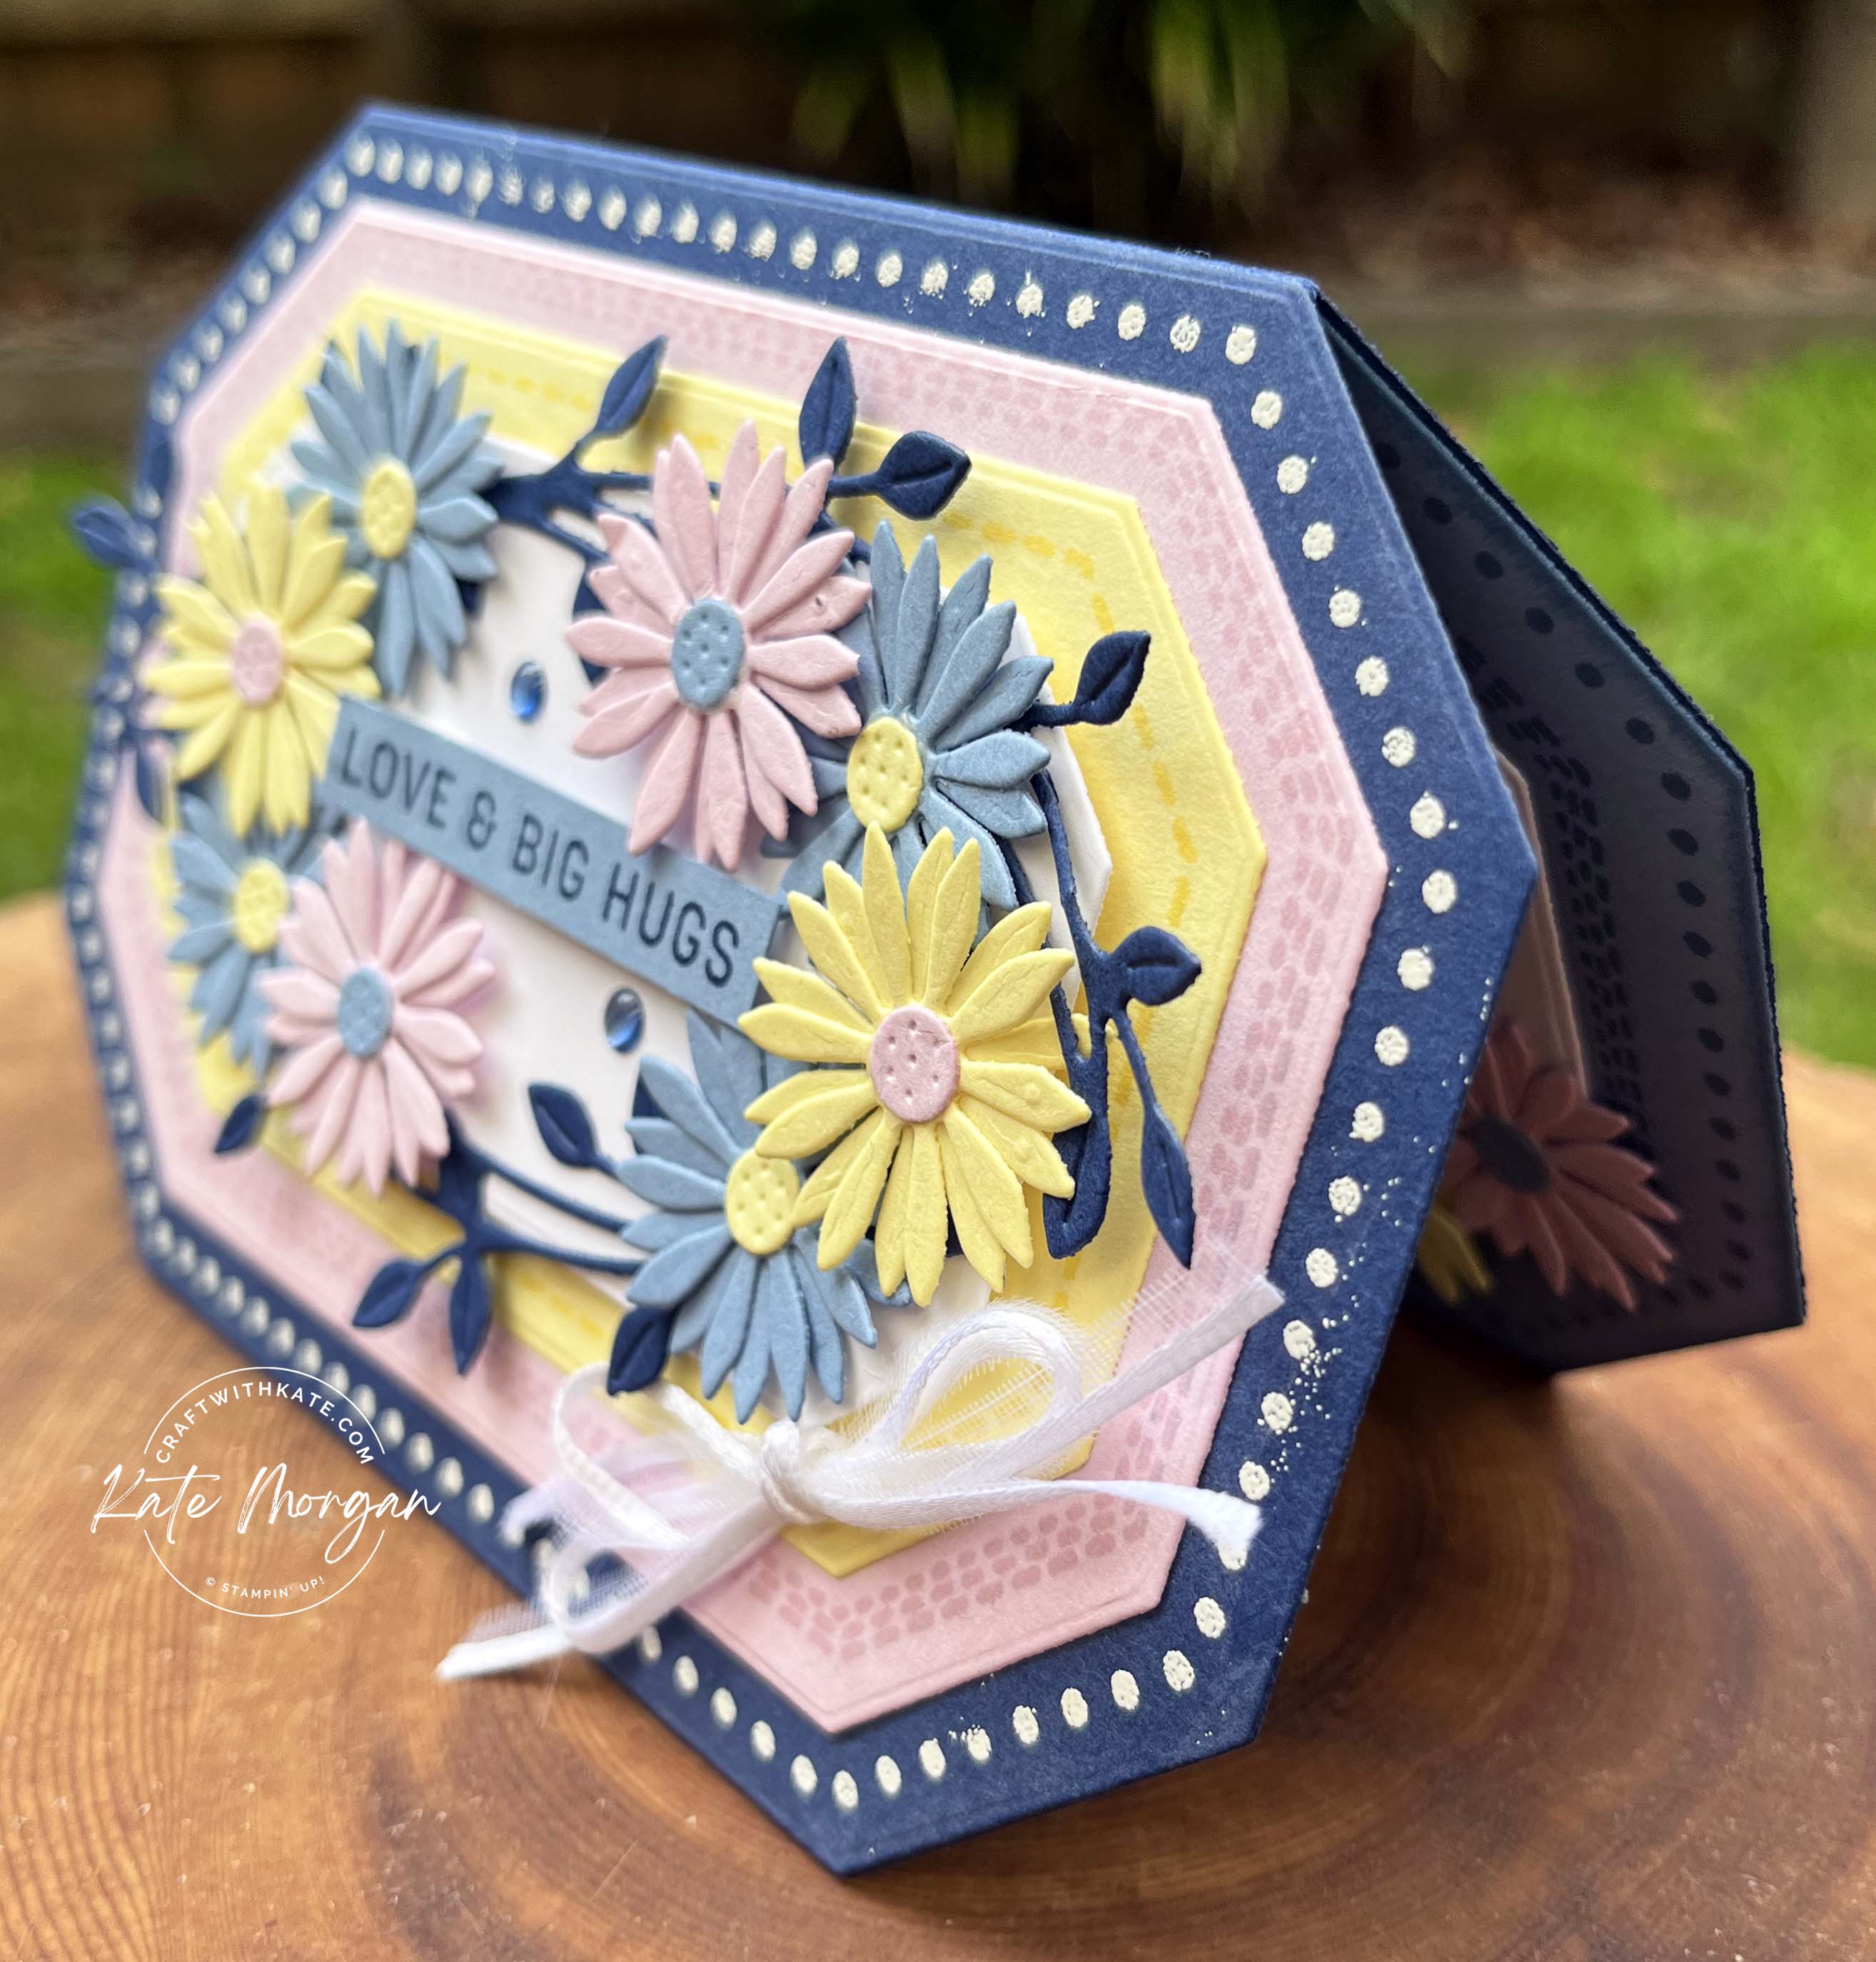
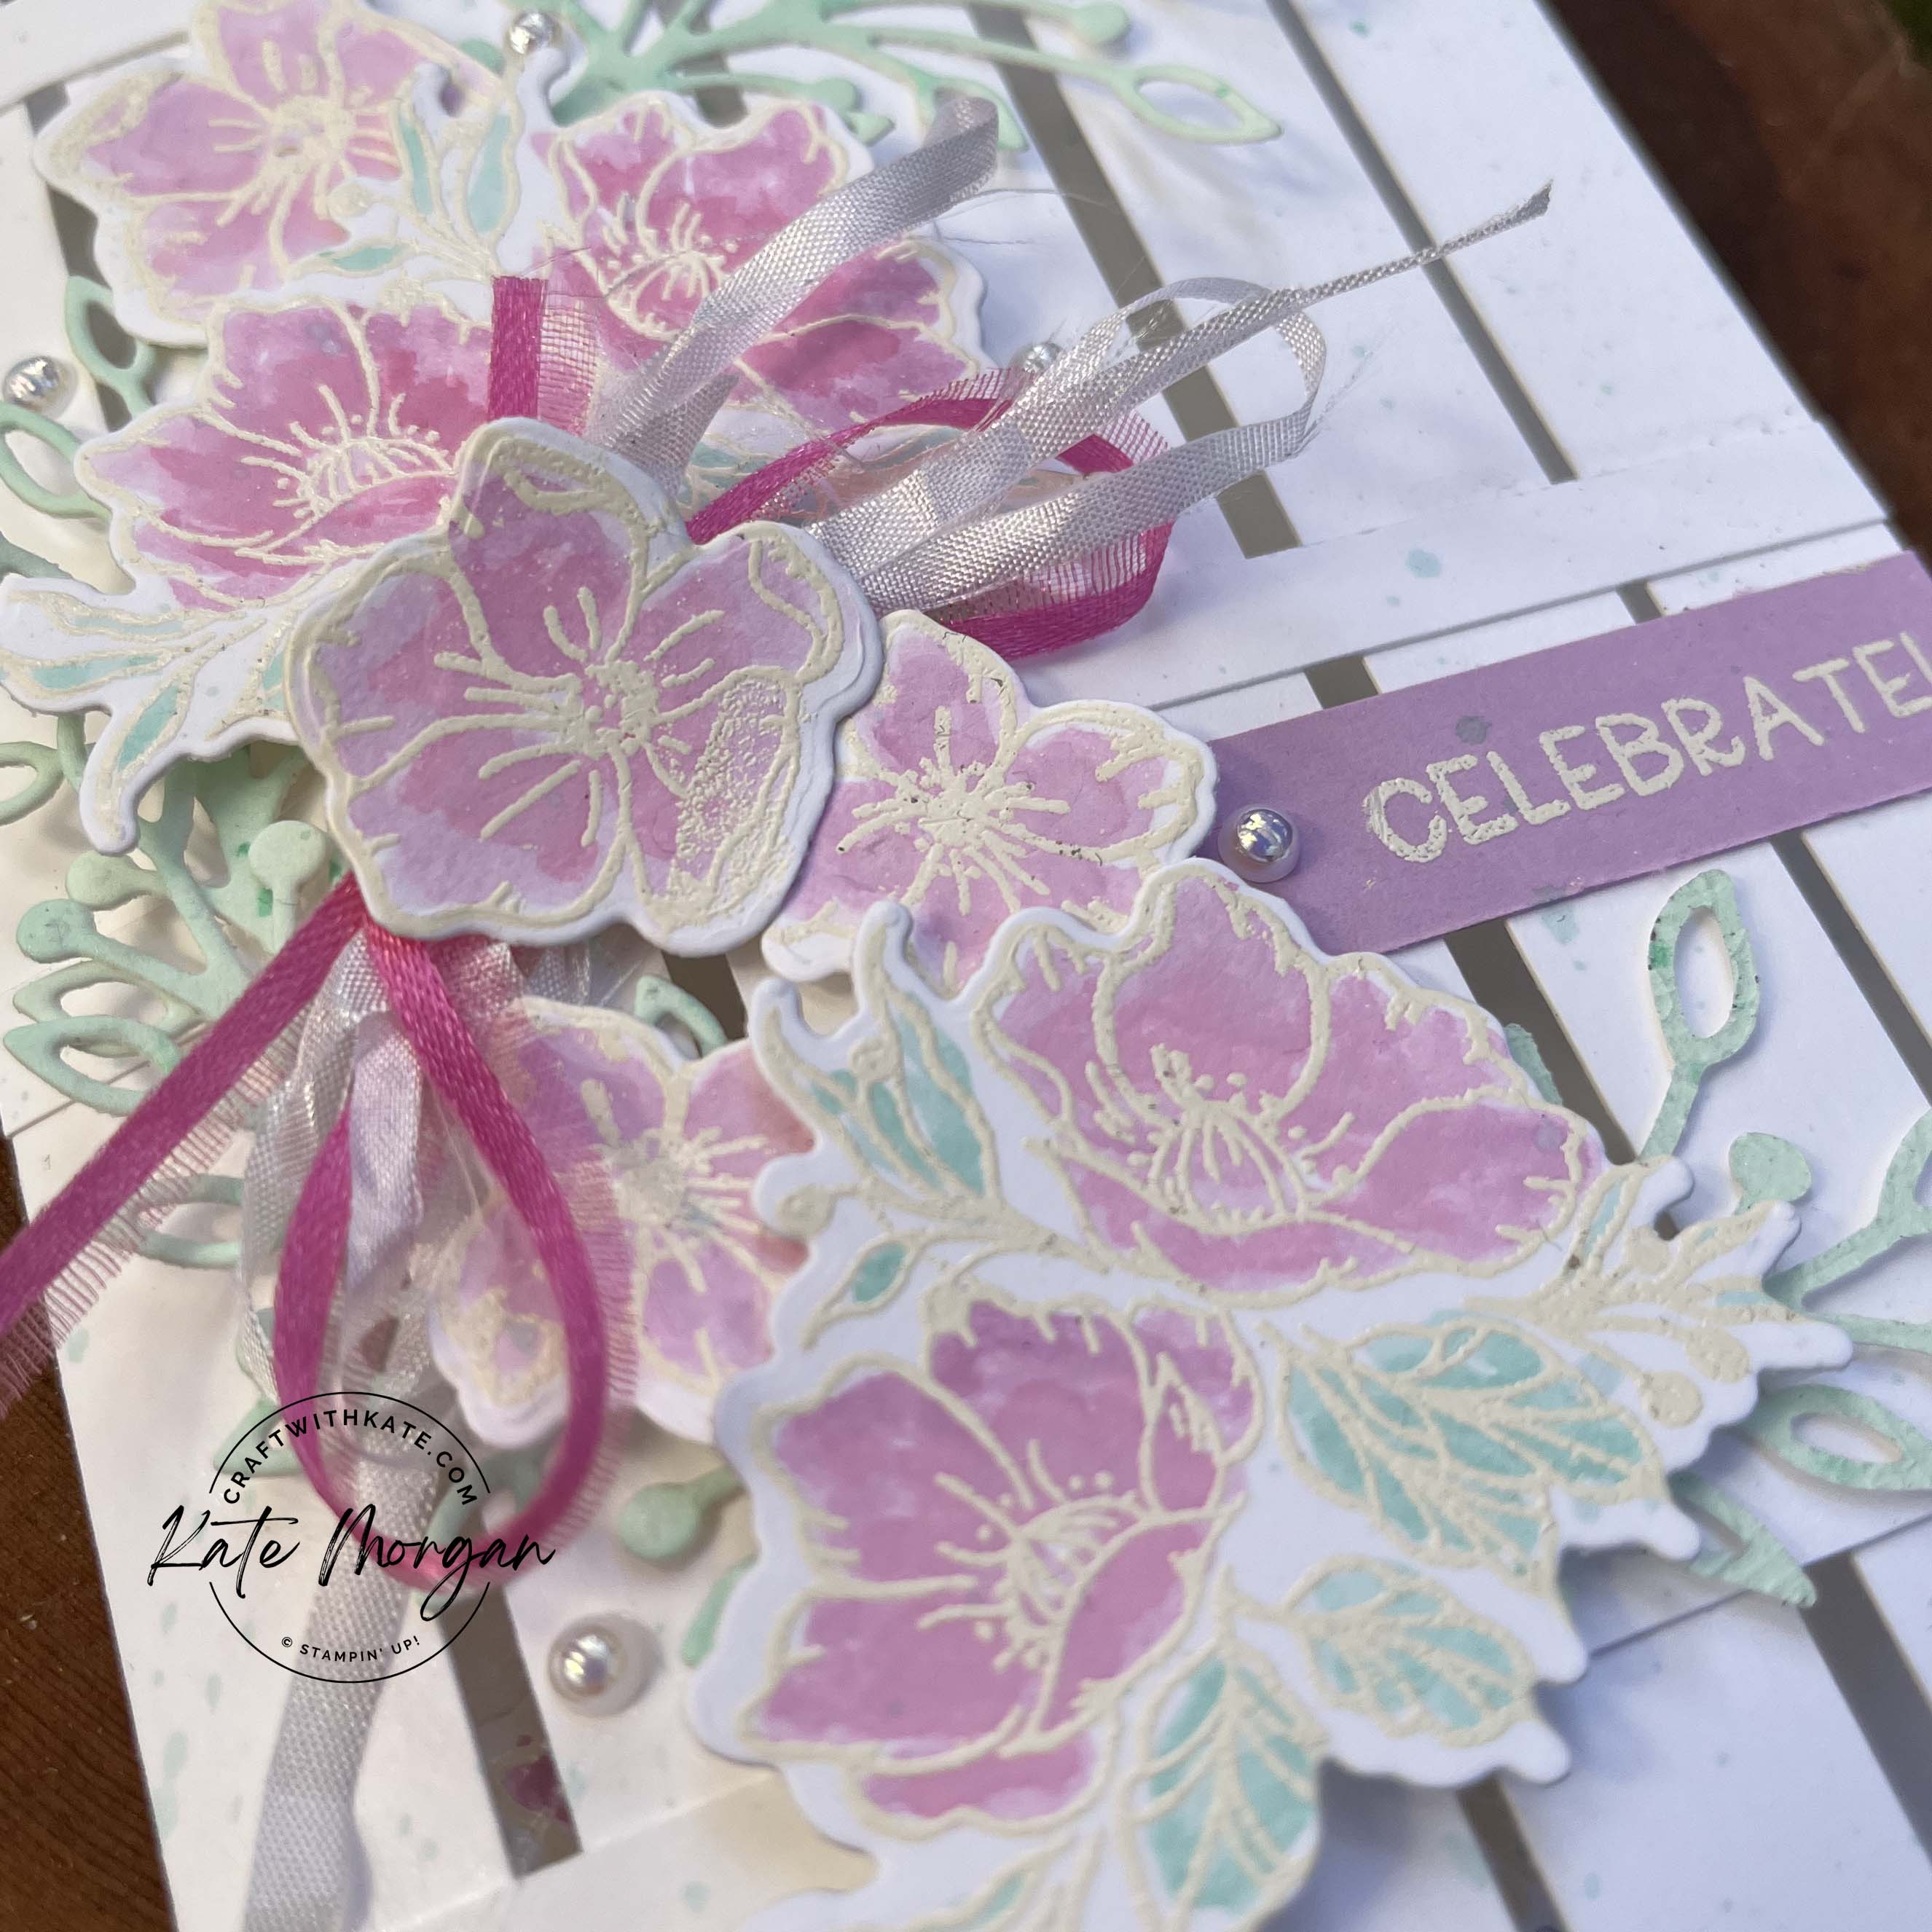
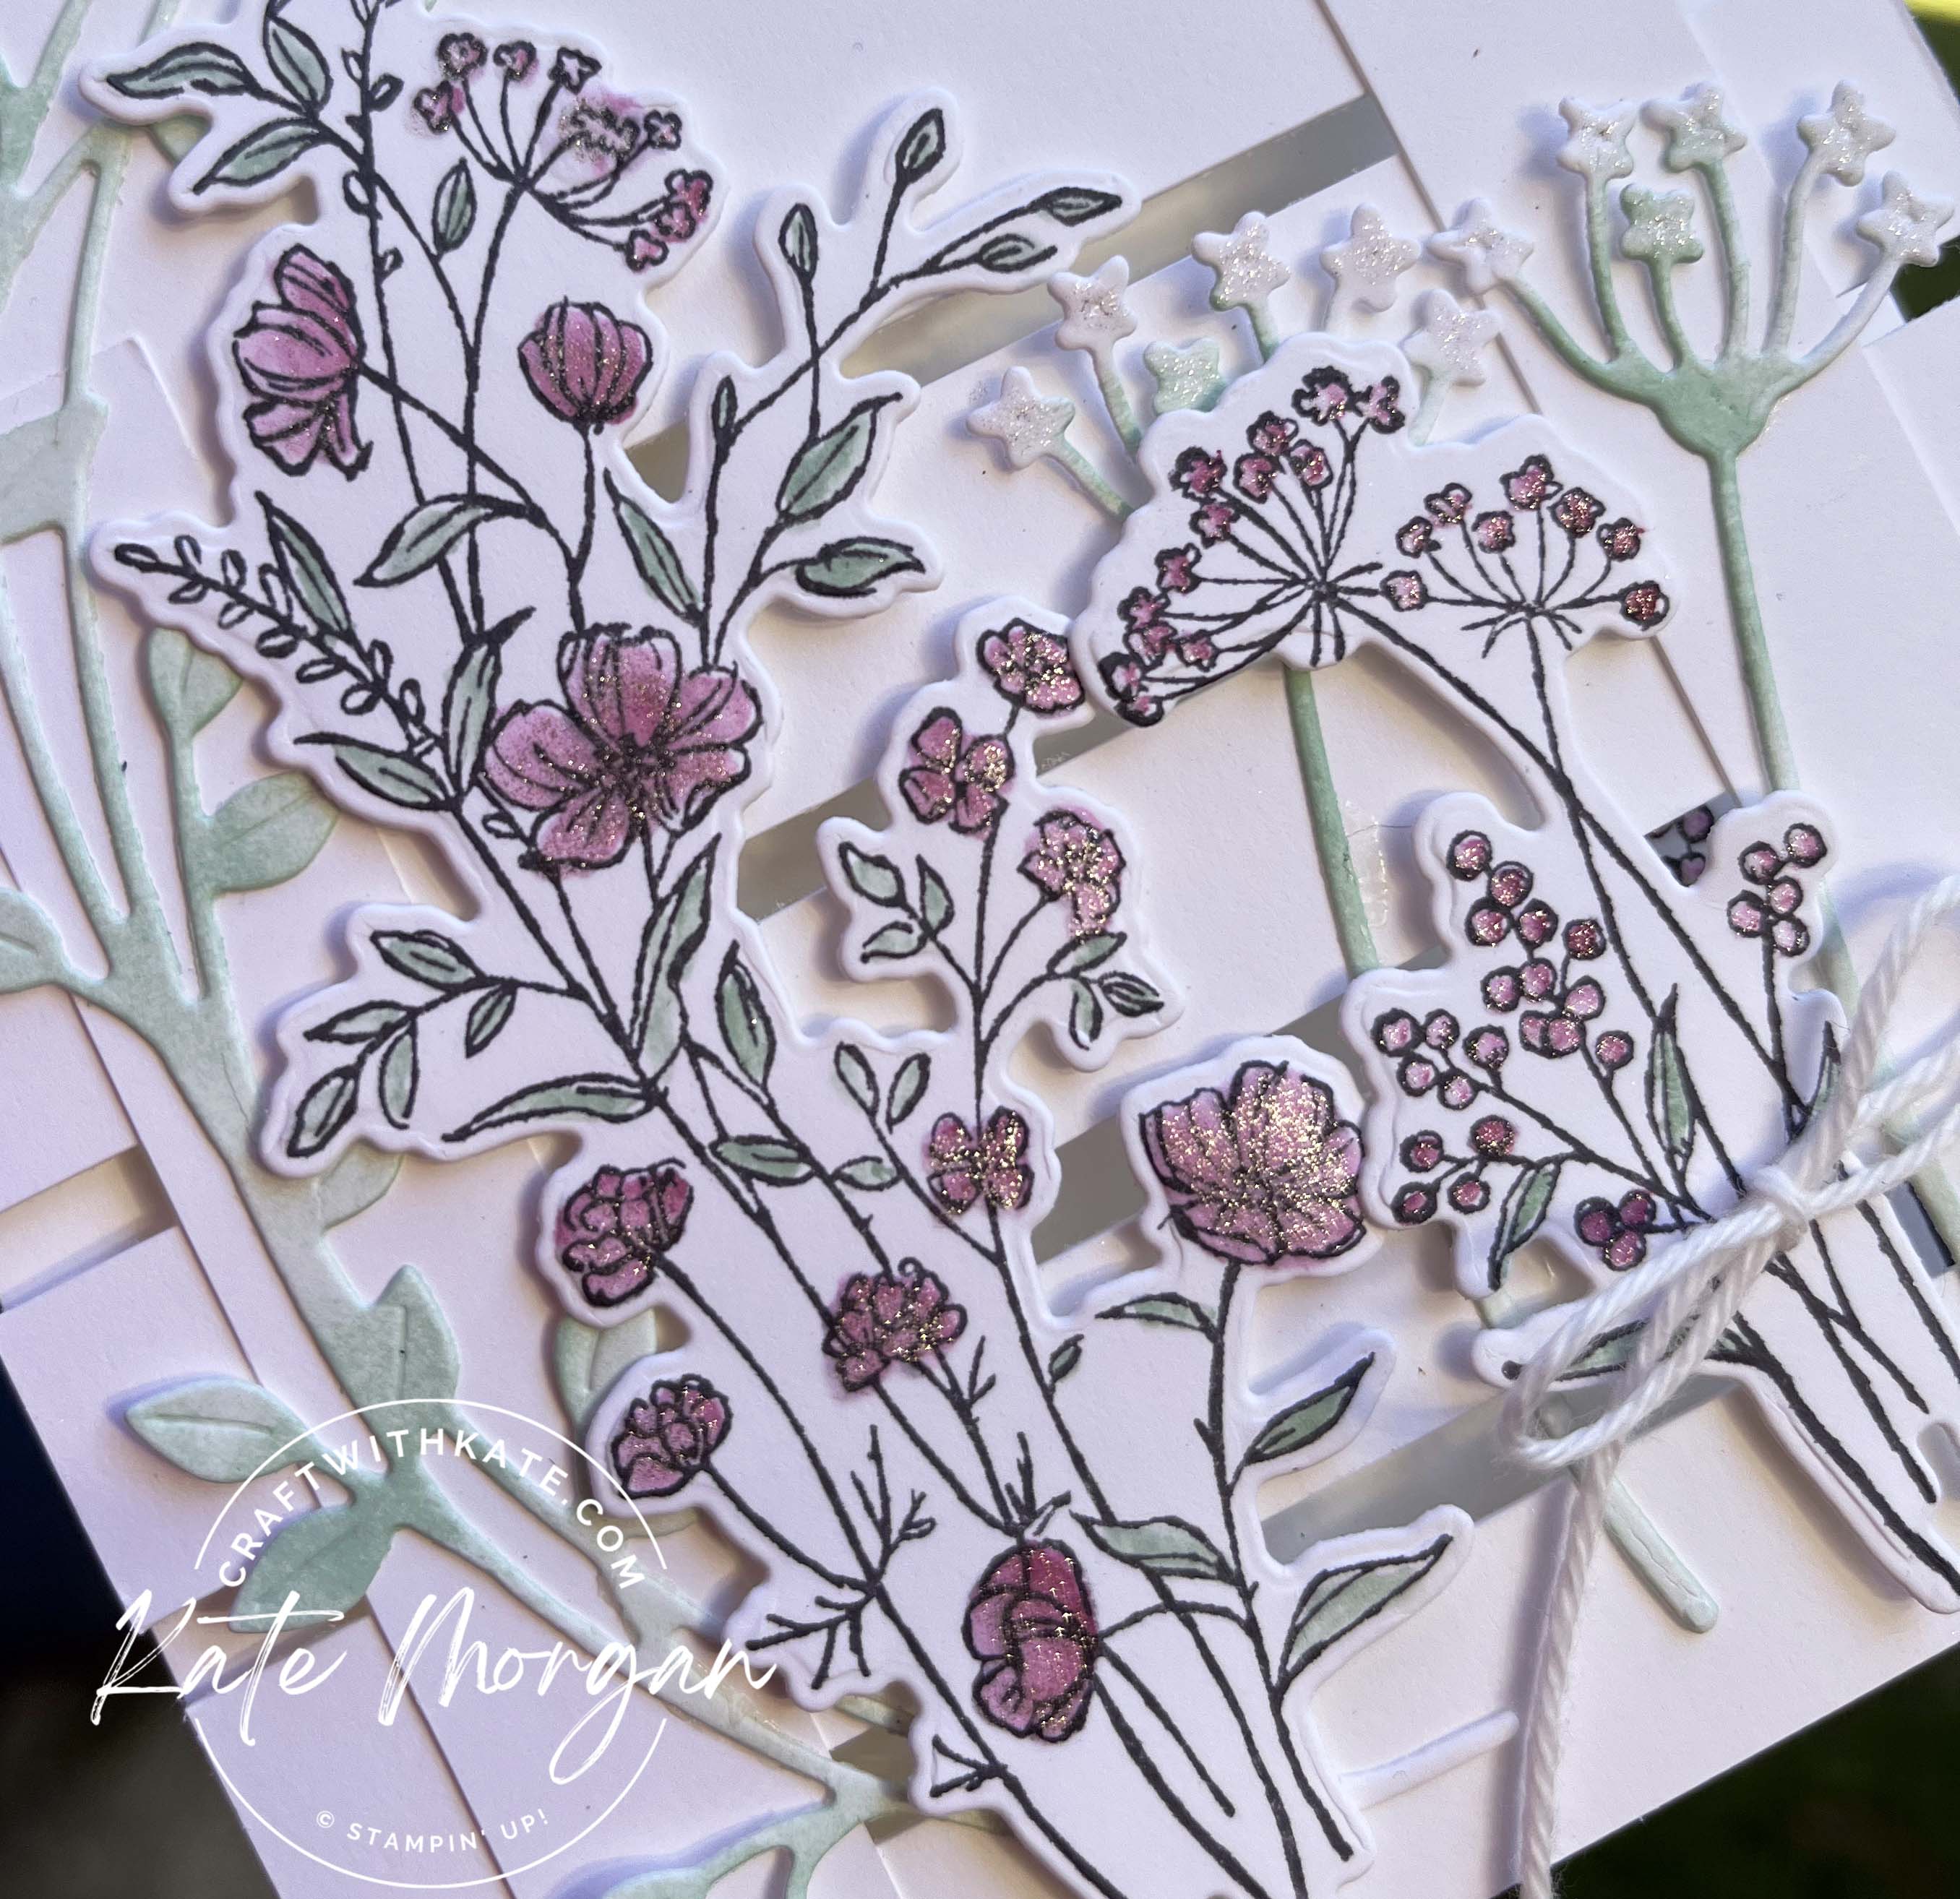
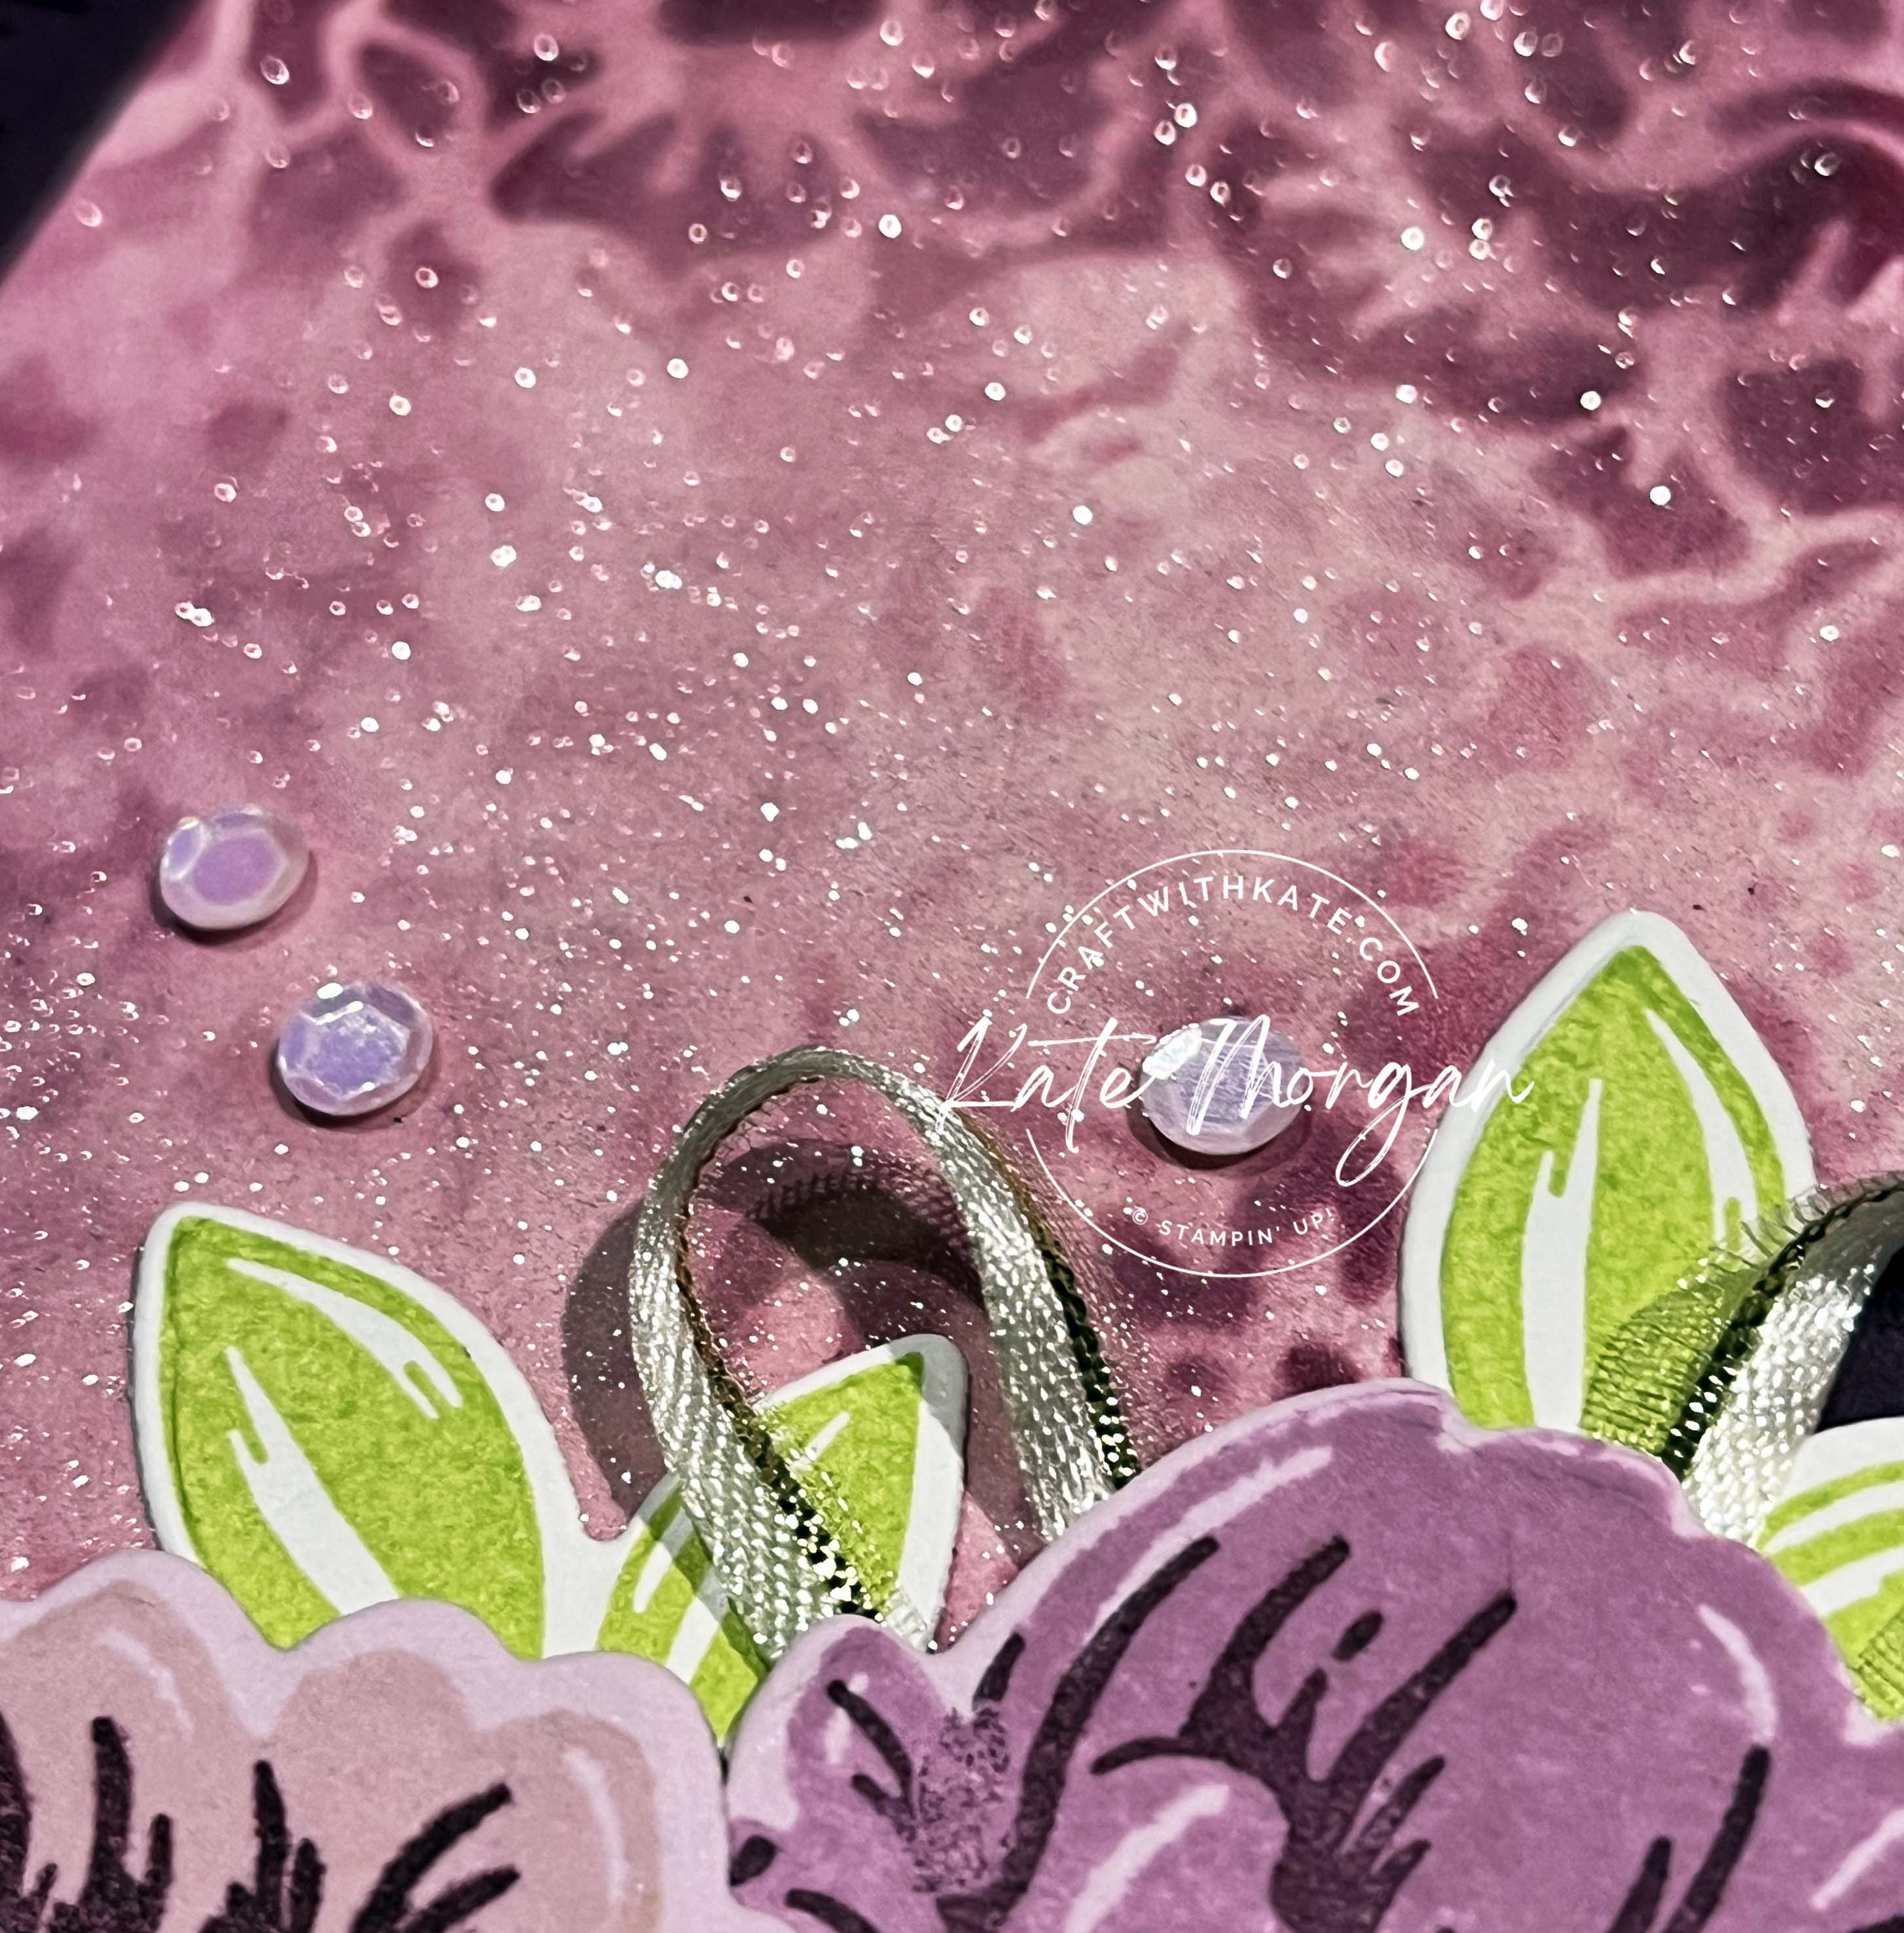
This card began with a piece of Fluid 100 Watercolour paper which I had every intension of doing watercolouring, but things changed as I went… I added Bubble Bath and Fresh Freesia ink with my Blending Brushes. Once I had a lovely soft marble type layer, I die cut the largest die from the Two-tone Flora dies, turned it to the reverse side, and gently added some Blackberry Bliss ink with a Blending Brush using the die cut as a stencil.

Masked glittery background Feminine card by Kate Morgan Sttampin Up Australia 2023 Blackberry Bliss Two Tone Flora

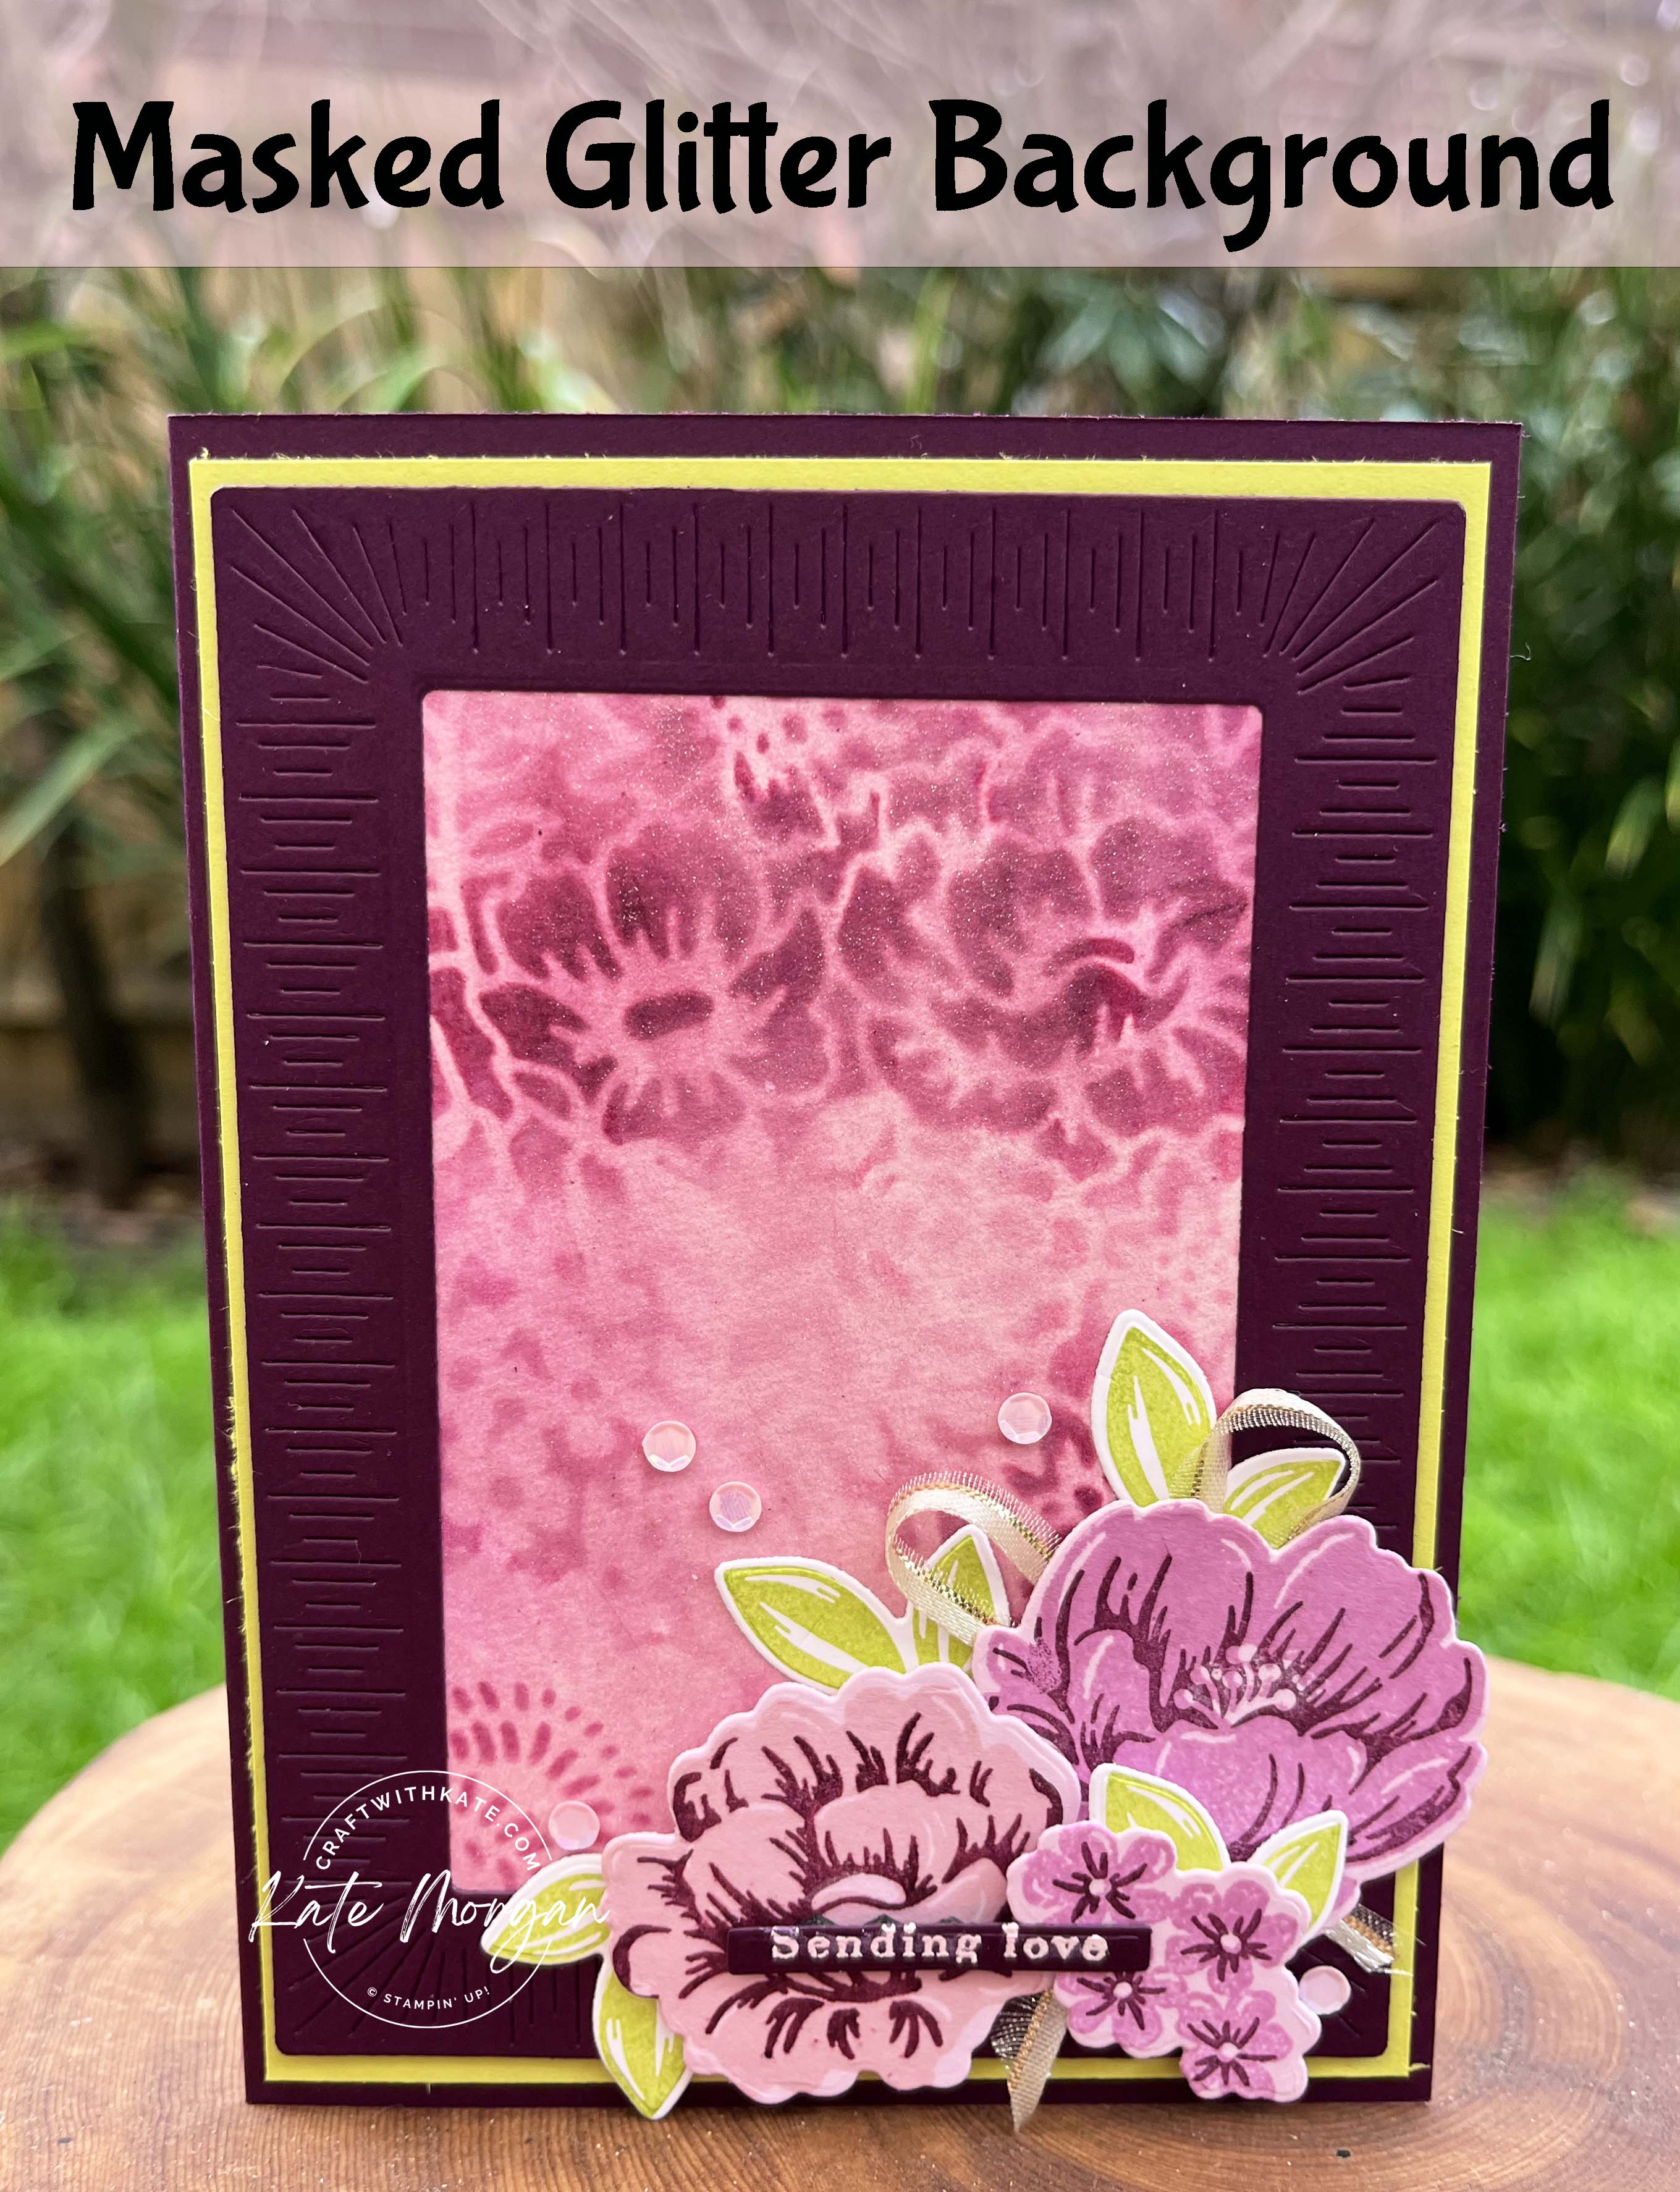
I was going to add some flicks of Wink of Stella, but it came out in a gush (oops) so I ended up having to cover the entire piece. How sparkly does it look though? It is even better in real life!!!

Masked glittery background Feminine card by Kate Morgan Sttampin Up Australia 2023 Blackberry Bliss Two Tone Flora sparkle

I die cut the two largest dies from the Radiating Stitches Dies to create the border. This was glued to the Watercolour piece. I added a Lemon Lime Twist matt layer for this to sit on and then onto my Blackberry Bliss card base.

The flowers are stamped on Bubble Bath card with the details in Blackberry Bliss ink. The solid stamps are Fresh Freesia and Bubble Bath inks. The leaves are stamped in Lemon Lime Twist onto Basic White card for a nice pop of colour and to also coordinate with the background layer. These were all die cut with the Two-tone Flora dies. I cut a piece of Gold Satin Edged ribbon in half lengthwise with Paper Snips and adhered it down with Stampin’ Seal before adding the flowers & leaves on Mini Dimensionals.

Masked glittery background Feminine card by Kate Morgan Sttampin Up Australia 2023 Blackberry Bliss Two Tone Flora close

The sentiment from the Dainty Delight stamp set was partially inked with Versamark ink and stamped onto Blackberry Bliss card. White Emboss Powder was added and melted with my Heat Tool.  This was cut using a die from the Share a Milkshake dies. I felt it was a little bright, so I covered the sentiment with my Dark Bubble Bath Blends Marker. I finished with some Pastel Adhesive-backed Sequins.

Masked glittery background Feminine card by Kate Morgan Sttampin Up Australia 2023 Blackberry Bliss Two Tone Flora inside

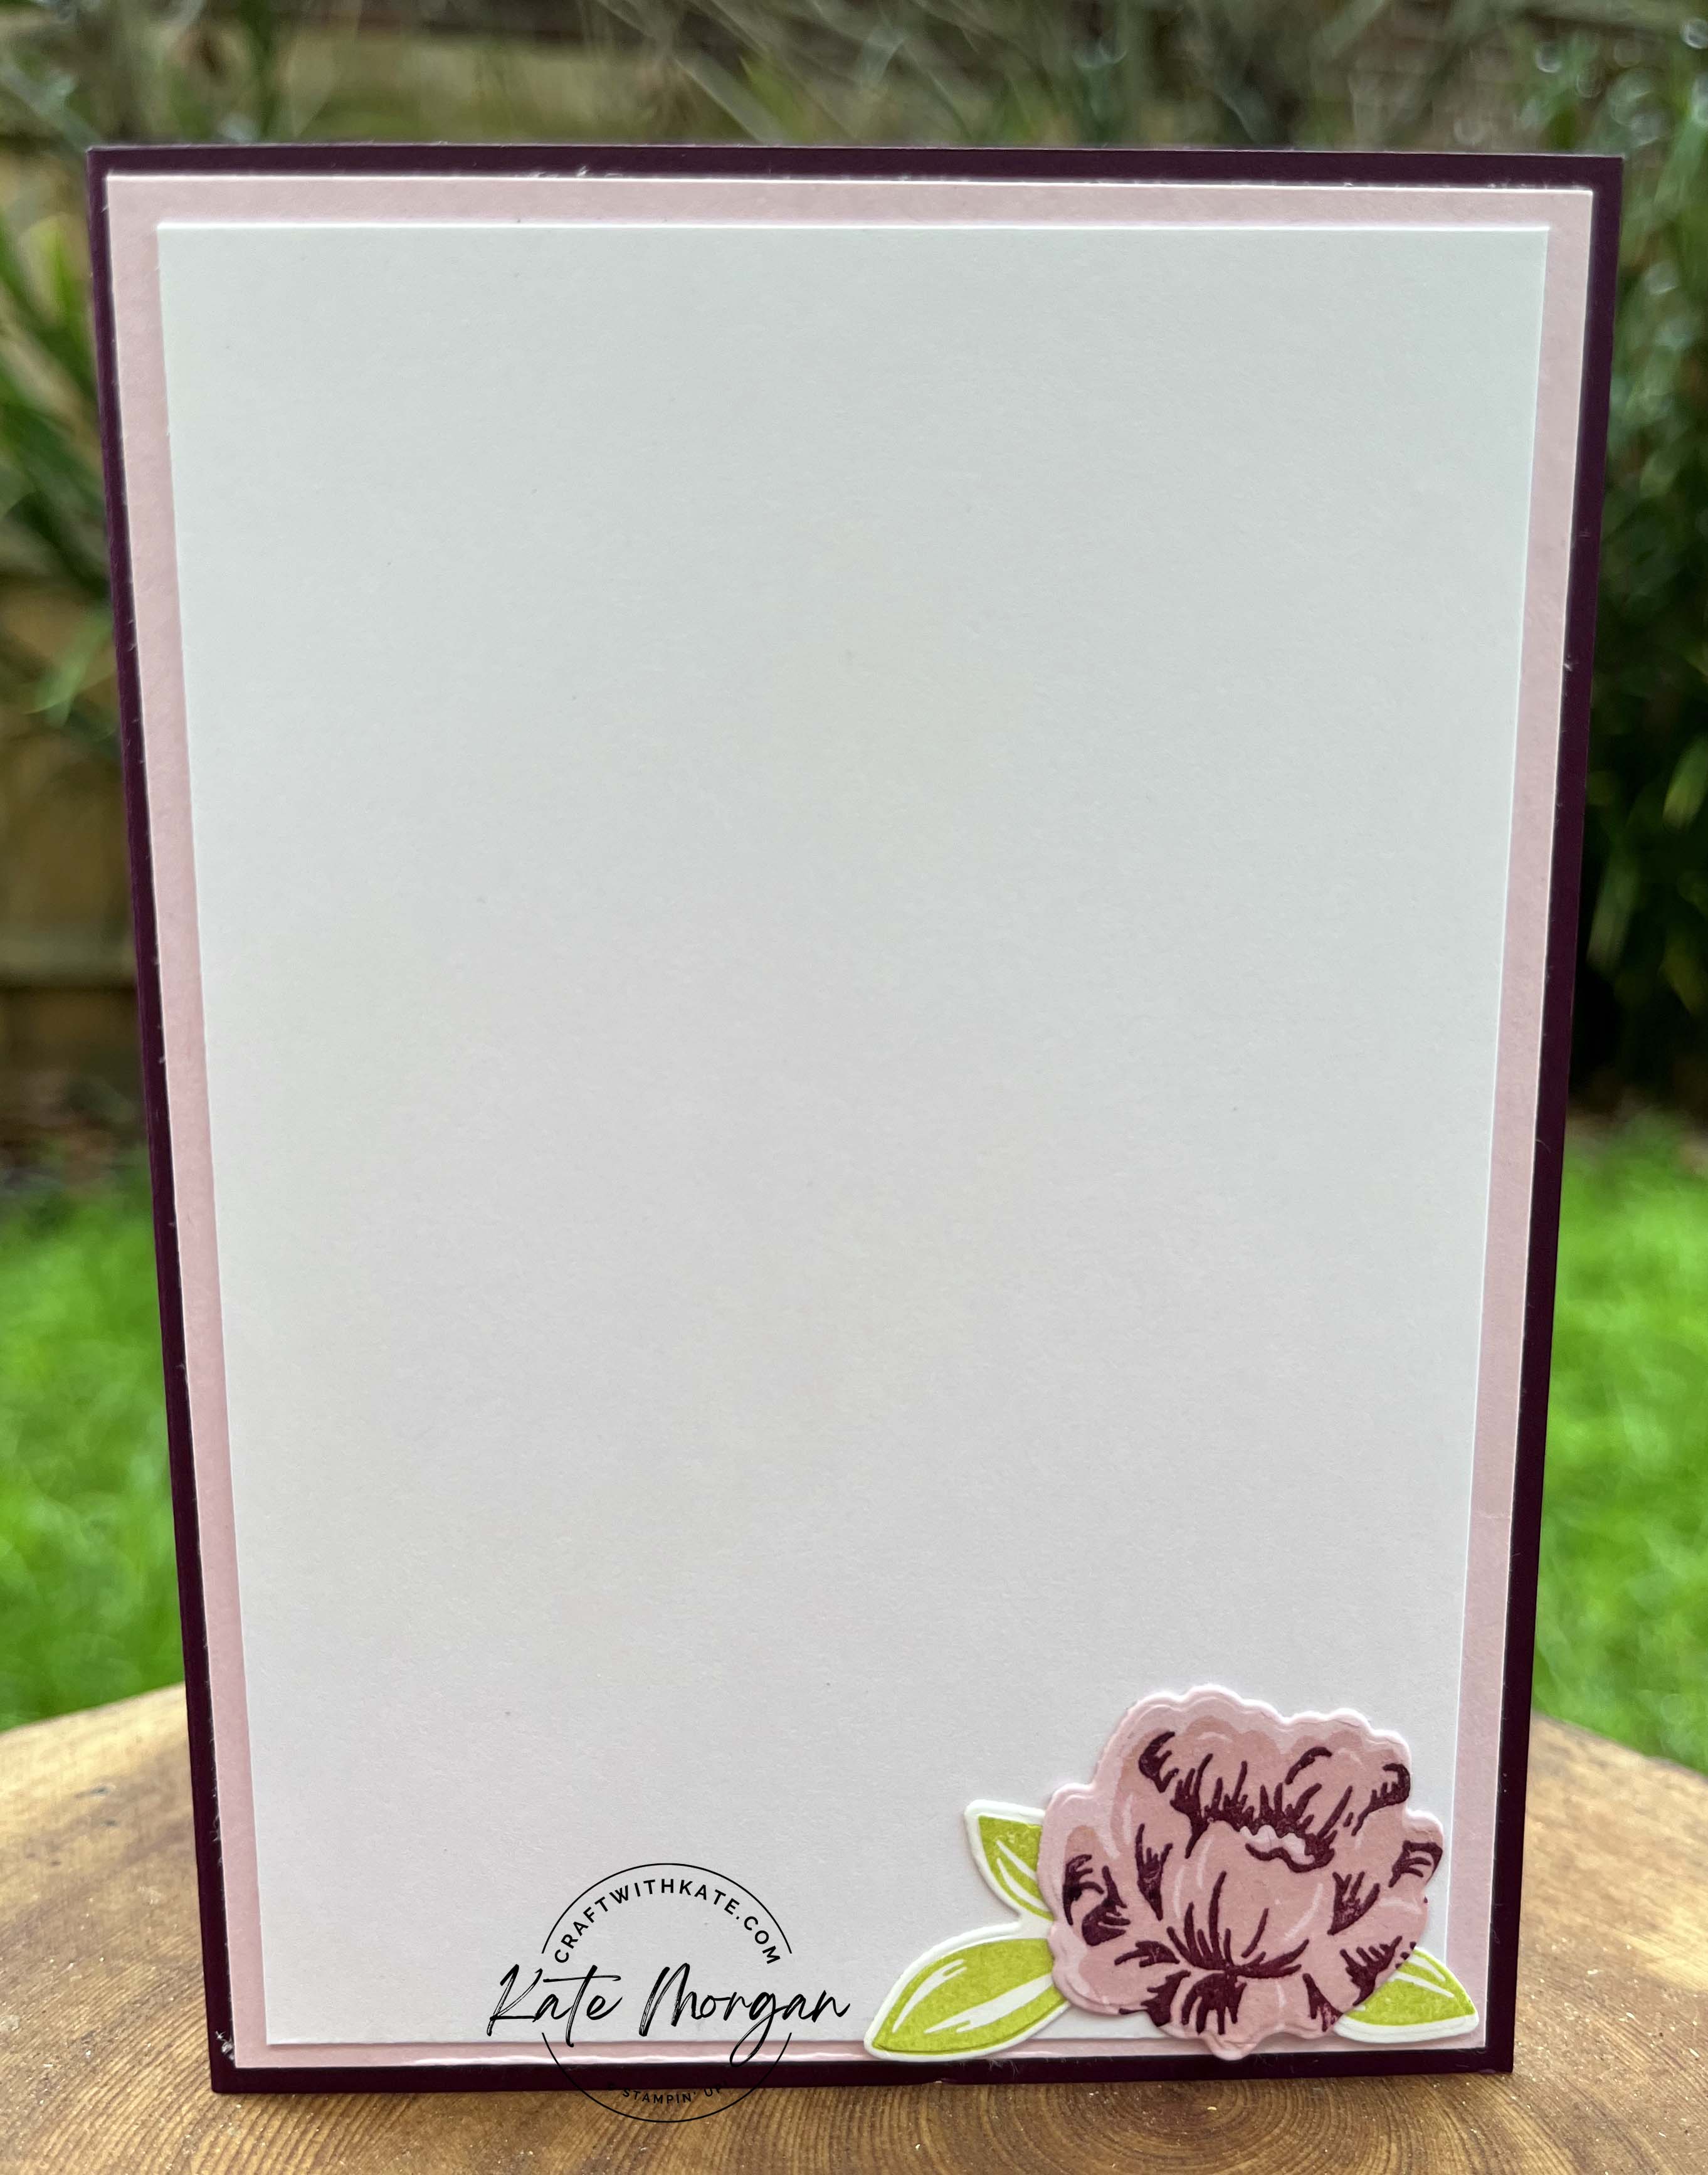
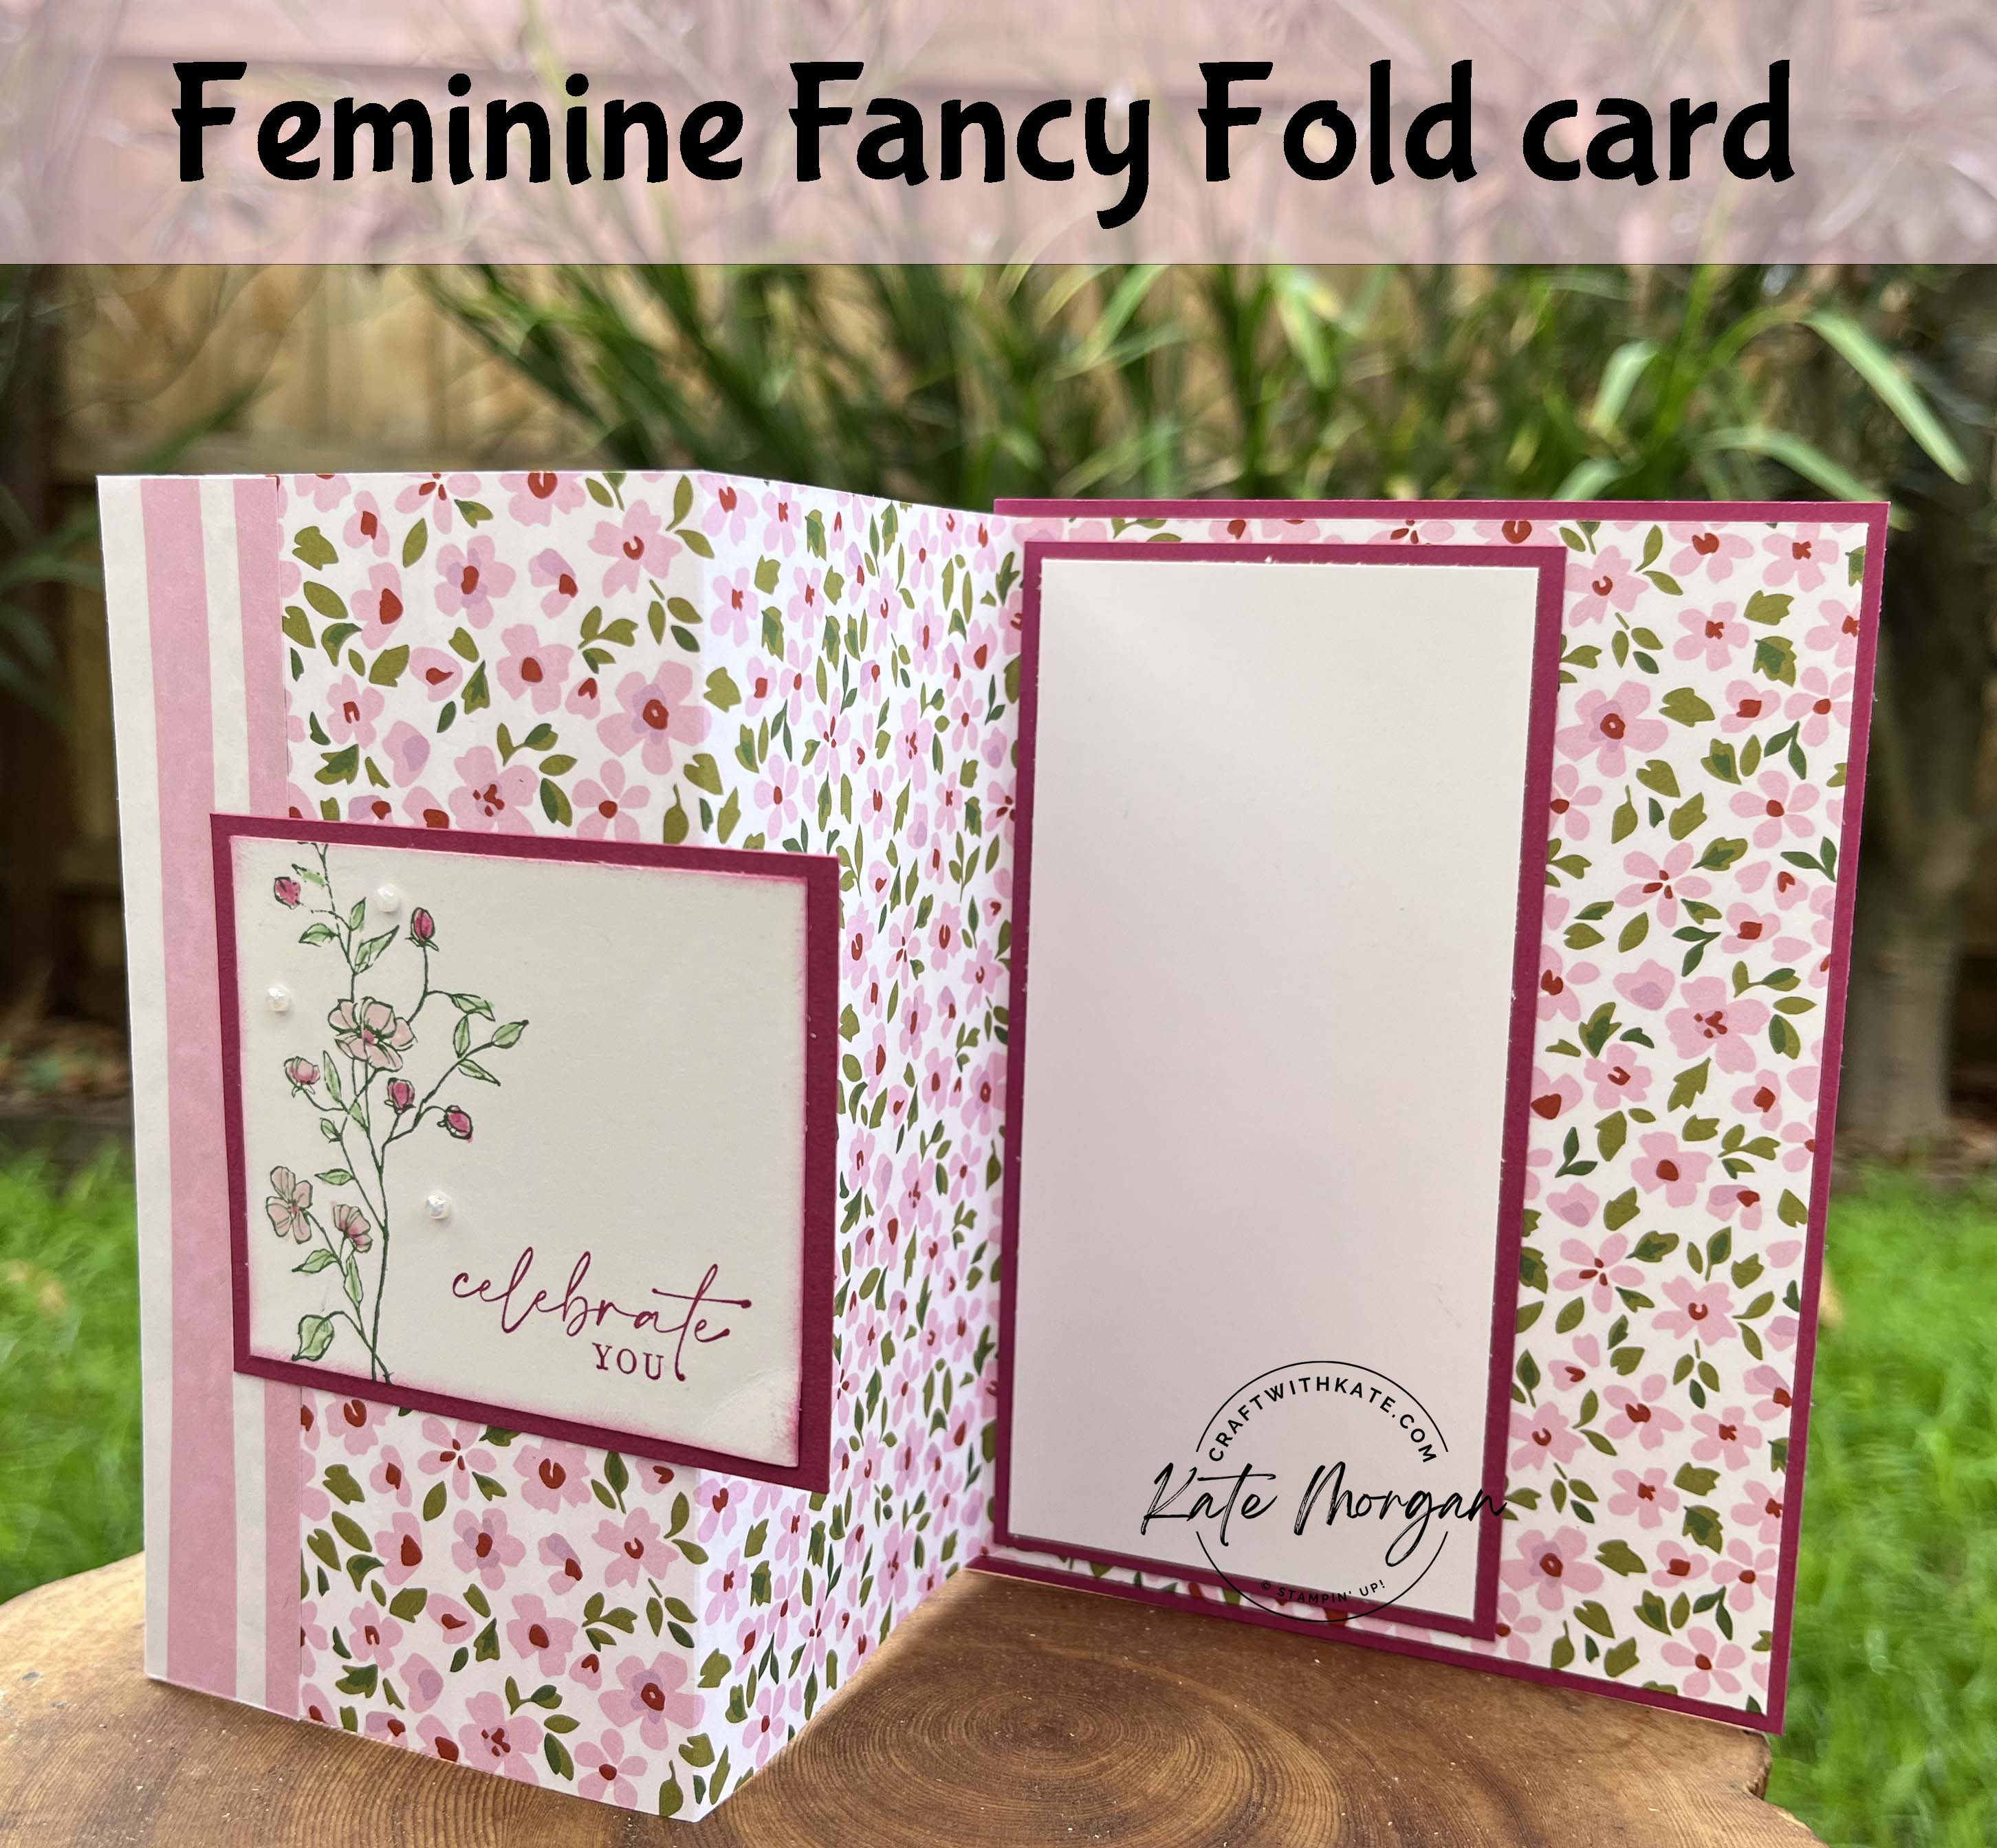
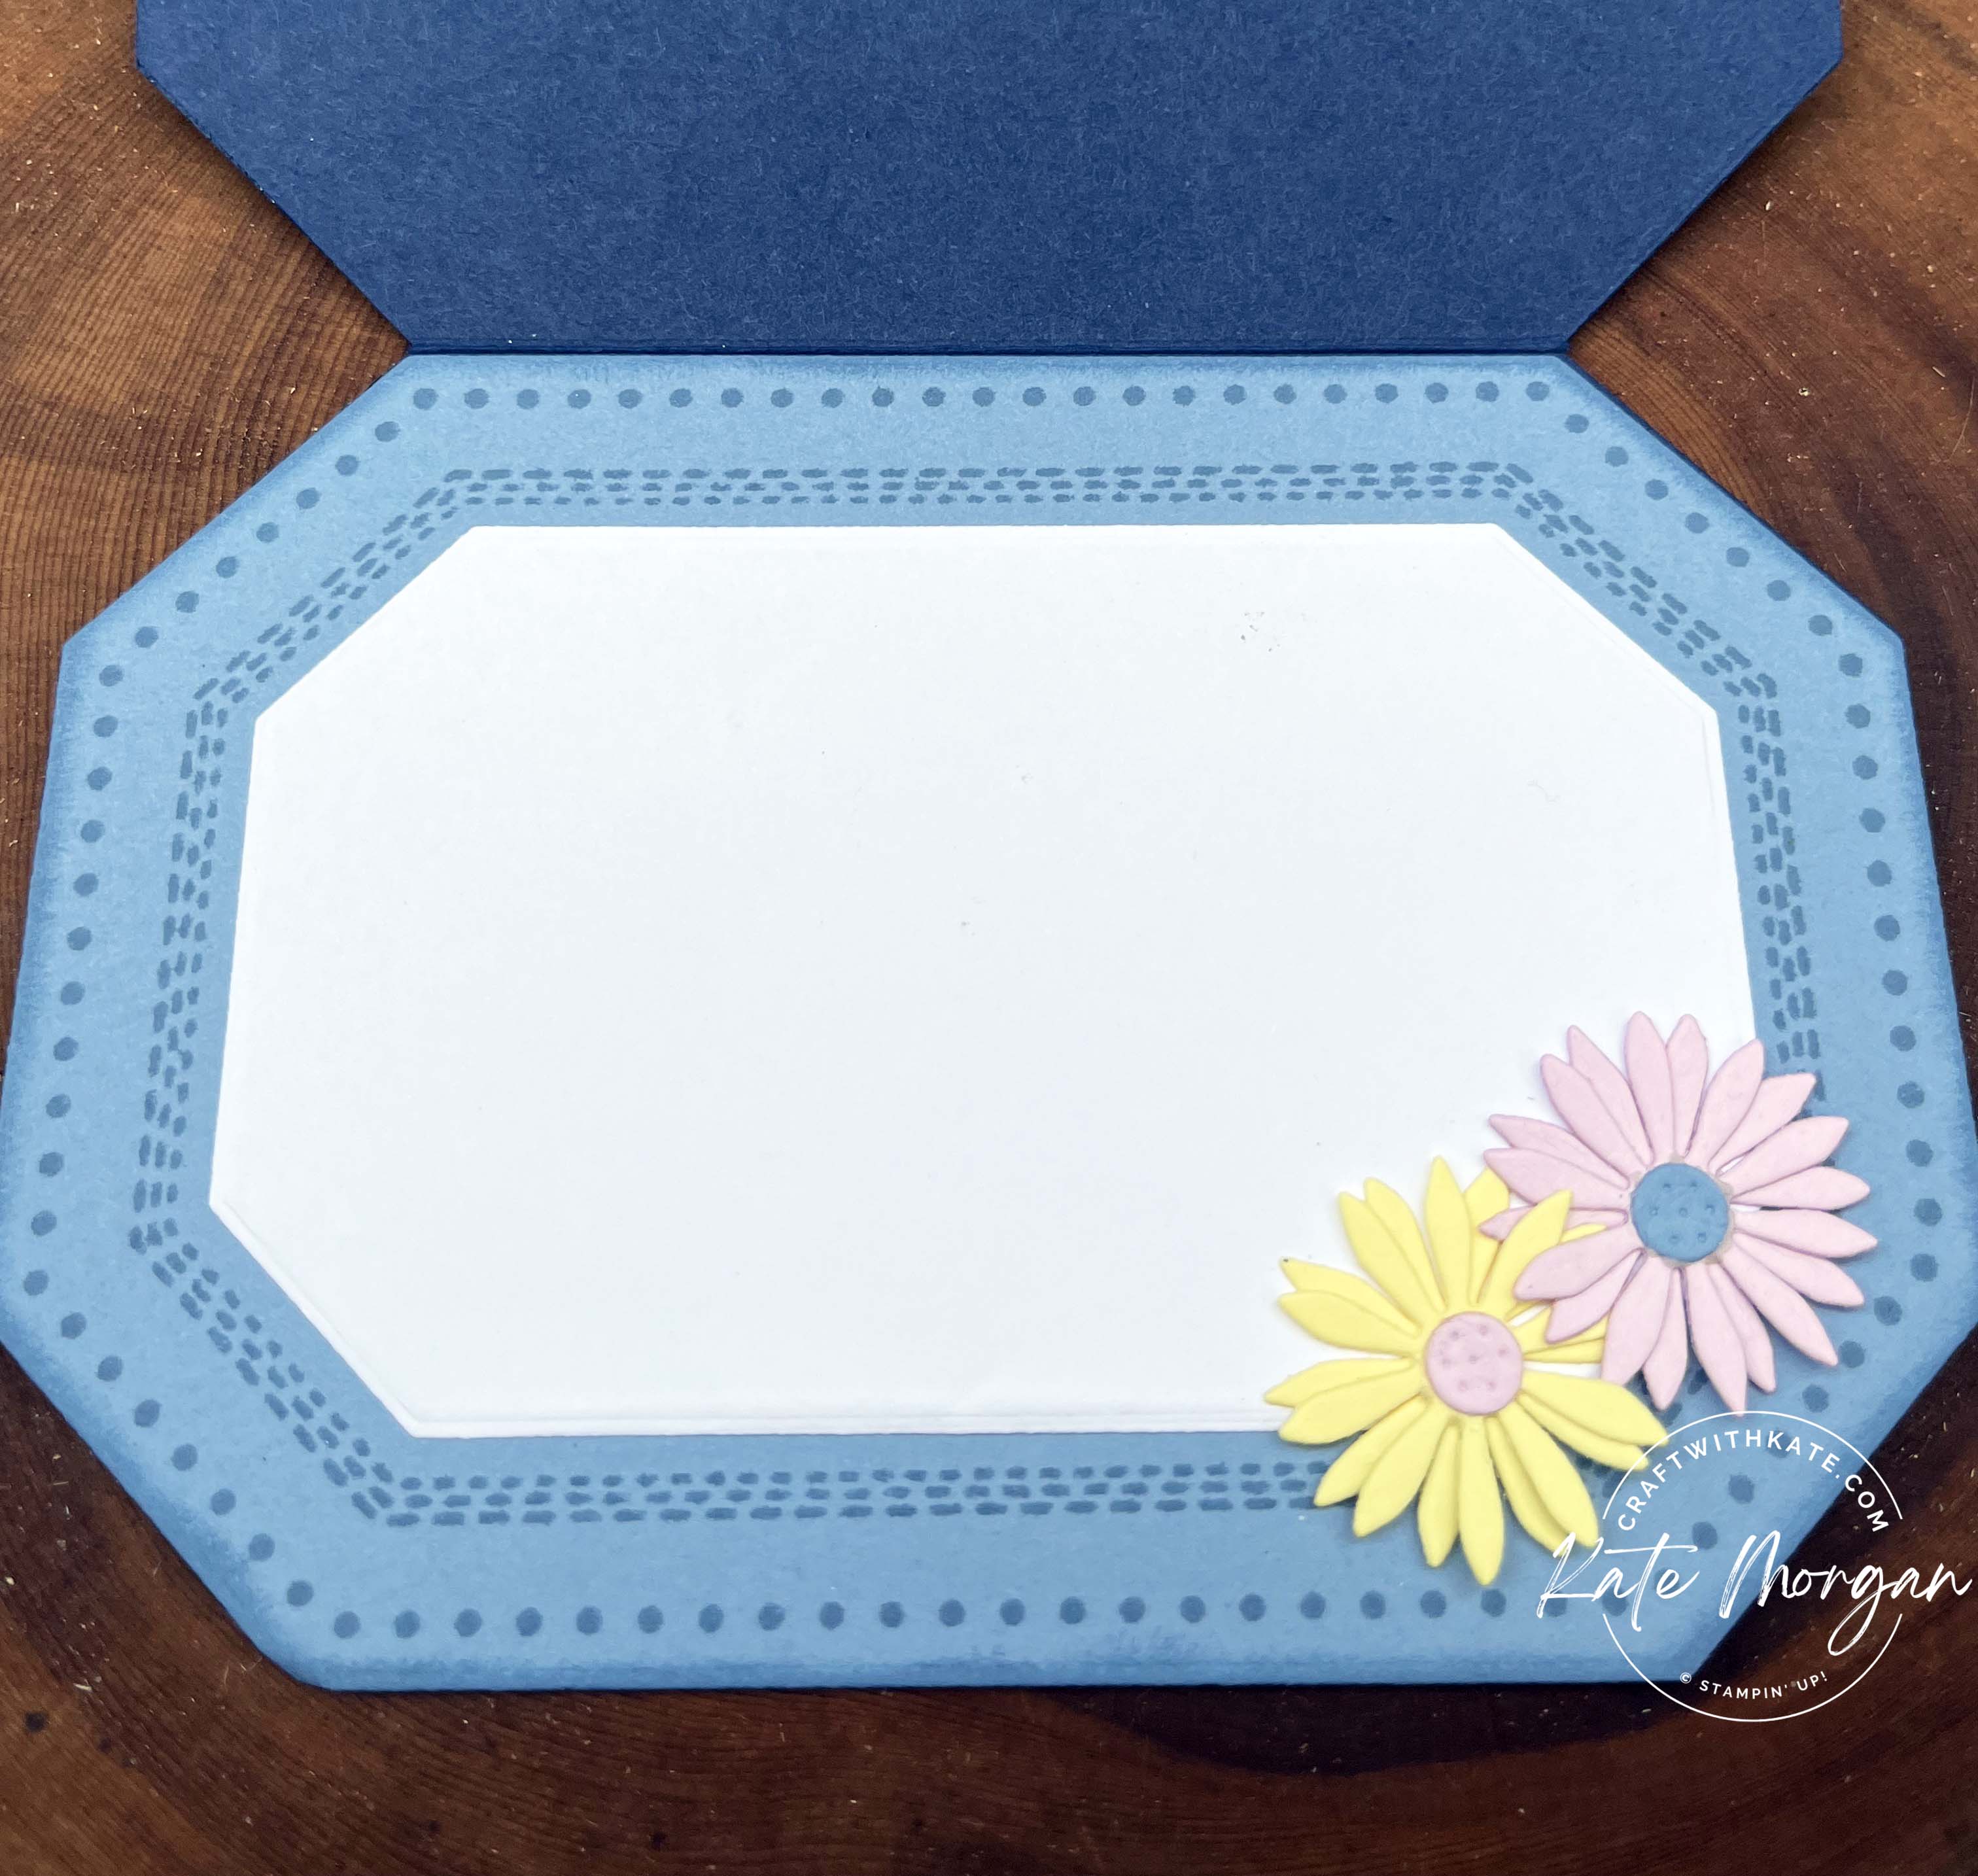
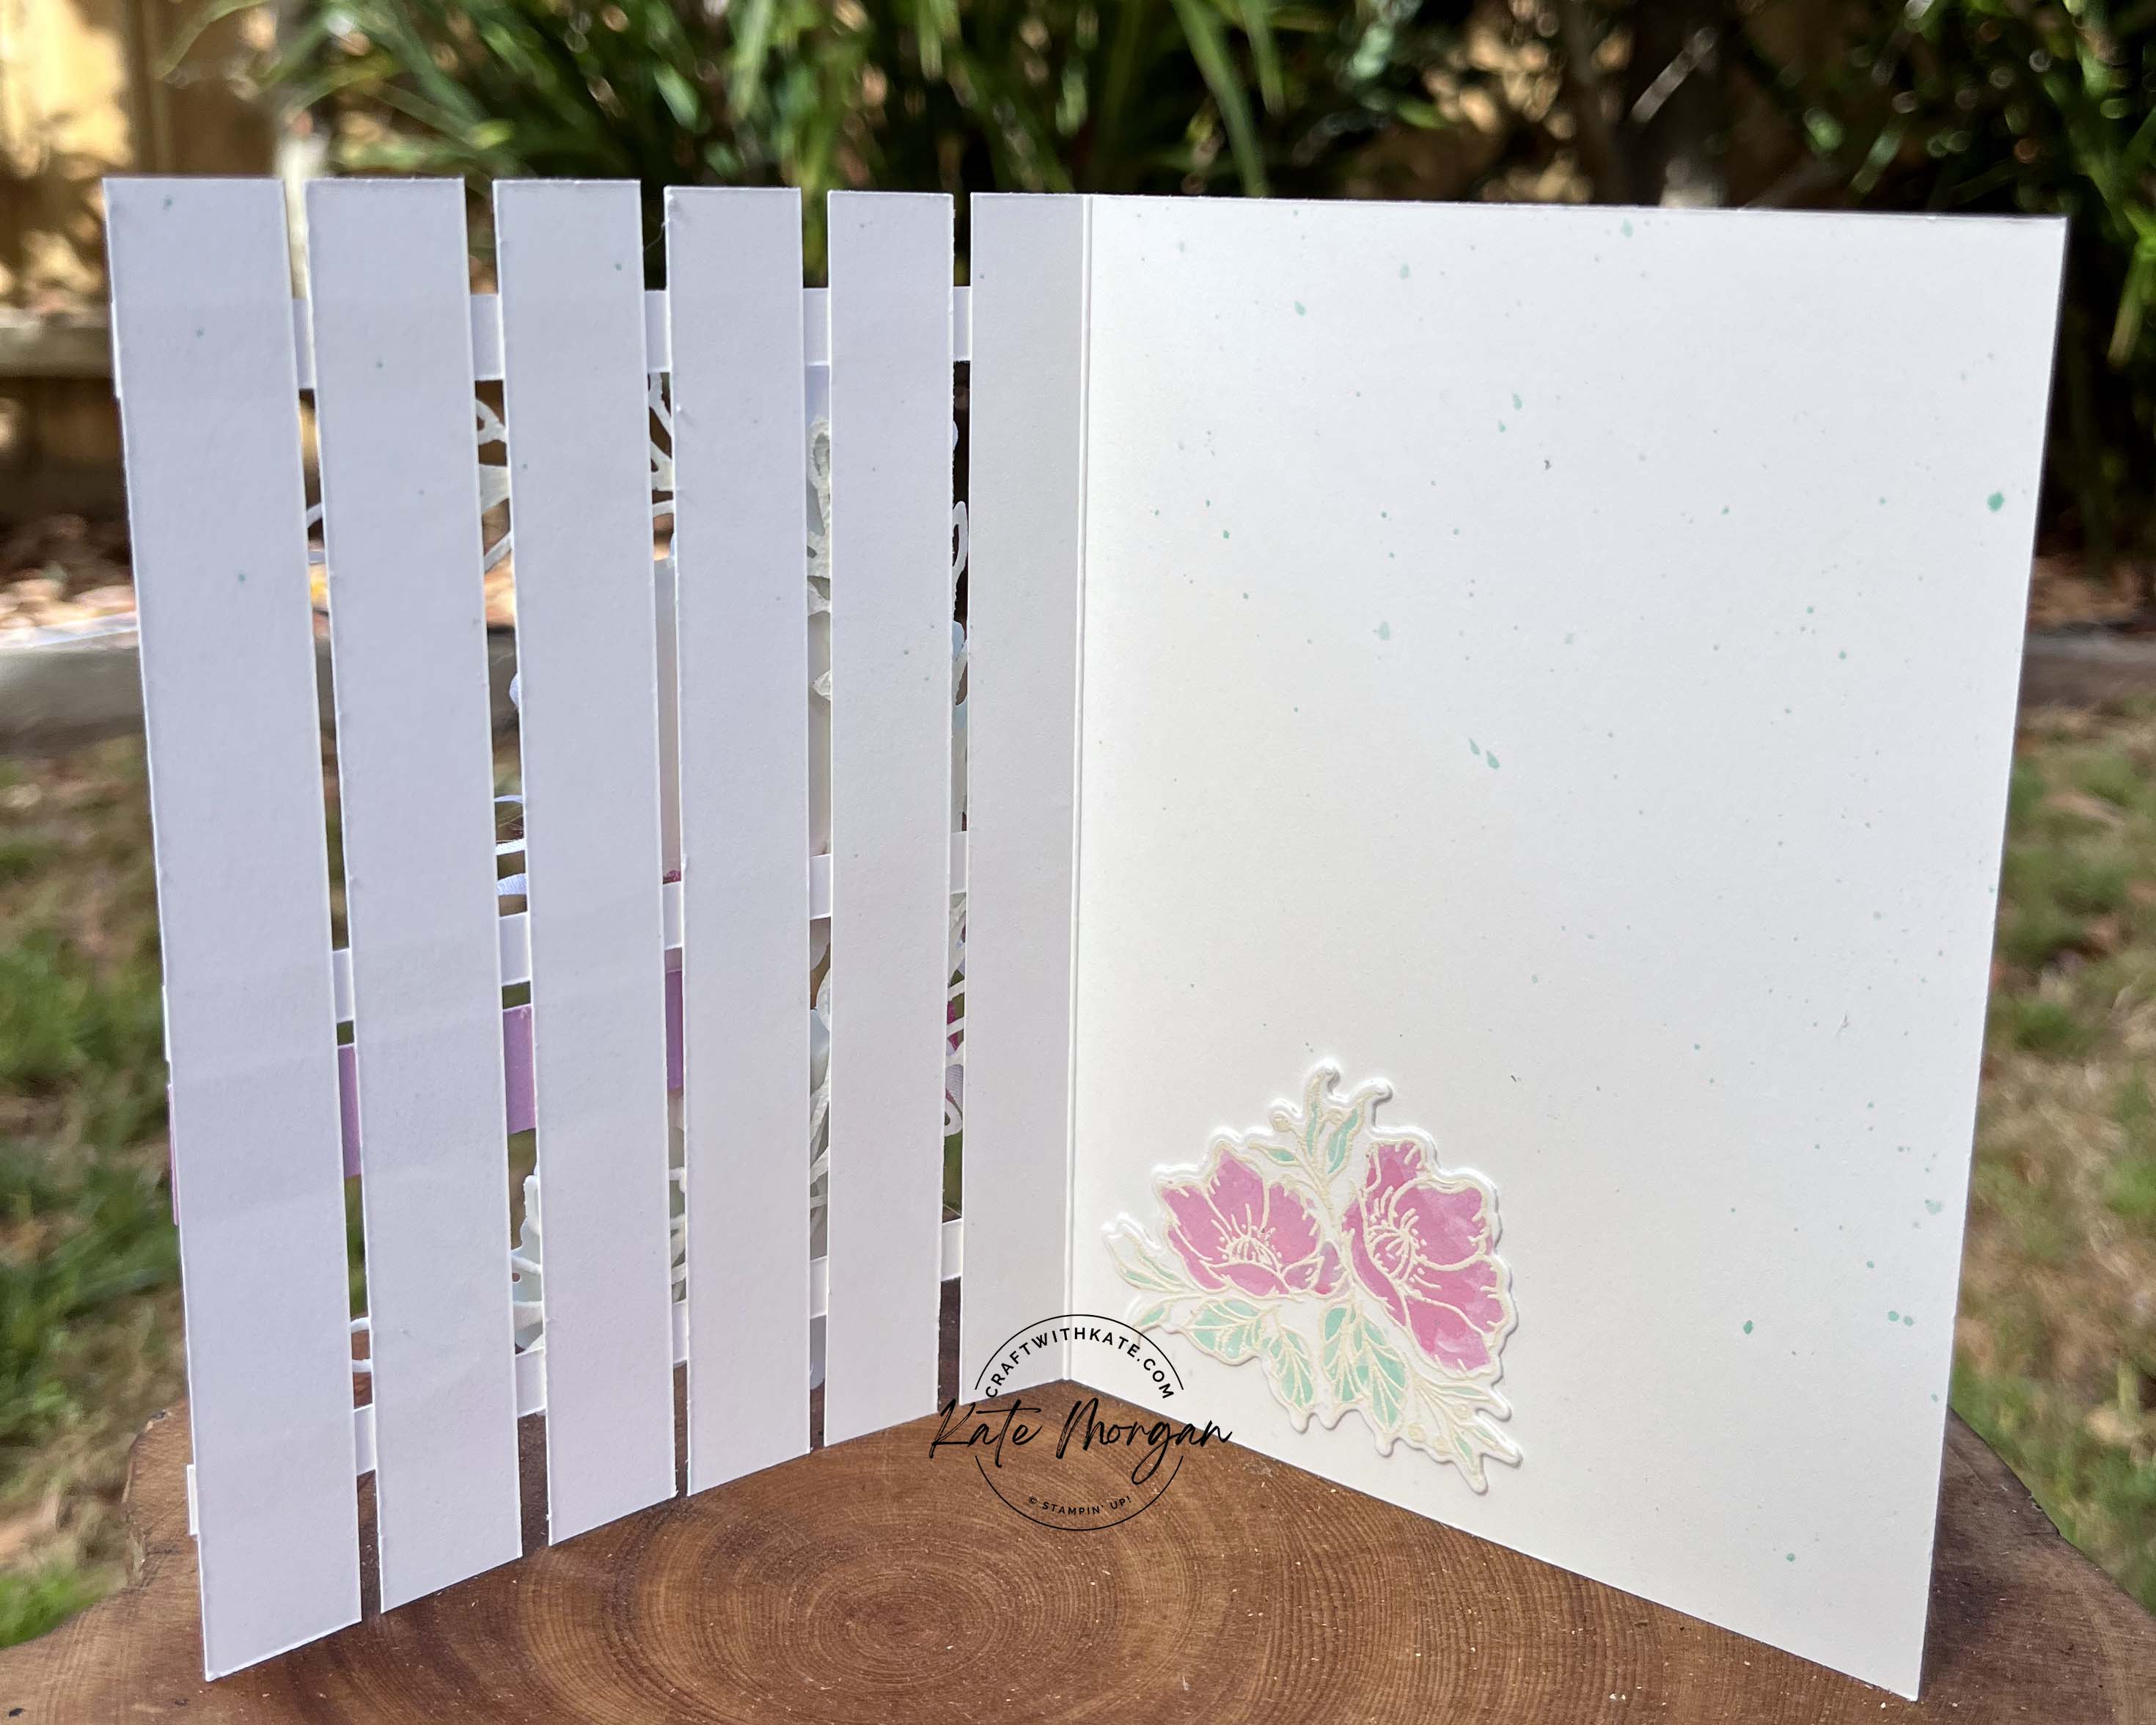
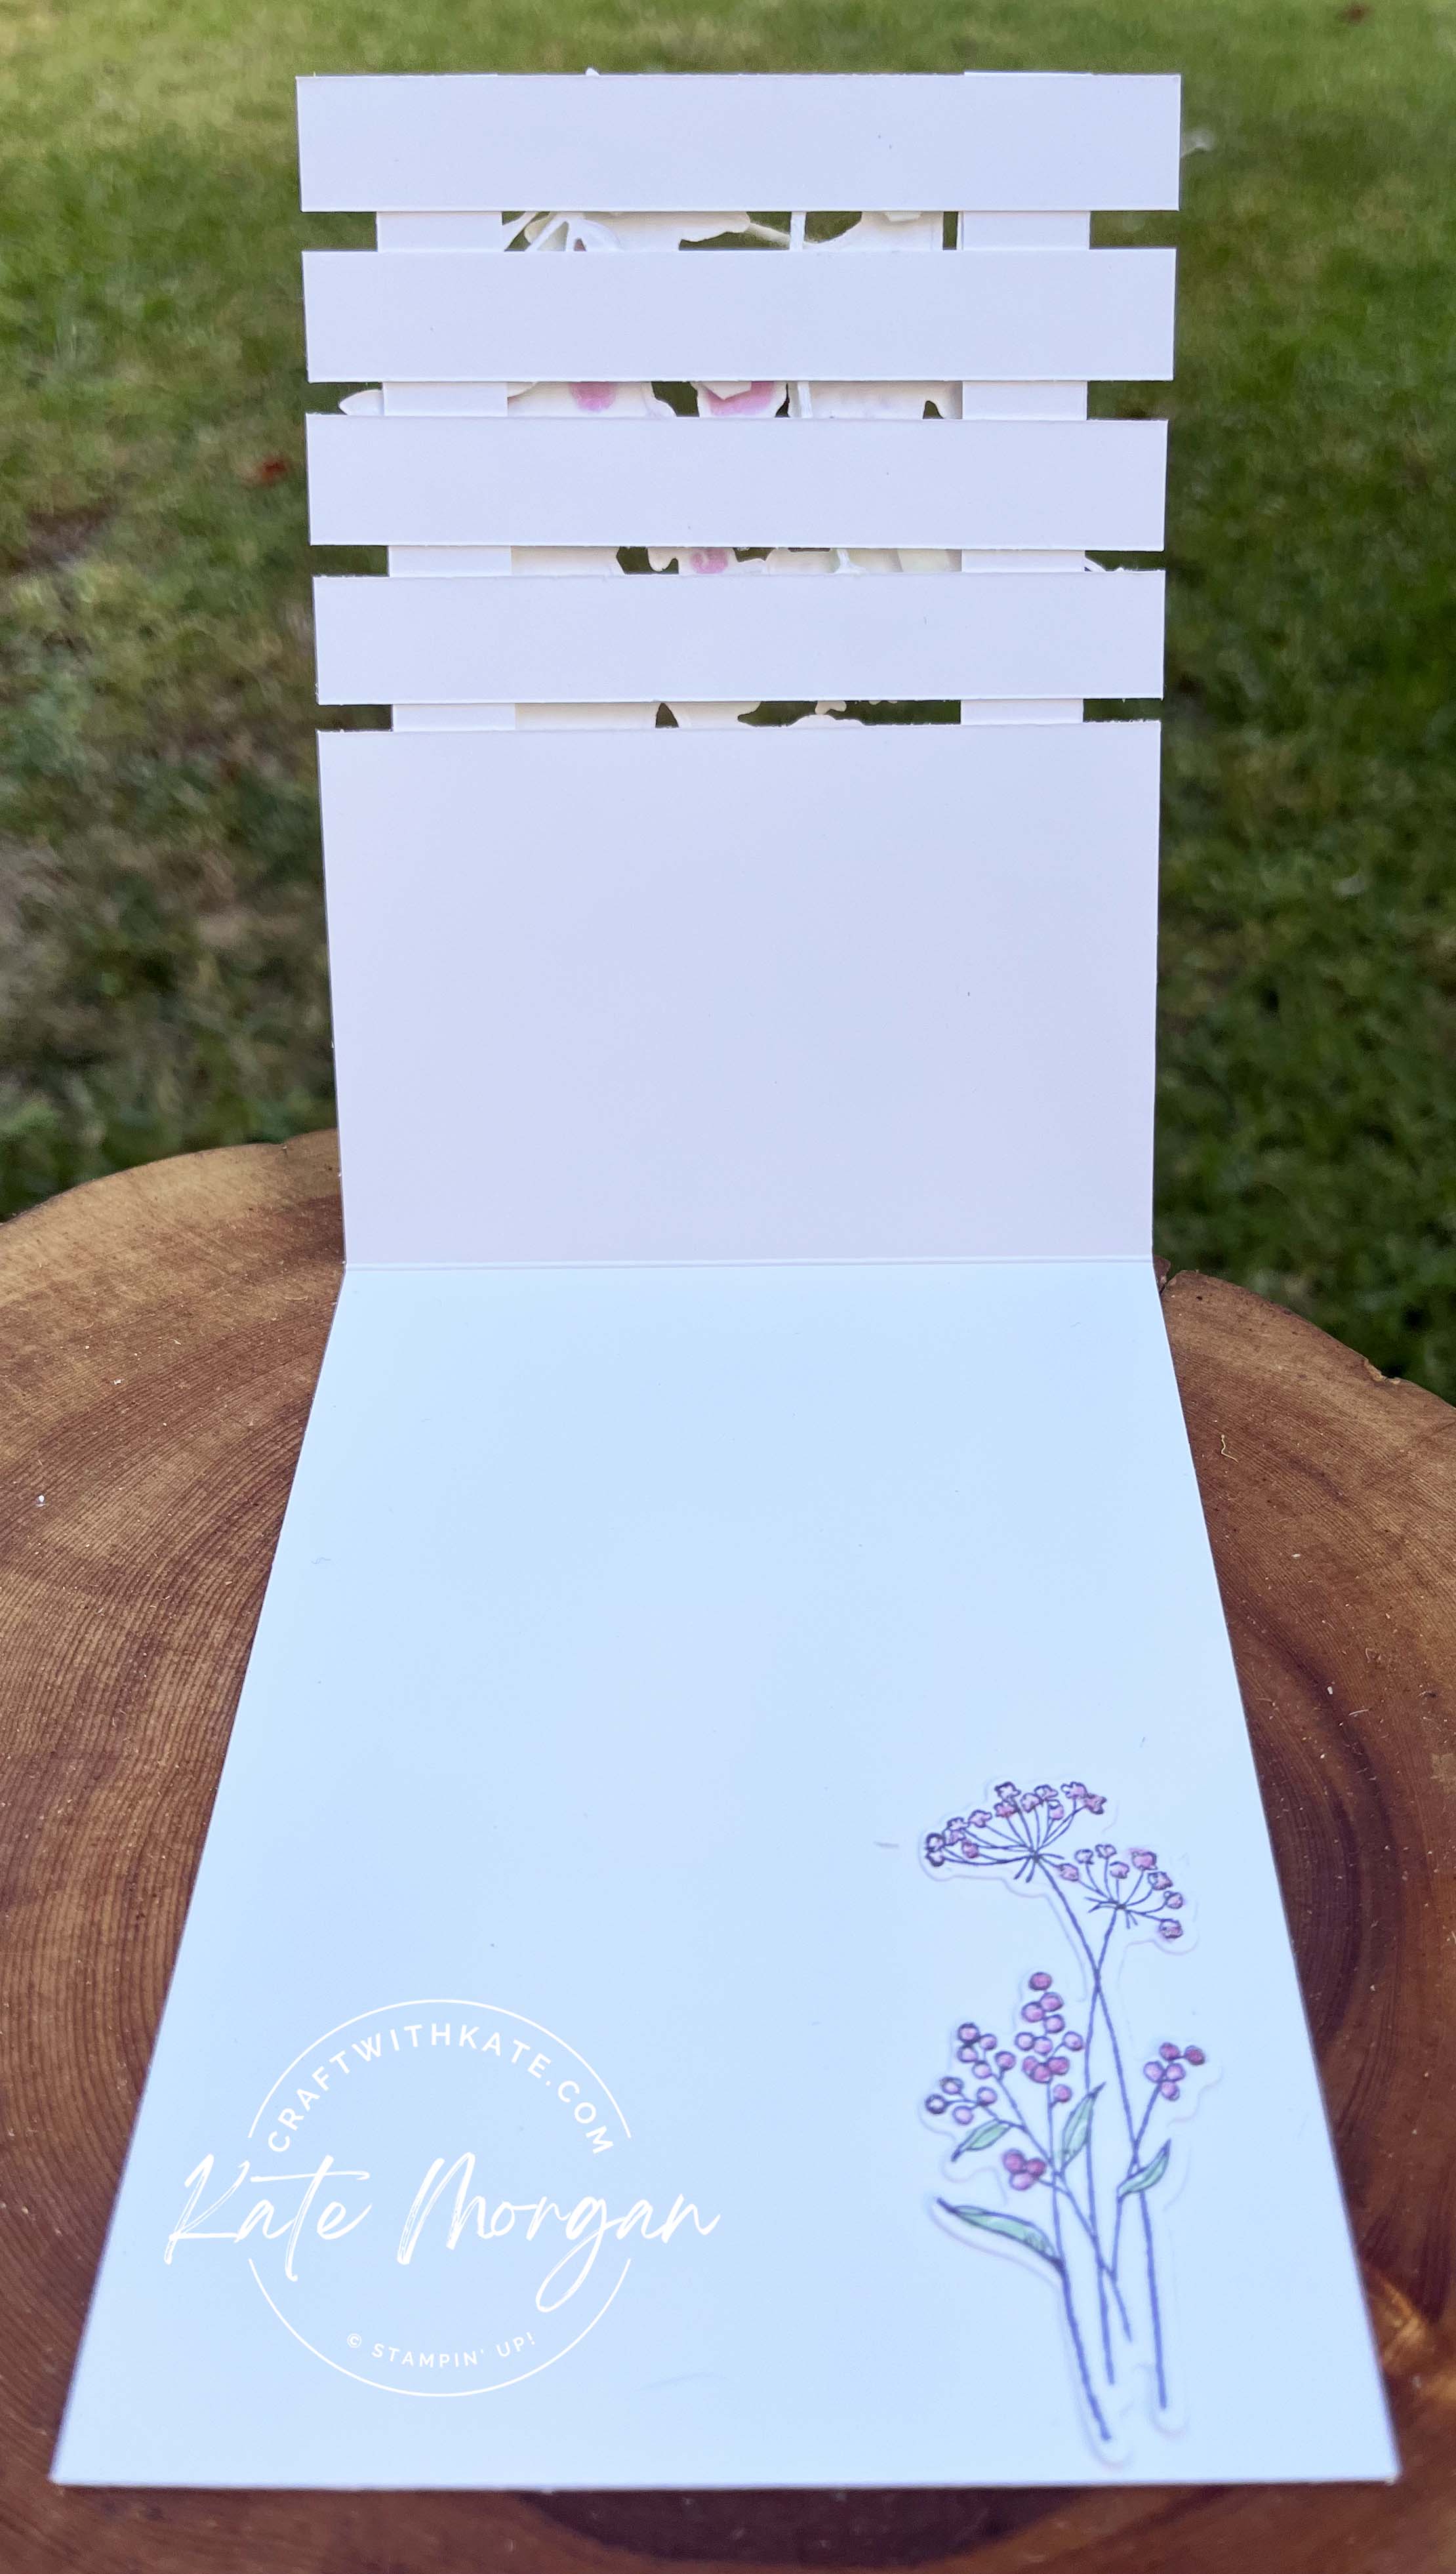
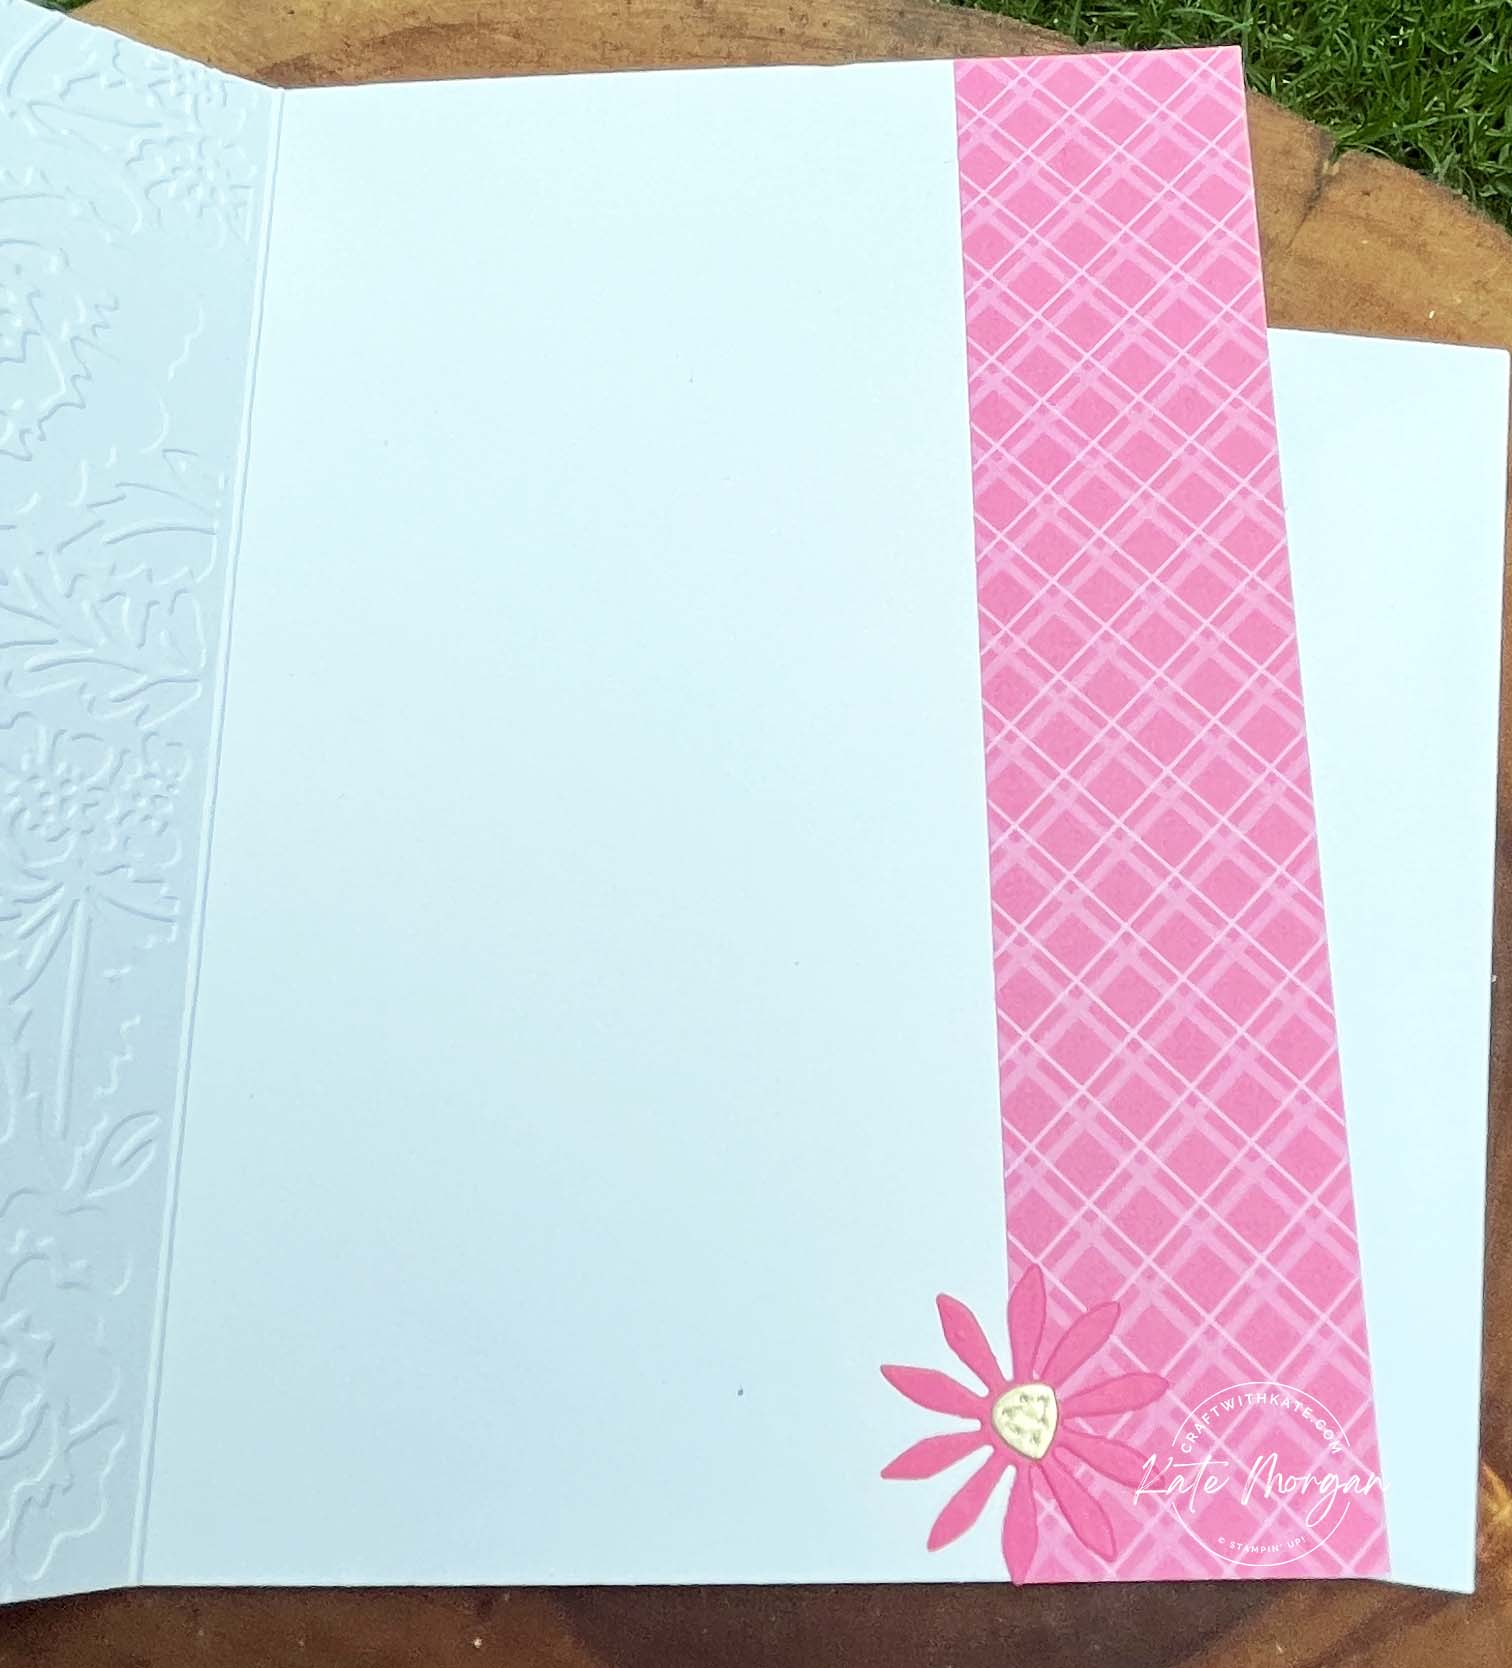
On the insde, I added a Basic White layer on a Bubble Bath matt and added another flower and leaves. I did the same on the envelope!

Product List
Stamps:
Two-tone Flora, Dainty Delight

Dies: Two-tone Flora, Share a Milkshake, Radiating Stitches
Card/Paper: Basic White, Blackberry Bliss, Bubble Bath, Lemon Lime Twist, Fluid 100 Watercolour 
Inkpads: Blackberry Bliss, Bubble Bath, Fresh Freesia, Lemon Lime Twist, Versamark
Other: Pastel Adhesive-backed Sequins, Gold Satin Edged Ribbon, Bubble Bath Stampin’ Blends, White Emboss Powder, Heat Tool, Wink of Stella, Blending Brushes, Paper Snips, Multipurpose Glue, Mini Stampin’ Dimensionals, Stampin’ Seal, Mini Stampin’ Cut & Emboss Machine, Stampin’ Cut & Emboss Machine, Paper Trimmer, Simply Shammy, Bone Folder, C6 Basic White Envelopes

Thanks for dropping by. I hope you can join me next Wednesday for inspiration using Blueberry Bushel.

Please hop across to our next participant and enjoy the wonderful inspiration of Christine Blain.

2023-2024 Next blog button AWH Colour creations

If you come across a broken link or have come from a different entry point, a full list of participants can be viewed on Cathy’s blog.

Shop Online Craft with Kate
10-yr-anniversary-badge

Be sure to download a PDF copy of current catalogues from my SU Catalogue Library page.

Don’t forget to Follow My Blog to receive blog updates and join my Newsletter Subscription for all the latest news and specials!

Birthday, Blog Hop/Instagram Hop, Designer/Patterned/Specialty Papers (DSP), Fancy Folds, feminine, Flowers, Handmade Cards, Stampin' Up!

Cathedral Window card and a Fancy Fold card

2023-2024 AWH Colour Creations header

Each week some of the Art With Heart team are joining  the Colour Creations Blog Hop to bring you creative inspiration showcasing our range of 50+ gorgeous Stampin’ Up! colours.

Week 12 – Berry Burst

Today I have a Cathedral Window card using the Bright & Beautiful 6″ x 6″ Designer Series Paper. Using the scallop circle (inner piece) from the Give it a Whirl dies, I cut 10 x 1½” circles from different patterns within the pack (if you have a 1½” circle punch it would be easier to punch the circles). I also cut a 1″ x 1″ square from black card as my template.

Cathedral Window card by Kate Morgan Sttampin Up Australia 2023 Berry Burst

Using a piece of foam or a piercing mat, place the 1” square piece into the centre of a circle and using a stylus, trace around the square. Do this to all 10 circles. Fold the edges up against the square card. Remove the black card and use the bone folder to flatten each edge.

Template for easy layoutCathedral Window template
Cut a 4” square of grid paper. Draw a diagonal line > rotate the paper and draw a 1cm line across the centre. Place in the trimmer so the diagonal line is at the ¾” mark and cut > repeat on the other side (cut lines in orange).

Cover the template in Stampin’ Seal & start with the 1st piece in the centre and continue to build to either side. Having the grid makes it super easy to line up!

Cathedral Window steps

Take a Thick Basic White card base, dry emboss the front with the Splatters Embossing folder, then glue the feature across the centre. I added some gold Festive Pearls to the centre joins and some Pastel Adhesive-backed Sequins to finish it off.

Cathedral Window card by Kate Morgan Sttampin Up Australia 2023 Berry Burst close up

On the inside I added a Basic White layer mounted onto a Berry Burst matt. The sentiment was cut using the Wanted to Say dies.

Cathedral Window card by Kate Morgan Sttampin Up Australia 2023 Berry Burst inside

This next card is very simple and the pretty Delightfully Eclectic Designer Series Paper (DSP) does all the work for you.

Dainty Delight Delightfully Eclectic Feminine Fancy Fold card by Kate Morgan Sttampin Up Australia 2023 Berry Burst.

The Dainty Delight stamp set was used for the flowers and the sentiment. The image is coloured using Blender Pens and inks; Berry Burst, Bubble Bath & Garden Green. A sponge dauber added some ink to the edge of the white card to soften it. Some Iridescent Pearl Jewels finished it nicely. I left the message panel blank so it could be used for any occasion.

Dainty Delight Delightfully Eclectic Feminine Fancy Fold card by Kate Morgan Sttampin Up Australia 2023 Berry Burst open

Although this DSP doesn’t have Berry Burst in it, I felt like the centre of the flowers matched really well. I cut another piece of Berry Burst card to have as the card base to make it a little more sturdy.

A left over strip of the DSP is added to the envelope!

Measurements for Fancy Fold
DSP: 28.5cm x 14.5cm, scored at 2.5cm, 10.3cm, 18cm
Berry Burst card: 15cm x 11cm, 13.5cm x 6.5cm & 8cm x 7cm
Basic White card: 7cm x 14cm & 7.5cm x 6.5cm

Product List
Stamps: Hello Ladybug, Dainty Delight
Dies:
 Wanted to Say dies, Give it a Whirl dies

Card/Paper: Berry Burst, Basic White, Basic Black, Thick Basic White
Designer Series Paper: Bright & Beautiful 6″ x 6″ DSP, Delightfully Eclectic 12″ x 12″
Inks: Versamark, Berry Burst, Bubble Bath, Garden Green

Other: Iridescent Pearl Basic Jewels, Blender Pens, Sponge Daubers, White Emboss Powder, Festive Pearls, Pastel Adhesive-backed Sequins, Stripes & Splatters 3D Textured Impressions Embossing Folders, Take Your Pick Tool, Paper Snips, Multipurpose Glue, Mini Stampin’ Cut & Emboss Machine, Stampin’ Cut & Emboss Machine, Paper Trimmer, Simply Shammy, Bone Folder, Grid Paper, Pencil, Ruler, Piercing Mat, 1½” Circle Punch

Thanks for dropping by. I hope you can join me next Wednesday for inspiration using Blackberry Bliss.

Please hop across to our next participant and enjoy the wonderful inspiration of Rachel Palmieri.

2023-2024 Next blog button AWH Colour creations

If you come across a broken link or have come from a different entry point, a full list of participants can be viewed on Cathy’s blog.

Shop Online Craft with Kate10-yr-anniversary-badge


Be sure to download a PDF copy of current catalogues from my SU Catalogue Library page.

Don’t forget to Follow My Blog to receive blog updates and join my Newsletter Subscription for all the latest news and specials!

Birthday, Designer/Patterned/Specialty Papers (DSP), Fancy Folds, feminine, Flowers, Handmade Cards, Stampin' Up!, Techniques & Tutorials

Countryside Corners Trifold card with Tutorial!

Today I have a Trifold card using the Countryside Corners dies to create the card base.

When I initially came up with my first card design in Soft Succulent tones (you can see it here), I had so many lovely comments and people asking how I made it. Well today, while I’m on Annual Leave for the school holidays, I had time to try and recreate it, however, I found an easier way. The tutorial link will be listed below.

Countryside Corners Trifold card Tutorial using Dainty Delight by Kate Morgan, Stampin Up Australia 2023

I just love the Dry Brushed Metallic 12″ x 12″ Specialty Paper with that gorgeous gold, and those pretty Dainty Delight die cut flowers!

Countryside Corners Trifold card Tutorial using Dainty Delight by Kate Morgan, Stampin Up Australia 2023.

Let’s open this card to see what is inside. The Dry Brushed Metallic Specialty DSP was used with one of the smaller size dies and it is so pretty! The Dainty Delight dies and Grove dies were used to cut the flowers and leaves for this panel using Calypso Coral, Lemon Lolly and Lost Lagoon. The Basic White background is cut using the Something Fancy dies.

Countryside Corners Trifold card Tutorial using Dainty Delight by Kate Morgan, Stampin Up Australia 2023 inside 1

Now we open up the third panel and wow, how beautiful is this?!!!

Countryside Corners Trifold card Tutorial using Dainty Delight by Kate Morgan, Stampin Up Australia 2023 open

This card folds flat to fit into our C6 envelope!

Click here for the PDF Tutorial.

Thanks for dropping by.

Product List
Stamps: Dainty Delight Bundle
Dies: Countryside Corners dies, Something Fancy dies, Grove dies
Cardstock: Basic White, Calypso Coral, Lemon Lolly, Lost Lagoon
DSP: Dry Brushed Metallic Specialty DSP
Inks: Calypso Coral, Lost Lagoon
Other: Brushed Brass Butterflies, Gold Satin Edged Ribbon, Sponge Daubers, Trimmer, Multipurpose Glue, Mini Dimensionals, Cut & Emboss Machine, Bone Folder

Shop Online Craft with Kate10-yr-anniversary-badge


Be sure to download a PDF copy of current catalogues from my SU Catalogue Library page.

Don’t forget to Follow My Blog to receive blog updates and join my Newsletter Subscription for all the latest news and specials!

Birthday, Blog Hop/Instagram Hop, Celebrate, Designer/Patterned/Specialty Papers (DSP), feminine, Flowers, Handmade Cards, Stampin' Up!

Introducing Pebbled Path

2023-2024 AWH Colour Creations header

Each week some of the Art With Heart team are joining  the Colour Creations Blog Hop to bring you creative inspiration showcasing our range of 50+ gorgeous Stampin’ Up! colours.

Week 4 – Pebbled Path

Today brings us to the next new In Color, Pebbled Path. I have to say, now that I’ve had a play with this colour, I really like it and I will find myself reaching for it often, I’m sure!

Card 1
To my card base, I have attached a piece of Pretty Peacock patterned paper from the Earthen Eleganance DSP. Next, die cut a piece of Pebbled Path card with the Gorgeous Garden die and glue it to the card.

Pebbled Path Paper Florist Gorgeous Garden card by Kate Morgan Stampin Up Australia Colour Creations Blog Hop 2023

Die cut the petals, leaves, buds from the Paper Florist dies in Bubble Bath, Lost Lagoon & Moody Mauve cards. Using the Bone Folder, curl the petals a little and glue them together.

Tip: when putting the buds together, die cut the buds and leave them on the cutting plate. Take the stem, add glue behind the tops of each and adhere them to the buds for easier lining up!

Glue the leaves to the card before adding the flowers last. I also cut  piece of Linen Thread, pulled it apart so I had a thin piece, tie in a bow and add between the two flowers. To finish, I added some 2023-2025 In Color Dots & Pretty Peacock coloured Basic Rhinestone Jewels.

Pebbled Path Paper Florist Gorgeous Garden card by Kate Morgan Stampin Up Australia Colour Creations Blog Hop 2023 sending love

I wanted only one part of the sentiment (Dainty Delight), so I used the Pebbled Path marker (2023-2025 In Color Stampin’ Write Markers) directly to the stamp then onto White card and fussy cut with Paper Snips. Adhere on dimensionals. On the inside, I added a strip of the Pretty Peacock DSP & another die cut flower!

Pebbled Path Paper Florist Gorgeous Garden card by Kate Morgan Stampin Up Australia Colour Creations Blog Hop 2023 inside

Card 2
Using similar products, this landscape card features some light watercolouring with Pebbled Path ink & Water Painters on Fluid 100 Watercolour Paper. I allowed this to dry while I did cut the flowers and glued them together.

Pebbled Path Paper Florist Wanted to say card by Kate Morgan Stampin Up Australia Colour Creations Blog Hop 2023

On my card base, I’ve added a layer of the Bubble Bath piece of White Centre Specialty Paper, then some Vellum Basics Specialty Designer Series Paper. The Wanted to Say dies were used to cut the sentiment.

Pebbled Path Paper Florist Wanted to say card by Kate Morgan Stampin Up Australia Colour Creations Blog Hop 2023 close

The leaves are cut from the wateroloured piece and the Pebbled Path piece from the 2023-2025 Luster Specialty Paper. The stamen and the top part of the sentiment are also from the watercoloured piece. The buds and flower centres are Bubble Bath card. I finished off adding some Wink of Stella and some Classic Matte Dots.

Products
Stamps: Dainty Delight [160675]
Dies: Paper Florist dies [161284], Gorgeous Garden dies [161283], Wanted to Say [161594]
Card/Paper: Pebbled Path [161731], Basic White [159228], Bubble Bath [161727], Lost Lagoon [133686], Moody Mauve [161732], 2023-2025 In Color Luster Specialty Paper [161746], White Centre 12×12 Specialty Paper [161748], Fluid 100 Watercolour Paper [149612]
Designer Series Paper:  Earthen Elegance [161503], Vellum Basics Specialty Designer Series Paper [160839]
Inks: Pebbled Path [161648]
Blends Combo Markers: Pretty Peacock [161676], Bubble Bath [161675]
Other: 2023-2025 In Color Stampin’ Write Markers [161695], Basic Rhinestone Jewels [119246], 2023-25 In Color Dots [161620], Classic Matte Dots [158146], Water Painters [151298], Wink of Stella [141897], Linen Thread [104199],  Glue Dots [103683], Paper Snips [103579], Multipurpose Glue [110755], Dimensionals [104430], Mini Stampin’ Cut & Emboss Machine [150673], Stampin’ Cut & Emboss Machine [149653], Paper Trimmer [152392], Simply Shammy [147042], Bone Folder [102300]

Thanks for dropping by. I hope you can join me next Wednesday for inspiration using another of our new In Colors, Wild Wheat.

Please hop across to our next participant and enjoy the wonderful inspiration of Tina Gillespie.

2023-2024 Next blog button AWH Colour creations

If you come across a broken link or have come from a different entry point, a full list of participants can be viewed on Cathy Proctor’s blog.
Shop Online Craft with Kate10-yr-anniversary-badge


Be sure to download a PDF copy of current catalogues from my SU Catalogue Library page.

Don’t forget to Follow My Blog to receive blog updates and join my Newsletter Subscription for all the latest news and specials!

Blog Hop/Instagram Hop, Designer/Patterned/Specialty Papers (DSP), Fancy Folds, feminine, Flowers, Handmade Cards, Stampin' Up!, Techniques & Tutorials

Introducing Moody Mauve

2023-2024 AWH Colour Creations header

Each week some of the Art With Heart team are joining  the Colour Creations Blog Hop to bring you creative inspiration showcasing our range of 50+ gorgeous Stampin’ Up! colours.

Week 3 – Moody Mauve

Today brings us to the third new In Color, Moody Mauve. I have two cards today and my first one uses the Patchwork Pieces dies, Radiating Stitches dies, Wanted to Say dies and the Fresh as a Daisy Designer Series Paper.

Patchwork Pieces Fresh as a Daisy card by Kate Morgan stampin Up Australia 2023 Moody Mauve

A Moody Mauve card base with a Bubble Bath layer cut with the Radiating Stitches die is added. The heart is also from this same die pack. The next layer is Very Vanilla. The Patchwork dies are cut from Bubble Bath card and again with some Fresh as a Daisy patterned paper. These are adhered alternating to get this beautiful Patchwork effect. The Wanted to Say dies cut both layers of the ‘celebrate’ and how good do they look?!!! I added a double bow of Linen Thread adhered to the heart and some In Color Dots to finish it off.

Patchwork Pieces Fresh as a Daisy card by Kate Morgan stampin Up Australia 2023 Moody Mauve celebrate

On the inside, I added a Very Vanilla piece with some of the extra Patchwork pieces and a heart in the corner, still leaving plenty of room for your message. Can you believe that I haven’t used any ink or stamps on this card?!

Patchwork Pieces Fresh as a Daisy card by Kate Morgan stampin Up Australia 2023 Moody Mauve inside

My next card I have used the Countryside Corners dies to make an Easel card. The Cheerful Daisies bundle is a beauty and you can see lots of it used on this fun fancy fold card.

Cheerful Daisies Easel Card by Kate Morgan, Stmpin Up Australia 2023

I have had a few people recently ask me how I created these card bases using these dies, so here you go – I hope you can follow this!

To create the card base, fold your cardbase in half. Take the largest die from the Countryside Corners dies and place the folded edge on top of the die, so the cutting edge is outside the card (see image below). It’s best to use some washi tape to hold it in place.  Carefully place your top acrylic cutting plate and run through your die cutting machine.

Cheerful Daisies Easel Card by Kate Morgan, Stmpin Up Australia 2023 cutting tip

Now you have your card base. Open it up and place it in your Trimmer and using the scoring blade, score a line down the centre of one side (see image below). Fold this in half (valley fold) and this is the top of your card. Cut another piece of card using the same large die. Add glue to the bottom half only of the front panel and attach this extra die cut to create the easel.

Cheerful Daisies Easel Card by Kate Morgan, Stmpin Up Australia 2023 easel mechanism

Here is a look at it from the side.

Cheerful Daisies Easel Card by Kate Morgan, Stmpin Up Australia 2023 side

On the inside, you can see a layer of Bubble Bath behind the Basic White, a stamped flower and silver foil foliage. The sentiment is popped up on dimensionals so the card front sits behind it creating the easel effect!

Cheerful Daisies Easel Card by Kate Morgan, Stmpin Up Australia 2023 inside

Thanks for dropping by. I hope you can join me next Wednesday for inspiration using another of our new In Colors, Pebbled Path.

Please hop across to our next participant and enjoy the wonderful inspiration of Di Furniss.

2023-2024 Next blog button AWH Colour creations

If you come across a broken link or have come from a different entry point, a full list of participants can be viewed on Cathy Proctor’s blog.

Click here to see the full list of products used in card 1♥
Click here to see the full list of products used in card 2 ♥

Shop Online Craft with Kate10-yr-anniversary-badge


Be sure to download a PDF copy of current catalogues from my SU Catalogue Library page.

Don’t forget to Follow My Blog to receive blog updates and join my Newsletter Subscription for all the latest news and specials!

Blog Hop/Instagram Hop, Designer/Patterned/Specialty Papers (DSP), feminine, Flowers, Handmade Cards, Mother's Day, Stampin' Up!

Introducing Boho Blue

2023-2024 AWH Colour Creations header

Each week some of the Art With Heart team are joining  the Colour Creations Blog Hop to bring you creative inspiration showcasing our range of 50+ gorgeous Stampin’ Up! colours.

Week 1 – Boho Blue

Today brings us to the start of the new In Colors available in the new Annual catalogue before we continue with the remainder of the 50 Stampin’ Up! colours. I hope you will join us each week for some amazing colour inspiration.

2023-2025 In Colors Craft with Kate Moody Mauve, Boho Blue, Pebbled Path, Copper Clay, Wild Wheat

The Countryside Inn Suite was the very first suite to jump into my shopping cart – how stunning are these designer papers?!! They are so much my colours! I have paired Boho Blue with Night of Navy.

Countryside Inn DSP

A Boho Blue card base with a layer of Night of Navy then a piece of the DSP which was embossed with the Countryside Blossoms Embossing Folder.

Countryside Inn Suite by Kte Morgsn, Stampin Up Australia 2023.

Using the Countryside Corners Bundle, I stamped the image in Boho Blue ink onto white card. Using the coordinating dies, I cut it out and used a slightly bigger die to cut the matt border. Using a Sponge Dauber, ink was applied around the edges of the white card, before gluing it to the matt layer. The Boho Blue Textured Ribbon was cut in half lengthwise so it wasn’t as thick, tied in a bow and added with a glue dot.  I finished off adding a few In Color Dots.

My next card is for Mother’s Day coming on 14 May, although it could really be used for any occasion. Who doesn’t love flowers, right?!! The Dainty Delight dies are stunning and I am introducing two new colours to the Subtle range; Bubble Bath and Lemon Lolly. Add these to Boho Blue and Night of Navy and it’s a glorious combination!

Countryside Corners Dainty Delight card Boho Blue Mother's Day card by Kate Morgn Stampin Up Australia 2023

I have continued to use the Countryside Corners Bundle to create the card layers. The Night of Navy layer was stamped with Versamark ink, White Emboss Powder added and heat set (initially I had the Navy layer without the white dots, but I added them afterwards, and it was hard not to get the extra powder everywhere). The other two layers are simply stamped tone on tone and a Basic White layer on top.

Countryside Corners Dainty Delight card Boho Blue Mother's Day card by Kate Morgn Stampin Up Australia 2023 close

Then all the fun begins die cutting loads of flowers and gluing them together.  The leaves are glued on first, then the blue flowers and the others are added with Mini Dimensionals.

Countryside Corners Dainty Delight card Boho Blue Mother's Day card by Kate Morgn Stampin Up Australia 2023 side

The sentiment is from the Sending Smiles stamp set and some In Color Dots are added last with a white ribbon bow. The inside is decorated in a similar way to carry the theme through, as is the envelope.

Countryside Corners Dainty Delight card Boho Blue Mother's Day card by Kate Morgn Stampin Up Australia 2023 inside

Thanks for dropping by. I hope you can join me next Wednesday for inspiration using another of our new In Colors, Copper Clay.

Please hop across to our next participant and enjoy the wonderful inspiration of Rachel Palmieri.

2022-23 CCBH Next button

If you come across a broken link or have come from a different entry point, a full list of participants can be viewed on Cathy Proctor’s blog.

Click here to see the full list of products used in this project ♥

Shop Online Craft with Kate10-yr-anniversary-badge


Be sure to download a PDF copy of current catalogues from my SU Catalogue Library page.

Don’t forget to Follow My Blog to receive blog updates and join my Newsletter Subscription for all the latest news and specials!

Blog Hop/Instagram Hop, Designer/Patterned/Specialty Papers (DSP), feminine, Flowers, Handmade Cards, Mini Catalogue and Sale-a-bration (SAB), Stampin' Up!, Thank you, Watercolour

Shaded Spruce Thank you card & bonus Water coloured flowers on a Picket Fence!

2022-23 CCBH Logo

Each week some of the Art With Heart team are joining  the Colour Creations Blog Hop to bring you creative inspiration showcasing our range of 50+ gorgeous Stampin’ Up! colours in alphabetical order.

Week 45 – Shaded Spruce

Today’s card started off a little shaky to be honest. I find this green a little tricky to create with, but I knew I wanted to use this pretty vellum with the leaf pattern. The Shaded Spruce card base was folded in half then I cut the Scallop edge on the front. I took another piece of card and die cut the edge again a little further in so it created the double scallop edge and adhered it to the card front.

I took a Blending Brush and applied Shaded Spruce ink to the reverse side of the Vellum. I needed to have some white card behind it but it can be tricky when it comes to gluing to the card, without the glue showing through. I managed to do it by adding glue to the right side and placing a thin strip of Gold Foil over the top. I then glued it onto the card front butting it up too the edge of the Scallop Contours die. The left side of the vellum doesn’t have any glue behind it, so I notched the top and bottom with my 1/8″ circle punch (this helps hold the ribbon/twine in place) and wound some gold Simply Elegant Trim around and tied in a bow. A glue dot was placed under the bow to hold it in place.

Thank you card by Kate Morgan, Stampin Up Australia 2023 Shaded Spruce CCBH

The Something Fancy dies were used to cut the Regency Park DSP and frame behind the sentiment. I stamped the sentiment (Charming Sentiments) onto Night of Navy card in Versamark Ink, added Gold Emboss Powder and melted it with my Heat Tool. It was die cut using the coordinating dies (Sentiment Silhouettes) and popped up on Mini Dimensionals.

Thank you card by Kate Morgan, Stampin Up Australia 2023 Shaded Spruce CCBH closem up

On the inside I placed a strip of the Regency Park Designer Series Paper down the right side and placed a smaller piece of white card with some gold foil.

Thank you card by Kate Morgan, Stampin Up Australia 2023 Shaded Spruce CCBH inside

I find this all really dark and it did not exactly please me, so I went about creating a softer and more subtle, feminine card.

I made a card a couple of weeks ago with a similar effect, but this week I have cut the card to create more of a picket fence look. I am using a couple of the In Colours that are due to retire at the end of May; Fresh Freesia & Polished Pink.

Framed Florets on a picket fence by Kate Morgan Stampin Up Australia 2023

The Framed Florets Bundle was used to stamp many flowers in Versamark ink, White Emboss Powder added and melted with the Heat Tool. I water coloured them with Shaded Spruce, Polished Pink and Fresh Freesia inks. I watered down some Shaded Spruce ink and added it to some Thick Basic White paper. Once dry, I die cut some leaves. Some Open Weave Polished Pink Ribbon and White Crinkled Ribbon was cut in half and added between the layers of flowers. The sentiment is embossed in white onto Fresh Freesia card. Some Iridescent Basic Pearls were added for that extra feminine touch!

Framed Florets on a picket fence by Kate Morgan Stampin Up Australia 2023 close up

On the inside, another water coloured flower is attached and some splatters of Wink of Stella with Shaded Spruce ink.

Framed Florets on a picket fence by Kate Morgan Stampin Up Australia 2023 inside

Products
Bundles: Charming Sentiments [158734], Framed Florets [162407]
Stamps:
Charming Sentiments [159985], Framed Florets [160623]
Dies: Sentiment Silhouettes [158733], Scalloped Contours [155560], Something Fancy [160424], Framed Florets [160623]
Card/Paper: Shaded Spruce [147006], Night of Navy [106577], Basic White [159228], Brushed Metallic [153524], Fresh Freesia [155612], Thick Basic White [159230]
Designer Series Paper: Vellum Basics Specialty [160839], Regency Park [160559]
Inks: Shaded Spruce [147088], Versamark [102283], Fresh Freesia [155611], Polished Pink [155712]
Other: Metallics Embossing Powders [155555], Basics Embossing Powders [155554], Heat Tool [129056], Blending Brushes [153611], Simply Elegant Trim [155766], Water Painters [151298], Glue Dots [103683], Multipurpose Glue [110755], Dimensionals [104430], Mini Stampin’ Cut & Emboss Machine [150673], Paper Trimmer [152392], Simply Shammy [147042], Bone Folder [102300], White Crinkled Ribbon [151326], Polished Pink  Open Weave Ribbon [155712], Paper Snips [103579], Wink of Stella [141897], Iridescent Pearl Basics Jewels [158987]

Thanks for dropping by. I hope you can join me next Wednesday for inspiration using Smoky Slate.

Please hop across to our next participant and enjoy the wonderful inspiration of Fiona Ryan.

2022-23 CCBH Next button

If you come across a broken link or have come from a different entry point, a full list of participants can be viewed on Cathy Proctor’s blog.

Click here to see the full list of products used in card 1 ♥
Click here to see the full list of products used in card 2 ♥

Shop Online Craft with Kate


Be sure to download a PDF copy of current catalogues from my SU Catalogue Library page.

Don’t forget to Follow My Blog to receive blog updates and join my Newsletter Subscription for all the latest news and specials!

Blog Hop/Instagram Hop, feminine, Flowers, Handmade Cards, Mini Catalogue and Sale-a-bration (SAB), Stampin' Up!

Dainty Delight Trellis card

2022-23 CCBH Logo

Each week some of the Art With Heart team are joining  the Colour Creations Blog Hop to bring you creative inspiration showcasing our range of 50+ gorgeous Stampin’ Up! colours in alphabetical order.

Week 43 – Rich Razzleberry

Today I have a trellis card and features the beautiful Dainty Delight bundle.

Dainty Delight Trellis card by Kate Morgan, Stampin Up Australia 2023

Take your card and cut 5 x 1.5cm strips off the bottom of the front panel. Place a large post it note upside down, behind the remaining card front and to the bottom of the card and place the strips back in place. I put an inkpad on the top portion to hold it down.

Trellis card front by Kate Morgan, Stampin Up Australia 2023

Now take 2 more strips and where the dots of glue are, adhere the strips to each side. Once dry you can safely remove the post it note and trim the edges overhanding at the bottom of the card.

Dainty Delight Trellis card by Kate Morgan, Stampin Up Australia 2023 closeup

The images are stamped in Black Memento ink and die cut. The flowers are coloured with the Wink of Stella directly to the ink on the lid of the Rich Razzleberry inkpad for that gorgeous instant sparkle. The leaves are coloured with Mint Macaron ink and a Blender Pen and the die cut foliage is Basic White card and coloured using the Blending Brushes with Mint Macaron ink.  The stamped flowers are added with Mini Dimensionals and the rest with multipurpose glue. A single bow of white bakers twine is added with a rolled up glue dot.

Dainty Delight Trellis card by Kate Morgan, Stampin Up Australia 2023 inside

On the inside, I added another stamped & die cut flower image. I’ve left this card without a sentiment, until I know who will be receiving it. It could be used for many different occasions.

Thanks for dropping by. I hope you can join me next Wednesday for inspiration using Sahara Sand.

Please hop across to our next participant and enjoy the wonderful inspiration of Fiona Ryan.

2022-23 CCBH Next button

If you come across a broken link or have come from a different entry point, a full list of participants can be viewed on Cathy Proctor’s blog.

Click here to see the full list of products used in this project ♥

Shop Online Craft with Kate


Be sure to download a PDF copy of current catalogues from my SU Catalogue Library page.

Don’t forget to Follow My Blog to receive blog updates and join my Newsletter Subscription for all the latest news and specials!

Birthday, Blog Hop/Instagram Hop, Designer/Patterned/Specialty Papers (DSP), Fancy Folds, feminine, Flowers, Handmade Cards, Mini Catalogue and Sale-a-bration (SAB), Stampin' Up!

Cottage Rose Corner Tuck card

2022-23 CCBH Logo

Each week some of the Art With Heart team are joining  the Colour Creations Blog Hop to bring you creative inspiration showcasing our range of 50+ gorgeous Stampin’ Up! colours in alphabetical order.

Week 42 – Real Red

Today’s Corner Tuck card uses the Cottage Rose Bundle with the Regency Park DSP & Gingham Cottage DSP (retired). Although there isn’t any Real Red in the Regency Park DSP, it is Sweet Sorbet, but it looks like Real Red to me!

The top right corner is some DSP cut into a triangle and glued along the top and right edges only. When the feature panel closes, pop it under this triangle to keep it closed. Isn’t that nifty?!!!

Cottage Rose Feminine fancy fold card by Kate Morgan, Stampin Up Australia 2023

I stamped and die cut the Cottage Rose image and coloured it using my Wink of Stella with ink from the ink pads (Real Red, Shaded Spruce & Mango Melody). This is like water colouring, but with extra sparkle! This is added to the feature panel with Dimensionals.

You can see the Wink of Stella in this image – it is so sparkly!

Cottage Rose Feminine fun fold card by Kate Morgan, Stampin Up Australia 2023

On the inside, I added a simple sentiment and a die cut flower.

Cottage Rose Feminine fun fold card by Kate Morgan, Stampin Up Australia 2023 inside

Measurements:
Card base: 29cm x 10.5cm, score @ 14.5cm (cut 7cm off one end to use as feature matt on card front)
DSP: 9.5cm x 6.5cm and 9.5cm x 13cm
White card: 10cm x 6.5cm (2)
DSP: 5.5cm x 5.5cm, cut on diagonal (glue one to upper right corner)

Thanks for dropping by. I hope you can join me next Wednesday for inspiration using Rich Razzleberry.

Please hop across to our next participant and enjoy the wonderful inspiration of Tina Gillespie.

2022-23 CCBH Next button

If you come across a broken link or have come from a different entry point, a full list of participants can be viewed on Cathy Proctor’s blog.

Click here to see the full list of products used in this project ♥

Shop Online Craft with Kate


Be sure to download a PDF copy of current catalogues from my SU Catalogue Library page.

Don’t forget to Follow My Blog to receive blog updates and join my Newsletter Subscription for all the latest news and specials!

Birthday, Blog Hop/Instagram Hop, Designer/Patterned/Specialty Papers (DSP), feminine, Flowers, Handmade Cards, Kids Cards, Markers for Colouring, Mini Catalogue and Sale-a-bration (SAB), Stampin' Up!

Adorable Owls and Dainty Delight

2022-23 CCBH Logo

Each week some of the Art With Heart team are joining  the Colour Creations Blog Hop to bring you creative inspiration showcasing our range of 50+ gorgeous Stampin’ Up! colours in alphabetical order.

Week 38 – Polished Pink

Today’s cards use two Sale•a•bration rewards; the beautiful pack of 12″x12″ patterned papers, Dandy Designs and the Adorable Owls stamp set.

Dandy Designs DSP

Just look at the fun patterns on those papers and you get 48 sheets which is double the amount of most packs!

Adorable Owls stamp set

My first card today is a Polished Pink card base with three strips of the Dandy Designs papers. The middle piece is the reverse pattern of the other two!

Adorable Owls & Dandy Designs DSP SAB 2023 by Kate Morgan, Stampin Up Australia

The Adorable Owl is stamped in Black Memento ink and coloured with alcohol Blends Combo Markers; Pale Papaya, Pool Party, Medium Combo, Medium Deep, Polished Pink & Fresh Freesia. It is die cut with the Layering Circles Framelits dies and the edge sponged with Fresh Freesia ink using a dauber. A Polished Pink banner from the Stylish Shapes dies is glued to the card. Some Metallic Woven Ribbon (Sweet Sorbet) was added then the circle added with Dimensionals.

Adorable Owls & Dandy Designs DSP SAB 2023 by Kate Morgan, Stampin Up Australia.

Some Wink of Stella is added to the party hat and eyes of the owl. Polished Pink In Color Jewels were added for more sparkle. The Basic White insert is stamped with Polished Pink ink and a narrow strip of DSP added across the bottom.

My next card also uses the Adorable Owls along with the Dainty Delight Bundle. The Basic Border Dies were used the cut the edge of the front of the card, before dry embossing it with the Pretty Flowers Embossing folder.

Adorable Owls & Dainty Delight Feminine card by Kate Morgan, Stampin Up Australia SAB 2023

I die cut the Polished Pink flowers and the Gold Foil centres and the leaves. Two of these were cut and joined together to create the wreath effect. The flowers are popped up on Mini Dimensionals. The sentiment is stamped in Versamark ink, White Emboss Powder added and melted using the Heat Tool. Then it was die cut using the banner die from the Stylish Shapes dies. This was also added on Dimensionals. The owl is stamped and fussy cut using Paper Snips and coloured using Stampin’ Blends Markers; Pool Party (Dark), Pale Papaya (Dark), SU500, SU600 & SU700. Some of the Fine Tip Glue was added to the eyes for extra shine!

Adorable Owls & Dainty Delight Feminine card by Kate Morgan, Stampin Up Australia SAB 2023 close up

On the inside I placed some Designer Paper down the side and another little die cut flower with the gold foil centre. The envelope also has the same flower in the bottom left corner!

Adorable Owls & Dainty Delight Feminine card by Kate Morgan, Stampin Up Australia SAB 2023 inside

Thanks for dropping by. I hope you can join me next Wednesday for inspiration using Pool Party.

Please hop across to our next participant and enjoy the wonderful inspiration of Rachel Woollard.

2022-23 CCBH Next button

If you come across a broken link or have come from a different entry point, a full list of participants can be viewed on Cathy Proctor’s blog.

Click here to see the full list of products used in project 1 ♥
Click here to see the full list of products used in project 2 ♥

2023 SAB Joining offer

Shop Online Craft with Kate


Be sure to download a PDF copy of current catalogues from my SU Catalogue Library page.

Don’t forget to Follow My Blog to receive blog updates and join my Newsletter Subscription for all the latest news and specials!