Birthday, Blog Hop/Creative Showcase, Handmade Cards, Kids Cards, Punch Art, Stampin' Up!

Colour Creations: Pumpkin Pie makes for a glorious sunset

9bdc0-34343751_10157403755198098_7101250458500464640_o

Welcome back to another Art With Heart Team Colour Creations weekly Blog Hop. Today we are featuring our 41st colour; Pumpkin Pie.

As we near the end of March it also means we near the end of Sale-a-bration and for you to earn FREE product. So don’t let this be you!

000 Saleabration ending soon.jpg

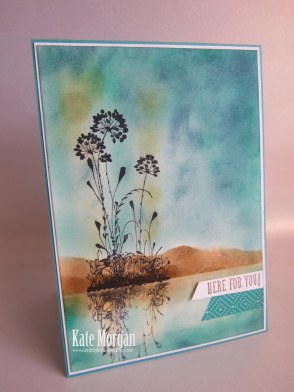
Today’s project was inspired by Michelle Zindorf from Ohio who is the absolute master of colouring. I admire her work and try to recreate similar effects, but I have a long way to go!!!

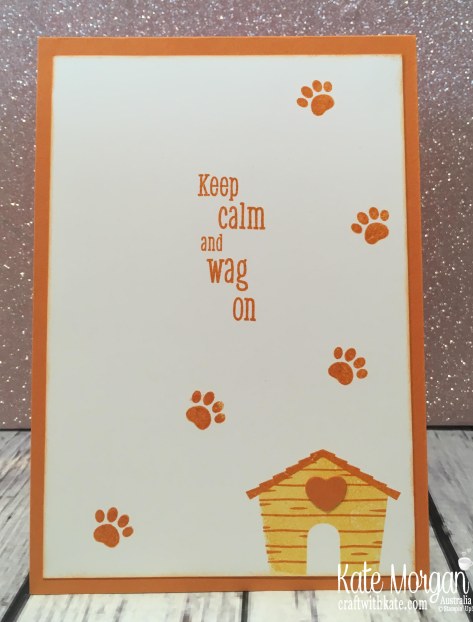
Pumpkin Pie is certainly one of my least used colours and so it stumped me when it came time to use it for this blog hop, although I do love a glorious sunset and so that is where the idea began. I also hadn’t inked up this Happy Tails stamp set nor used the coordinating Dog Builder punch, so perfect time to get it out and get creating.

Happy Tails Dog Stampin Up Sponging by Kate Morgan Australia.JPG

The background is created by sponging Mango Melody at the top, then some Pumpkin Pie ink. Then I used my AquaPinter with some Garden Green ink and swiped it across the centre of the card to create the horizon. I then sponged from the bottom with Garden Green ink and swished up with the sponge dauber to get the grassy effect.

Happy Tails Dog Builder PunchStampin Up Sponging by Kate Morgan Australia

The dog is punched from basic black card and I used a HB pencil to draw the lines for the shadow. Don’t look too closely at my wobbly hands LOL

On the inside I sponged the edges and stamped the dog house in Pumpkin Pie and the Mango Melody solid layer is stamped off once for a lighted tone.

The paw prints were not going to appear as part of the card, but guess what… I got a couple of tiny smudge marks and these paws are there to cover them up!!! LOL. Have you ruined a card at the final step too, and needed to embellish, rather than starting over?

Happy Tails Dog Stampin Up Sponging by Kate Morgan Australia inside

Head on over to Catherine’s blog where you’ll find the links to other participants.

To purchase these products click on the images below in the product list to take you directly to my online store!


2019 Saleabration Brochure & 2019 SAB 2nd release brochure ends 31 March 2019
2019 Occasions Catalogue ends 3 June 2019
2018-2019 Annual Catalogue ends 3 June 2019

Be sure to download a PDF copy from my SU Catalogue Library page today.


Don’t forget to Follow My Blog to receive blog updates and join my Newsletter Subscription for all the latest news and specials!

 Happy Stamping,

Blog Signature

Blog Button - Catalogue  Blog Button - Shop   Blog Button - Classes  Blog Button - Join my Team  Blog Button - Watermark

Product List

Blog Hop/Creative Showcase, Flowers, Jan-Jun Mini Catalogue and Sale-a-bration, Stampin' Up!, Sympathy

Colour Creations: Poppy Parade with a vibrant colour combination

9bdc0-34343751_10157403755198098_7101250458500464640_o

Our AWHT Colour Creations weekly Blog Hop features our 39th colour; Poppy Parade. This Wishing You Well card was  one of the cards we made in my class on Saturday. Check out how vibrant it looks against the Tin Tile Embossed black background!!!!

I know I am probably pushing the boundaries in the use of Poppy Parade, but I think it is this pop of colour in adding Poppy Parade that makes all the difference to this card!

Lasting Lily Stampin Up Saleabration 2019 Colour Creations Blog Hop by Kate Morgan Australia

The Lasting Lily stamp set is one of the Sale-a-bration items you can choose for free with a $90 order this month. Also available for March only, are the coordinating framelits to cut out these images, making life so much easier.

LILY

The flowers are inked in Mango Melody and then I used a sponge dauber with Poppy Parade ink and gently added ink to the edges of the stamp before stamping onto the paper. It gives such a wonderful two tone depth to the image.

Lasting Lily Stampin Up Saleabration 2019 Colour Creations Blog Hop by Kate Morgan, Australia.

I was so inspired by Emma Goddard, one of the Artisan Design Team members, and had to case this design.

Head on over to Catherine’s blog where you’ll find the links to other participants.

To purchase these products click on the images below in the product list to take you directly to my online store!


2019 Saleabration Brochure & 2019 SAB 2nd release brochure ends 31 March 2019
2019 Occasions Catalogue ends 3 June 2019
2018-2019 Annual Catalogue ends 3 June 2019

Be sure to download a PDF copy from my SU Catalogue Library page today.


Don’t forget to Follow My Blog to receive blog updates and join my Newsletter Subscription for all the latest news and specials!

 Happy Stamping,

Blog Signature

Blog Button - Catalogue  Blog Button - Shop   Blog Button - Classes  Blog Button - Join my Team  Blog Button - Watermark

Product List

Christmas, Handmade Cards, Holiday Catalogue, Stampin' Up!

Twinkling Christmas Lights

Today I have another card using the Making Christmas Bright Bundle, CASE’d directly from page 6 of the 2018 Holiday catalogue. You may remember seeing my post on Wednesday using this same bundle, you can see it here.

My Real Red card base is embossed in the Big Shot with the Subtle Dynamic Textured Impressions Embossing Folder. A layer of Call Me Clover card is added down the centre.

The Whisper White card is stamped with the sprigs from the Christmas Pines stamp set. Then I added the strings for the lights, however, I forgot to stamp these last week when Andrea was here so I’ve had to improvise and so I used the line stamp from the Balloon Celebrations stamp set! I stamped it in Gray Granite ink, but 2nd generation stamping so it isn’t so dark.

Christmas card using Stampin' Ups Making Christmas Bright Bundle by Kate Morgan, Australia. Holiday catalogue 2018.JPG

The Christmas lights are stamped in Real Red, Call Me Clover, Pineapple Punch and Pool Party. The tops are Gray Granite ink on coordinating card stock. Before I added each light with a dimensional, I used a sponge dauber to lightly add some ink for the light’s glow!

Can you see those Pretty Pines die cuts on top of the stamped ones? These just added an extra bit of dimension.

Christmas card using Stampin' Ups Making Christmas Bright Bundle by Kate Morgan, Australia. Holiday catalogue 2018.

The ribbon I have used is retired, however there is one very similar in my product list below that is a suitable replacement!

To purchase these products click on the images below in the product list to take you directly to my online store!


2018-2019 Annual Catalogue ends 3 June 2019
2018 Holiday Catalogue ends 2 January 2019
Be sure to download a PDF copy from my SU Catalogue Library page today.


Don’t forget to Follow My Blog to receive blog updates and join my Newsletter Subscription for all the latest news and specials!

 Happy Stamping,

Blog Signature

Blog Button - Catalogue  Blog Button - Shop   Blog Button - Classes  Blog Button - Join my Team  Blog Button - Watermark

Product List

Sympathy, Techniques & Tutorials, Washi Tape

Sponging & Reflection technique

Dear Crafters,

Today I share a card made using the sponging & reflection technique.

Now I have to say, I am a HUGE fan of artists who are great with using sponges, but I have to say, I am not.  I have a go and that is the point of this card. You need to try new things and maybe one day, you too will accomplish new highs.

Serene Silhouettes Sponging Reflection Technique #stampinup Sympathy card @cardsbykate

The very first thing I did, was to stamp the image in basic black ink. Then I stamped that same image onto some acetate and quickly applied the acetate to the card to create the reflection.

Then I placed a large post it note across the bottom of the main image to create the horizon first. I used sponge daubers to keep adding colour until I was happy with it. Be careful not to add too much, as you can always add more, not take it away!!!

Then I removed the post it note and did the lower section of the card. I added some washi tape and the sentiment overlay with a stapler.

Serene Silhouettes Sponging Reflection Technique #stampinup Sympathy card @cardsbykate

Inks: Marina Mist, Soft Suede, So Saffron, Basic Black, Island Indigo

Stamp sets: Serene Silhouettes

Serene Silhouettes Sponging Reflection Technique #stampinup Sympathy card @cardsbykate

How do you think I did with the sponging? Yeah, needs improvement, but that will come with more practice!


All Catalogues, Clearance Rack & Weekly Deals are available online here! They are full of amazing new products and wonderful full colour picture inspiration. It is a must have for anyone interested in Ink, Paper and Stamps!

Shop Online 24/7 for products

Don’t forget to Follow My Blog to receive blog updates and join my Newsletter Subscription for all the latest news and specials!

Enjoy the many perks of being a Demonstrator (even just for yourself as a Hobby Demonstrator) by joining my friendly team, click HERE for details.

Happy Stamping!

Name Banner

Techniques & Tutorials

Sponging & Masking Technique

Good morning Stampers,

This morning I want to share with you the Sponging and Masking Technique.

IMG_3678

To create this card, I cut a piece of Whisper White cardstock 10.5 x 7.5cm.

Then punched a circle out of a post it note ensuring I get most of the sticky back behind my punch. (This is best punched by doing about 4 post it notes at once).

Place the circle post it note onto your small cardstock and then begin the sponging with the lightest colour first (I started with the Blushing Bride).

Start the sponging from off the page and then slowly, in circular motions, move onto the cardstock. Start slowly and build up your colour by going over the area repeatedly.

When you’re ready to add the Tempting Turquoise, start at the bottom of the cardstock and work your way up to blend the colours together. Go back to the first colour to continue blending if need be. When you are happy with your colourings, remove the circle punch!

Next, add your stamped image, in this case I used the Lovely as a Tree Stamp Set, using black ink.

I cut a piece of silver ribbon and stuck it down across one end with Glue Dots. Tie a bow and add this to the ribbon so it looks like once piece of ribbon tied with a bow. This way it uses less ribbon!

Next I stamped my sentiment towards the bottom right corner of the A5 card.

Finally, I added 6 dimensionals to the back of the stamped card and adhered it to the top section of the card.

Stampin’ Up! products used:

Stamp Set: Lovely as a Tree, Simply Sketched (Hostess)

Inkpads: Blushing Bride, Tempting Turquoise, Black

Cardstock: Whisper White

Tools: Paper Trimmer, Circle 1 3/8″ Punch

Accessories:  Glue Dots, Dimensionals, Sponge Daubers, Silver Ribbon, Post It Note

To purchase any or all of these items, be sure to visit my online store!

Happy stamping,

Kate