I just love the Coming Home Bundle and today I have added the Ornate Garden Specialty DSP to the background which is really beautiful and adds an extra classy feel.
This is not your usual Christmas colour scheme, but I think it really works?!! What do you think?
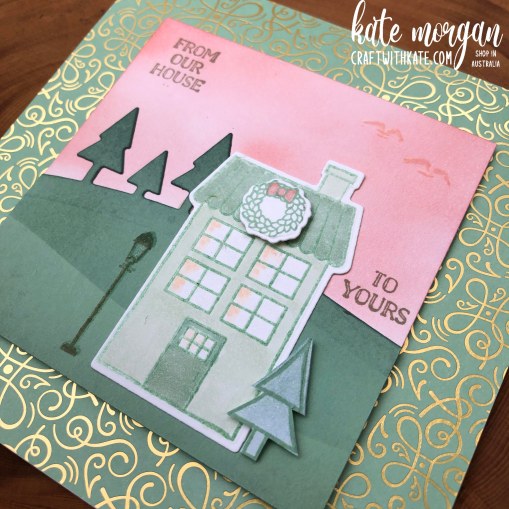
The In the Pines Bundle coordinates perfectly with the In Good Taste patterned papers. I also used some of the Just Jade sheets from the 2020-2022 In Color PaperPack, behind the large tree cutout and also die cut a couple of the smaller trees, as well as a Gold Foil one and Just Jade one.
The layer of Just Jade card is embossed with the Subtle 3D embossing folder before I brushed the edges with the Versamarkinkpad. Some Gold emboss powder is added and heat set. This adds the look of an extra layer, without the bulk of extra card. The sentiment is also Gold Embossed and cut out with the Classic Label Punch.
Die cut the fancy tree (largest) in the centre top of the woodgrain patterned paper and place some of the Just Jade patterned paper behind it. I selected that stripy patterned piece, as it looks a little like a string of lights or tinsel wrapped around the tree.
The Just Jade Ribbon is tied around the woodgrain layer, and in a bow, before it is adhered to the Just Jade card layer. Then add the smaller trees last.
Some Gold Faceted Gems were added to the tops of the trees.
On the inside, I added some leftover strips of card and patterned paper an another small tree.
I can’t believe I am still finishing off my Christmas cards – I normally have them all done, written messages inside and in the mail by 1 December, eek! Have you mailed your Christmas cards yet?
My colour combination: Rich Razzleberry – Bermuda Bay – Bumblebee – Whisper White
Using Blending Brushes or a foam sponge roller, add colour directly from the inkpads of each of the feature colours onto a Whisper White strip of cardstock. This will create a beautiful soft background. Before adhering it to the front of your card base, flick some drops of Wink of Stella over it and allow it to dry for a few minutes.
Stamp 4 or 5 pears by inking them up on the Bumblebee inkpad, then take a Sponge dauber to add a little Bermuda Bay ink around the edges to get that two tone colour. Give your stamp a huff of breath to re-activate the ink before stamping onto white card, then cut them out with the coordinating die. Repeat the same process for the bird, starting with Bermuda Bay, then sponge Rich Razzleberry.
Die cut 3 wreaths in each of the colours and glue them together. Add the stamped images with dimenionals, so they pop up a little. Stamp your sentiment and add some Elegant Faceted Gems.
Using the 2020-2022 In Color 6″ x 6″ DSPin the background as well as behind the tree cut out, you can quickly create some elegant Christmas card. The In the Pines bundle and Itty Bitty Christmas stamp set are my must have items for the holiday season.
My colour combo: Just Jade, Cinnamon Cider, White
The Lovely Labels Pick a Punch is used to create the fancy ends of my sentiment. The Just Jade layer is embossed with the Subtle 3DTIEF for a bit of texture. A Star Designer Element is added to the top of the tree. We all need a star or an angel there!
I till felt it was missing something, so I added a Just Jade Gingham bow made using the Flowers for Every Season Ribbon Combo Pack.
On the inside, I added some left over strips and used the Banner Triple Punchon the ends.
Each week some of the Art With Heart team are joining the Colour Creations Showcase to bring you creative inspiration to showcase our range of 50+ gorgeous Stampin’ Up! colours.
Week 26 – Merry Merlot
The Dove of Hope stamp set and coordinating Detailed Dove dies make gorgeous Christmas cards without too much effort.
The card base is Merry Merlot, embossed with the Dainty Diamonds 3DTIEF. The Whisper White layer, I scored the border using the Simply Scored, at 1/8″ intervals. This is another great way to create borders without adding extra bulk to your card.
I used a Decorative Mask (oops, sorry this one is retired) but you can use any mask with Blending Brushes. Once I removed the mask, I found it a bit “in your face”, so I lightly brushed over it again to soften the look… much better! The sentiment is stamped in Merry Merlot before I added the dove.
Some Elegant Faceted Gems were added at the very end for a little bling.
Please head over to Cathy’s blog to see the full list of participants in this week’s Colour Creations Showcase. We would love for you to visit each one and leave some comments if you feel inspired.
Plaid Tidings patterned paper is another of the packs that is on sale this month and tonight I have teamed it up with the reindeer image from the Warm & Toasty stamp set and includes some Paper Piecing!
The bow on this reindeer, I coloured with a Black Stampin’ Write Marker direct to the stamp and stamped it into the centre of this plaid piece of paper. I cut out a small square just around the image with my trimmer (the oval is placed over the top to hide the hole) then neatly cut around the edges of the bow. Using the marker, I ran it around the edges to make the sides black, so when it’s glued to the reindeer, it looks like one piece. The reindeer is coloured with Stampin’ Blends Markers.
I added a little Wink of Stella to the antlers, hooves and nose. The oval is popped up on dimensionals.
Don’t forget to add some patterned papers to your October order!
Welcome back to our second Heart of Christmas post with the Art with Heart Team. Each month we are sharing Christmas inspiration with you using current Stampin’ Up! products.
Do you have a copy of the new catalogue yet? You can view it online or Email Me to request a copy be mailed to you!
Tonight I have a Christmas card and ornament to share with you. I love this Trimming the Town Designer Series Paper and it makes the most gorgeous decorations to hang on your tree this festive season. This paper is part of the 15% off sale on right now!
Here is my card predominantly using the DSP with very little stamping; in fact the car and the wreath on the house are the only stamped images.
To go with my card is this Shaker Ornament using the same suite
Using 3 sizes of circle dies, you will need to cut the following pieces;
Largest die: Blue base (pictured with ribbon), the blue ring (top piece), Foam Sheet, DSP
Middle die: Foam sheet & Window Sheet
Smallest die: cut the centre of the top piece & cut the centre of the foam sheet
Glue the ribbon to the base piece (shown above) then glue the DSP circle over the top. I cut out some of the trees and house from another piece of the DSP and glued these on, along with a stamped sentiment.
Glue the window sheet onto the blue ring
Place the foam circle on top of the window sheet.
Add some tiny clear beads to the centre of the ornament and very carefully place the above piece on top.
Then tie a bow and add it to the top to finish it off.
Have I inspired you to make some decorations for your tree this Christmas?
Please head over to Judy’s blog for all participants in this month’s Heart of Christmas!
Do you sometimes get a bit overwhelmed with product choice, especially when you are starting out?
Well fear no more, because this product medley, has most of the product included in the kit. Just add cardstock, adhesive and inks to complete your projects.
The Most Wonderful Time Product Medley includes these exclusive products:
Most Wonderful Time photopolymer stamp set – 11 stamps; suggested clear blocks (sold separately): b, d, g)
48 sheets of 6″ x 6″ (15.2 x 15.2cm) Designer Series Paper, 8 each of 6 double-sided designs
12 gold foil card fronts, 4 each of 3 designs
7 sticker sheets
Gold/white tinsel trim, 10 yards (9.1m)
58 adhesive-backed gold faceted stars
6-piece Most Wonderful Time Dies (use with a Stampin’ Cut & Emboss machine, AC p. 170)
Product colours: Basic Black, Old Olive, Real Red, White, Gold foil
This card I have kept very simple, aimed at the beginner stamper. A Real Red card base folded in half with a strip of the patterned paper down the centre. This paper has a gold foil accent on the trees, which adds a classy look.
The banner and the deer are both stickers, so very easy to add. Stamp the tree onto a Stitched Oval in Old Olive ink then using the Wink of Stella pen, colour the image while the ink is still wet. This will pick up some of the colour and blend beautifully (I don’t think you can see the glittery look in the photos). Add one of the gold stars to the top of the tree to finish off.
A full list of products can be found at the end of this post.
If you haven’t seen the catalogue yet, click the image to download your own PDF copy!
Some of my favourite products are:
Dove of Hope Bundle – I think this one is a great bundle for our current COVID situation to give hope to all. We are currently in Stage 4 lock-down in Melbourne, we have a curfew of not being out after 8pm and only allowed out to exercise for 1 hour per day. So this bundle gave me comfort and I will be using it heaps.
This is a card I made using this bundle and you can the blog post here
Trimming the Town DSP – I love this paper pack and you will see me share loads of projects using this over the next few months.
Here is a card using these gorgeous papers and you may also notice some new dies; Pine Woods Dies. You can see the Heart of Christmas blog post here.
Returning favourite – Christmas Gleaming Variety Bundle – I do love a punch bundle for quick and easy projects and their ease of use.
Here is my bookmark card that I created last year using these products. You can see the original post here.
NEW Stampin’ Cut & Emboss Machine (Standard Size)– this is available for Demonstrators to pre-order this month and customers to purchase from 1 September 2020. However, if you join my team this month, you can add this machine to your starter kit! How cool is that?!!!
Unfortunately the Stampin’ Cut & Emboss Machine (Mini size) won’t be available until later in the year, due to the COVID situation.
I have more great items to share with you over the coming months, but just thought I’d share a few must haves. What are your favourite products?
Today is the day for the new 2020 August-December Mini catalogue becoming available and you can now grab all those amazing Christmas products! Click the image to download a PDF copy of the catalogue.
My card today is a fancy fold design using the Trimming the Town Designer Paper and the Dove of Hope Bundle.
Place the Old Olive card in the Trimmer with the 13cm side at the top and score at 2.5cm. Fold this over and burnish with a bone folder. This creates the top of the card.
For the inside of the card, take the Whisper white card and glue the 2 pieces of Designer Paper to each side, then glue to the inside of the card base. Stamp your sentiment in Old Olive ink.
For the front of the card, place the Poppy Parade piece on the inside in the centre and line it up with the bottom of the card. Holding it carefully in place, add some glue to the top only and fold down the Old Olive flap. Now you can add the Designer Paper (I sponged the edges with Poppy Parade ink).
Die cut the pieces of the dove in Whisper White card and glue a small section so the filigree part of the wings sits up a little and is not glued down. Place dimensionals on the back and adhere it to the card. On a small piece of white card, stamp the bauble in Versamark ink, add White Emboss Powder and heat set it. Colour the bauble with Water Painters and ink pads before cutting it out with scissors and gluing it to the card.
Add 3 small rhinestones to the bauble and tie some white ribbon around the top flap and tie in a bow. I placed a glue dot behind the bow to hold it in place.
Measurements:
Old Olive card base – 14.8cm x 13cm
Whisper White card (inside) – 14.3cm x 10cm
Designer Paper (inside) – 10cm x 2.5cm (2 pieces)
Poppy Parade card – 10.3cm x 9.5cm
Designer Paper (front) – 9cm x 7.2cm
A full list of products can be found at the end of this post.


")


 Crinkled Seam Binding Ribbon")


