Designer/Patterned/Specialty Papers (DSP), Gift Ideas, Stampin' Up!, Techniques & Tutorials

Window Box Ribbon Dispenser

Dear Crafters,

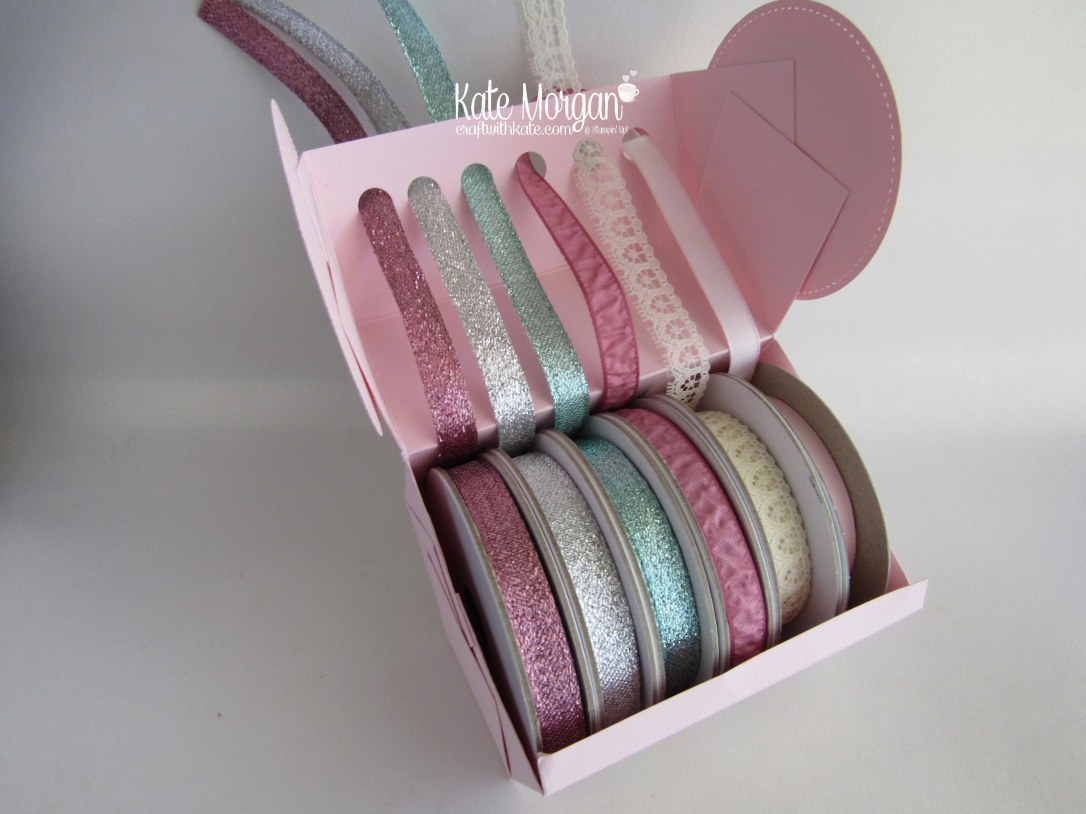
Today I have used the Window Box Framelits to create a Ribbon Dispenser.

I posted this on one of our private Stampin’ Up! Facebook Forums, and the response I got was enormous (over 1.3k likes) and so many requests for a tutorial on how I made it.

window-box-ribbon-dispenser-using-stampin-up-products-by-kate-morgan-independent-demonstrator-australia-classes-in-rowville-occasions2017-front

I love the detail on each end and you can decorate it with any Designer Series Paper!!!

window-box-ribbon-dispenser-using-stampin-up-products-by-kate-morgan-independent-demonstrator-australia-classes-in-rowville-occasions2017-side

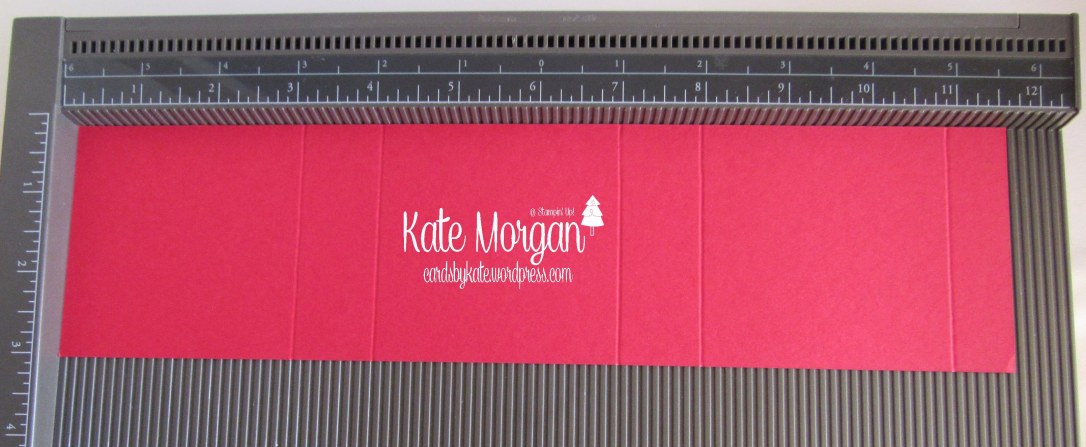
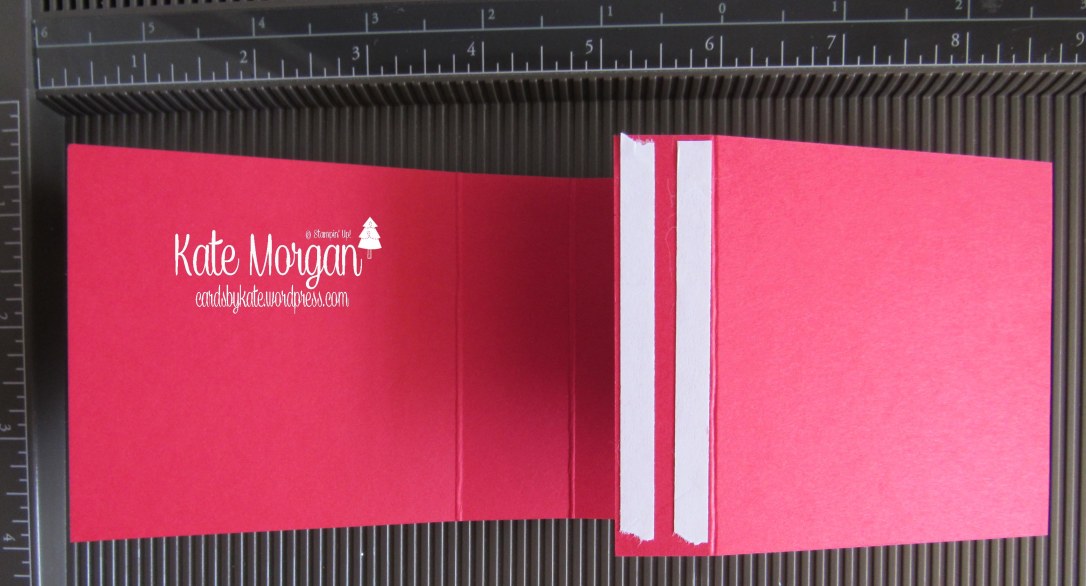
I have attempted doing a written tutorial for this, but please let me know if you find it hard to follow, as I didn’t write down instructions when I was creating this the first time! You can download the PDF tutorial by clicking here window-box-thinlits-ribbon-dispenser-by-craft-with-kate.

window-box-ribbon-dispenser-using-stampin-up-products-by-kate-morgan-independent-demonstrator-australia-classes-in-rowville-occasions2017-open

What do you think of this project? This would make a great gift for a crafty friend or a Hostess gift for a workshop!!!

Sale-a-bration time!!!

With any $90 order you can choose 1 item for FREE
with a $180 order you can choose 2 items for FREE
with a $270 order you can choose 3 items for FREE
ETC
Here are all the FREE items you can choose from!

2017-saleabration-images

Products Used:

Cardstock: Island Indigo, Blooms & Bliss DSP
Inks: Melon Mambo
Other: Big Shot, Window Box framelits, Tombo Multipurpose Glue, Trimmer, Paper Snips, Tear & Tape Adhesive, 1/2″ circle punch

shop-online-copyget-a-catalogue-free-copy  classes-in-rowville-copy  join-my-team-copy  watermark-purchase

Don’t forget to Follow My Blog to receive blog updates and join my Newsletter Subscription for all the latest news and specials!

Happy Stamping!

Blog Signature-001

feminine, Gift Ideas, Stampin' Up!

Ribbon Dispenser

Dear Crafters,

Today I share a gift idea that I have been making for Christmas gifts for some crafty people who will appreciate them.

ribbon-dispenser-using-stampin-ups-falling-in-love-dsp-by-kate-morgan-independent-demonstrator-classes-in-rowville

I keep my ribbons on small shelving but I find they sometimes roll off and unroll and then I have ribbons everywhere! You know what I mean, right?!!!

Well, I did a search on YouTube and found this nifty idea by Linda Parker, a UK demonstrator and had to make one or two or three!!!

ribbon-dispenser-using-stampin-ups-falling-in-love-dsp-by-kate-morgan-independent-demonstrator-classes-in-rowville

I have used the new Falling in Love DSP with Blushing Bride cardstock as the base. This DSP will be available on 4th January 2017.

ribbon-dispenser-using-stampin-ups-falling-in-love-dsp-by-kate-morgan-independent-demonstrator-classes-in-rowville

And I love these Stitched Shapes Framelits, they give that little bit of added detail!

What do you think of this project? Are you going to give it a go?!

Products Used:

Cardstock: Blushing Bride and Falling in Love DSP
Other: Big Shot, Stitched Shapes Framelits, Paper Snips, Tombo Multipurpose Glue, Trimmer, Simply Scored, Double Sided Tape, 3/8″ circle punch

shop-online-copyget-a-catalogue-free-copy  classes-in-rowville-copy  join-my-team-copy  watermark-purchase

Don’t forget to Follow My Blog to receive blog updates and join my Newsletter Subscription for all the latest news and specials!

Happy Stamping!

Blog Signature-001

Christmas, Gift Ideas, Holiday Catalogue, Stampin' Up!

Handbag Gift Bag

Dear Crafters,

On Monday I shared a fancy fold card using the delightful, Candy Cane Lane DSP and Cookie Cutter Christmas Bundle.

Today, I have a Handbag made purely from paper to place that lovely card into, in the same Designer Series Paper!

gift-handbag-using-stampin-ups-candy-cane-lane-dsp-holiday-catalogue-2016-by-kate-morgan-independent-demonstrator-classes-in-rowville

and here you can see the card inside!

gift-handbag-using-stampin-up-candy-cane-lane-dsp-holiday-catalogue-2016-by-kate-morgan-independent-demonstrator-classes-in-rowville

How did I create this bag?  Start by making the base using a piece of cardstock 8″ x 5″. Score on each edge at 1″. At each corner on the long edges, cut up to the first score line. Using a bone folder, burnish the score lines, then stick the base together to create a box.

Next, I simply started with a 12″ x 12″ piece of DSP, cut in half so you have two 6″ x 12″ and join them together so you have one long piece. Cut this down to 18 1/2″. Add Tear and Tape along the long edge and down one side. Fold it around the base and join together to create the central part of the bag.

The handles are 1″ strip cut from the longer side of an A4 sheet. Score down the centre lengthwise leaving 1.5″ from both ends. Place a piece of tear & tape along one inside edge only to the score lines and fold together. I also used another strip of cardstock of 1″ to place around the top of the bag to make it more sturdy, but that is optional. To finish, I glued some pom pom trim around the top.

gift-handbag-using-stampin-up-candy-cane-lane-dsp-holiday-catalogue-2016-by-kate-morgan-independent-demonstrator-classes-in-rowville-diy

What do you think of this project?

Products Used:

Cardstock: Real Red, Candy Cane Lane DSP
Other: Trimmer, Simply Scored, Tear & Tape, Paper Snips, Real Red Pom Pom Trim

shop-online-copyget-a-catalogue-free-copy  classes-in-rowville-copy  join-my-team-copy

Don’t forget to Follow My Blog to receive blog updates and join my Newsletter Subscription for all the latest news and specials!

Happy Stamping!

Blog Signature-001

Christmas, Designer/Patterned/Specialty Papers (DSP), Gift Ideas, Stampin' Up!, Techniques & Tutorials

Christmas Card with a Gift Box

Dear Crafters,

I have a different type of card today that can also be used as a gift. It has a card on the top and a little pull out box underneath to place a gift!

I have used the Candy Cane Lane DSP and the Cookie Cutter Bundle. I just love these products!

Here is the front of the project:

gift-box-with-card-candy-cane-lane-dsp-cookie-cutter-bundle-santa-holiday-catalogue-2016-cards-by-kate-stampinup-cardsbykatemorgan

Here is how it looks when opening the card:

gift-box-with-card-candy-cane-lane-dsp-cookie-cutter-bundle-santa-diy-holiday-catalogue-2016-cards-by-kate-stampinup-cardsbykatemorgan

Oh and here is another one I made with the gorgeous Rudolf on the front!

gift-box-with-card-candy-cane-lane-dsp-cookie-cutter-bundle-reindeer-holiday-catalogue-2016-cards-by-kate-stampinup-cardsbykatemorgan

gift-box-with-card-candy-cane-lane-dsp-cookie-cutter-bundle-reindeer-holiday-catalogue-2016-cards-by-kate-stampinup-cardsbykatemorgan-diy

Card and drawer open:

card-gift-box-with-necklace-candy-cane-lane-dsp-cookie-cutter-bundle-reindeer-diy-holiday-catalogue-2016-cards-by-kate-stampinup-cardsbykatemorgan

Aha, and there is my gift!  A designer series paper necklace!!!

card-gift-box-with-necklace-candy-cane-lane-dsp-cookie-cutter-bundle-reindeer-holiday-catalogue-2016-cards-by-kate-stampinup-cardsbykatemorgan-diycard-gift-box-with-necklace-candy-cane-lane-dsp-cookie-cutter-bundle-santa-holiday-catalogue-2016-cards-by-kate-stampinup-cardsbykatemorgan

I just love how all of these products coordinate!!!

Here’s how to make it:

Start with an A4 piece of card and cut it down to 3″ x 11 6/8″ then score it at 3″, 4″, 7″, 8″, 11″

christmas-card-with-gift-box-cards-by-kate-stampinup-cardsbykatemorgan-diy

Burnish the folds and add Tear & Tape as shown below

christmas-card-with-gift-box-cards-by-kate-stampinup-cardsbykatemorgan-diy

Fold up the right hand side (see below), remove the cover off the tape and then fold down the left side to secure firmly.

christmas-card-with-gift-box-cards-by-kate-stampinup-cardsbykatemorgan-diy

Next cut a piece of card to 4 7/8″ x 4 7/8″. Score each edge at 1″. Using scissors, cut in and notch as shown below. Also use a 1″ circle punch to create the semi circle before you put the box together with tape. This will then slide beneath the card!

christmas-card-with-gift-box-cards-by-kate-stampinup-cardsbykatemorgan-diy

What do you think of today’s project?

By the way, this Candy Cane Lane DSP is part of a special sale, see below!

b3g1dsp_demoheader_uksp

Between 1-31 October, you and your customers can buy three packages of Designer Series Paper and get one free! That’s great news since everyone can use more Designer Series Paper. This sale includes Designer Series Paper from both the annual catalogue and the recently released holiday catalogue (not including Specialty Designer Series Paper or Designer Series Paper Stacks). Promotion period: 1-31 October 2016

2016-buy-3-get-1-free-graphic

All Catalogues and the Clearance Rack are available online here! They are full of amazing new products and wonderful full colour picture inspiration. It is a must have for anyone interested in Ink, Paper and Stamps!

Shop Now

Don’t forget to Follow My Blog to receive blog updates and join my Newsletter Subscription for all the latest news and specials!

Enjoy the many perks of being a Demonstrator (even just for yourself as a Hobby Demonstrator) by joining my friendly team, click HERE for details.

Happy Stamping!

Blog Signature-001

Birthday, Flowers, Gift Ideas, One Sheet Wonder, Stampin' Up!

One Sheet Wonder

Dear Crafters,

One Sheet Wonders are a fantastic way to make some cards to give as a gift. They all coordinate and are actually quite easy to produce.

I saw this idea from a UK demonstrator, Michelle Last, and I wanted to give it a go myself.

I began stamping the A4 sheet of Whisper White cardstock using the Blooms & Wishes stamp set.

Blooms & Bliss OSW, Sunshine Wishes, DIY #stampinup

Then you cut up the sheet like this below!

TIP: Before I cut the sheet, I placed an A4 window sheet over the top and used a black sharpie to draw the lines and measurements so I have a template to use again!!!

Blooms & Bliss OSW, Sunshine Wishes, Pop of Pink, DIY, #stampinup

and these are all the cards you can make with each of the pieces that have been stamped. Also using the Pop of Pink Washi Tape, and the Sunshine Wishes Thinlits, you can create 7 of your own coordinating cards from 1 sheet of A4 card!!!

Blooms & Bliss OSW, Sunshine Wishes, Pop of Pink, DIY #stampinup  Blooms & Bliss OSW, Sunshine Wishes Pop of Pink, DIY #stampinup @cardsbykate

Why don’t you give this a go? It makes for a great gift!!!

Products

Stamps: Blooms & Wishes, Thoughtful Banners
Inks:  Sweet Sugarplum, Melon Mambo, So Saffron, Peekaboo Peach, Wild Wasabi
Card/Paper: Whisper White, Melon Mambo, Sweet Sugarplum, Peekaboo Peach, Gold Glimmer
Accessories:  Sunshine Wishes Thinlits, Big Shot, Pop of Pink Washi Tape, Rhinestones, Stampin’ Trimmer, Tombo Multipurpose Glue, Stampin’ Scrub, Paper Snips, Simply Scored.

Bonus Days – for every $90 you order in July, you will earn a $9 coupon to be used in August. Click here to find out more!

All Catalogues and the Clearance Rack are available online here! They are full of amazing new products and wonderful full colour picture inspiration. It is a must have for anyone interested in Ink, Paper and Stamps!

Shop Now

Don’t forget to Follow My Blog to receive blog updates and join my Newsletter Subscription for all the latest news and specials!

Enjoy the many perks of being a Demonstrator (even just for yourself as a Hobby Demonstrator) by joining my friendly team, click HERE for details.

Happy Stamping!

Blog Signature-001

Designer/Patterned/Specialty Papers (DSP), Gift Ideas, Stampin' Up!

Designer necklace & earrings

Dear Crafters,

Today I have many more jewellery pieces to share with you. Some are necklaces by themselves and some are sets of necklace & earrings!

Do you make cards or scrapbook and have loads of designer papers that you buy, but they are too darn pretty to use? Well, this is a great way to use up some of those retired papers.

I just love to showcase the Stampin’ Up! Designer Series Papers and what better way to do that, than by wearing it around your neck!

What do you think of these? Why don’t you give them a try too.

Products

Card/Paper: Pretty Petals DSP (R), Love Blossom DSP (R)
Accessories:  Crystal Effects, 1/2″ Circle Punch, 1-1/4″ Circle Punch (Jewellery items purchased on eBay!)

All Catalogues and the Clearance Rack are available online here! They are full of amazing new products and wonderful full colour picture inspiration. It is a must have for anyone interested in Ink, Paper and Stamps!

Shop Online 24/7 for products

Don’t forget to Follow My Blog to receive blog updates and join my Newsletter Subscription for all the latest news and specials!

Enjoy the many perks of being a Demonstrator (even just for yourself as a Hobby Demonstrator) by joining my friendly team, click HERE for details.

Happy Stamping!

Blog Signature-001

Designer/Patterned/Specialty Papers (DSP), feminine, Gift Ideas, Stampin' Up!

Designer Jewellery!

Dear Crafters,

You probably looked at the heading and thought “What? Designer Jewellery? I thought this was a paper crafting site”. Well yes, today I have an extra blog post to share with you with some amazing projects that I have made using our Designer Series Papers!!! I love to showcase them in this way, because it is always a talking point when speaking with so many people. I get loads of wonderful comments and I’m always asked where I purchased them from…. well me of course!

Here is this Necklace and Earring Set made with the Floral Boutique DSP!

IMG_5795

The jewellery items I purchased on eBay and I used my circle punches to cut the Designer Series Paper. The necklace circle was a little too big, so I did have to trim around the edges with paper snips for it to fit neatly inside the tray! I adhered it with Crystal Effects and then added some more Crystal Effects on top to add the glass circle. The earrings were done the same way.

What do you think of my jewellery sets to showcase our DSP?!!!

Products

Card/Paper: Affectionately Yours DSP, Blooms & Bliss DSP, Floral Boutique DSP
Accessories:  Crystal Effects, 1/2″ Circle Punch, 1-1/4″ Circle Punch (Jewellery items purchased on eBay!)

All Catalogues and the Clearance Rack are available online here! They are full of amazing new products and wonderful full colour picture inspiration. It is a must have for anyone interested in Ink, Paper and Stamps!

Shop Online 24/7 for products

Don’t forget to Follow My Blog to receive blog updates and join my Newsletter Subscription for all the latest news and specials!

Enjoy the many perks of being a Demonstrator (even just for yourself as a Hobby Demonstrator) by joining my friendly team, click HERE for details.

Happy Stamping!

Blog Signature-001

Gift Ideas, Kids Cards, Punch Art, Stampin' Up!

Foxy Friends Shadow Box

Dear Crafters,

Today I have created a Shadow Box with the brand new Foxy Friends Bundle. I had so much fun playing with this bundle that I wanted to incorporate as many of the little animals in one project, but they wouldn’t fit on a card so I made a shadow box to display!

Sorry for the reflection, it is quite difficult to photograph without it and it didn’t look the same not in the frame!

Shadow Box, Foxy Friends, DIY, #stampinup, Handmade, 2016

I started with a whisper white background and cut it to size to fit into the 8″ x 8″ frame.

I stamped all the animals, punched them out with the Fox builder punch and some I had to fussy cut. I created an extra head for each one. Once I glued them together, I added the second head piece with a dimensional for that true 3D effect.

Here are each of the animals closer up!

Check out this little kitty cat with the bell tied around its neck, super cute!

Shadow Box, Foxy Friends, DIY, #stampinup, Handmade

Products

Stamps: Foxy Friends, Rose Wonder
Inks:  Smoky Slate, Basic Black, Basic Gray, Crumb Cake, Soft Suede, Early Espresso, Tangerine Tango, Mint Macaron
Card/Paper:  Basic Black, Whisper White, Silver & Red Glimmer paper
Accessories:  Fox Builder punch, White Baker’s Twine, Dimensionals, Paper Snips, Stampin’ Scrub, Tombo Multipurpose Glue, Heart Punch (retired) Gold Bell (not SU)

All Catalogues and the Clearance Rack are available online here! They are full of amazing new products and wonderful full colour picture inspiration. It is a must have for anyone interested in Ink, Paper and Stamps!

Shop Online 24/7 for products

Don’t forget to Follow My Blog to receive blog updates and join my Newsletter Subscription for all the latest news and specials!

Enjoy the many perks of being a Demonstrator (even just for yourself as a Hobby Demonstrator) by joining my friendly team, click HERE for details.

Happy Stamping!

Blog Signature-001

Butterflies, feminine, Flowers, Gift Ideas, Stampin' Up!

Calendar Card

Dear Crafters,

Today I share with you one of the projects we made at my Techniques class last week.

These mini tab calendars prove popular every year, and my class attendees love making projects with them.

IMG_4654

We have made an easel card and added the calendar, so the recipient can have it standing on their desk, wardrobe, where ever they place it for the whole year to admire.

We used the Flowering Fields stamp set which we coloured with Stampin’ Write Markers. The background is the Designer Series Paper, Wildflower Fields which coordinates with this stamp set.

IMG_4661

I love that we have something quite Australian in the range.

IMG_4656

What do you think of this project? My class ladies loved it!

An here is another card using the same stamp set and DSP. I love making Random Act of Kindness cards and popping them in the post to unsuspecting recipients xx

All Catalogues, Clearance Rack & Weekly Deals are available online here! They are full of amazing new products and wonderful full colour picture inspiration. It is a must have for anyone interested in Ink, Paper and Stamps!

Shop Online 24/7 for products

Don’t forget to Follow My Blog to receive blog updates and join my Newsletter Subscription for all the latest news and specials!

Enjoy the many perks of being a Demonstrator (even just for yourself as a Hobby Demonstrator) by joining my friendly team, click HERE for details.

Happy Stamping!

Blog Signature-001

feminine, Flowers, Gift Ideas, Techniques & Tutorials

Card Box using Diagonal Plate

Dear Crafters,

Back on the 18th January, I shared a card box/envelope and today I share another one that is slightly bigger but uses a full 12″ x 12″ sheet of card stock.

This envelope holds at least 6 A5 cards and 6 C6 envelopes. It is really just a thicker envelope that I made using the diagonal plate with the Simply Scored.

Card Box Wildflower Fields DSP #stampinup

I started with an 12″ x 12″piece of card stock and scored on the diagonal plate at 4″ and 6″. Tip: Score from the ruler along the top and the sides so you don’t have to turn your card stock.

Turn the card stock 90 degrees and score both sides diagonally at 5″ and 7″.

Cut out the small triangles as shown below

Card Box Wildflower Fields DSP #stampinup

Cut up the scorelines as shown below

Card Box Wildflower Fields DSP #stampinup

Now add your Designer Series Paper (Wildflower Fields DSP) and your Tear and Tape adhesive as shown

Card Box Wildflower Fields DSP #stampinup  Card Box Wildflower Fields DSP #stampinup

Also add another piece of DSP to the back of the box

Card Box Wildflower Fields DSP #stampinup

I have decorated the front using a flower I made with the Bow Builder Punch

Card Box Wildflower Fields DSP #stampinup

I adhered the flower to the top flap of the envelope/box as the weight will hold it closed.

Card Box Wildflower Fields DSP #stampinup

What do you think of my gift idea?

It is such a beautiful way to package up your handmade cards as a gift for your loved ones.


All Catalogues, Clearance Rack & Weekly Deals are available online here! They are full of amazing new products and wonderful full colour picture inspiration. It is a must have for anyone interested in Ink, Paper and Stamps!

Shop Online 24/7 for products

Don’t forget to Follow My Blog to receive blog updates and join my Newsletter Subscription for all the latest news and specials!

Enjoy the many perks of being a Demonstrator (even just for yourself as a Hobby Demonstrator) by joining my friendly team, click HERE for details.

Happy Stamping!

Blog Signature-001