Birthday, Designer/Patterned/Specialty Papers (DSP), feminine, Flowers, Stampin' Up!, Techniques & Tutorials

Floral Phrases Fancy Fold card

Hello Crafters,

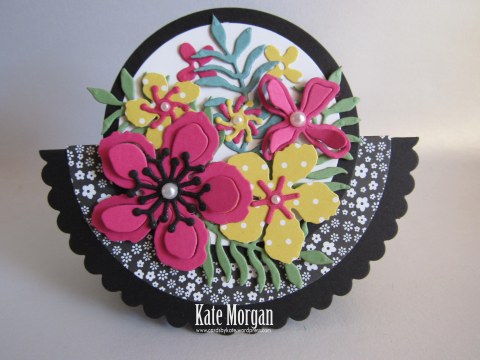
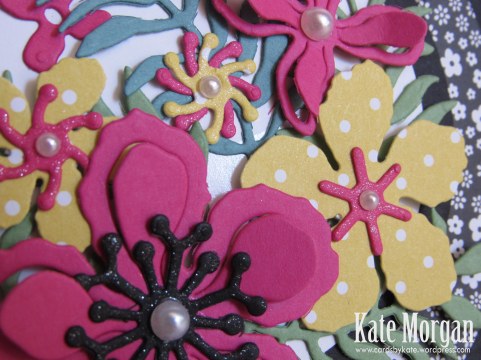
Today I am featuring the Floral Phrases & Happy Birthday Gorgeous Stamp Sets to create this Fancy Fold card, with the pretty Fresh Florals DSP. #cutitnothoardit

Fancy Fold Card using Stampin Ups Floral Phrases, Happy Birthday Gorgeous & Fresh Florals DSP by Kate Morgan, Independent Demonstrator Australia

I also love how this card folds flat to fit into a C6 envelope for posting!

This style is very elegant, but also very quick and easy to create. It would be a fantastic fold for many multiples of cards, like Christmas cards!

Fancy Fold Card using Stampin Up Floral Phrases, Happy Birthday Gorgeous & Fresh Florals DSP by Kate Morgan, Independent Demonstrator Australia

What do you think of my version of this fancy fold card?

Here are the instructions:

Thick Whisper White Card Base: A5 (8¼” x 5⅞”). Score at 4⅛″ & 7″
Designer Series Paper: A6 (4⅛″ x 5⅞″)
White Square: 2¾″ x 2¾″
Berry Burst Square Matt: 2⅞” x 2⅞”

BASIC INSTRUCTIONS:
Begin with an A5 Thick Whisper White card and score it at 4⅛″ & 7” and burnish score lines.
Cut the DSP at 1⅜”. Add adhesive to the small strip of DSP and adhere it to the far right inside of the card.  The larger piece, add adhesive and adhere to the outside far left of the card (under the fold).
Centre and hold the Berry Burst Square matt on the front white panel and add adhesive down the centre only. Flip it over and adhere it the white panel.
Stamp the floral image and sentiment of your choice on the White square before adhering it to the matt.

Blog Button - Catalogue  Blog Button - Shop   Blog Button - Classes  Blog Button - Join my Team  Blog Button - Watermark

Don’t forget to Follow My Blog to receive blog updates and join my Newsletter Subscription for all the latest news and specials!

Happy Stamping!

Blog Signature

Product List

Birthday, Designer/Patterned/Specialty Papers (DSP), feminine, Flowers, Handmade Cards, Stampin' Up!

Tranquil Tulip Fancy Fold card

Hello Crafters,

Today I am featuring the Tranquil Tulips Hostess Stamp Set to create this Fancy Fold card. I really like this style and you can easily make it using 1 sheet of A4 cardstock. I’ll show you that shortly!

Fancy Fold Card using Stampin Ups Tranquil Tulips, Pretty Label Bundle & Wood Grain DSP by Kate Morgan, Independent Demonstrator Australia 3D

Here is how I cut the A4 sheet of card (full instructions at the end of my post).

Fancy Fold Card using Stampin Ups Tranquil Tulips, Pretty Label Bundle & Wood Grain DSP by Kate Morgan, Independent Demonstrator Australia layout

I also love how this card folds flat to fit into a C6 envelope for posting!

Fancy Fold Card using Stampin Ups Tranquil Tulips, Pretty Label Bundle & Wood Grain DSP by Kate Morgan, Independent Demonstrator Australia

I’m also using the the Wood Grain Designer Series paper. #cutitnothoardit

Fancy Fold Card using Stampin Ups Tranquil Tulips, Pretty Label Bundle & Wood Grain DSP by Kate Morgan, Independent Demonstrator Australia DIY

I added a piece of white card to the back to write your message on and stamped a couple more tulips!

What do you think of my version of this fancy fold card?

Here are the instructions:

Coloured Base: 4⅛″ x 10⅞″ (10.5cm x 29.7cm). Score at 6″, 7⅛″, 9″ and 10⅛″ (15cm, 18cm, 23cm and 26cm)
Coloured Front Panel: 3″ x 6″ (7.6cm x 15.2cm). Score at ½″ x 1⅝ (1.3cm and 4.2cm)
Designer Series Paper: TOP: 4″ x 4⅜″ (11.1cm x 10.2cm) BOTTOM: 4″ x 1⅝″ (10.1cm x 4.2cm)
White Backing: 3¾″ x 5⅝″ (9.5cm x 14.3cm)  White Card Front: 2¾″ x 4⅛ (7cm x 10.5cm)

BASIC INSTRUCTIONS:
Burnish the score lines of the Base card. Add the DSP with glue. Add Adhesive to the smaller tab and fold up to adhere to the front.
Fold each of the score lines of the front panel. Add adhesive to the small scored section at the top.  Before sticking it down, turn the cardstock over and place it on the front of the card to see where to place the adhesive on the lower panel. Add adhesive then flip it over, holding the card flat and adhere this panel.
Stamp the two white piece of cardstock and add them to the card with adhesive. Stamp the sentiment on white card and punch out. Punch two further pieces from the coloured card to use as a matt layer. Adhere to the card.

Blog Button - Catalogue  Blog Button - Shop   Blog Button - Classes  Blog Button - Join my Team  Blog Button - Watermark

Don’t forget to Follow My Blog to receive blog updates and join my Newsletter Subscription for all the latest news and specials!

Happy Stamping!

Blog Signature

Product List

Birthday, Designer/Patterned/Specialty Papers (DSP), feminine, Flowers, Stampin' Up!, Techniques & Tutorials

Fancy Fold card with Lots of Labels

Hello Crafters,

Today I am featuring the Lots of Labels framelits to create this Fancy Fold card inspired by Dawn Griffith. I love to try different fancy folds and this one we did in my class on Saturday and the ladies loved it, although at first took fright wondering if it was going to be difficult to create!

Fancy Fold Card using Stampin' Up! Blooms & Wishes stamp set, Birthday Blossoms stamp set & Delightful Daisy DSP by Kate Morgan, Independent Demonstrator Australia DIY

I’m also using my favourite Designer Series paper, Delightful Daisy. #cutitnothoardit

Fancy Fold Card using Stampin' Up!s Blooms & Wishes stamp set, Birthday Blossoms stamp set & Delightful Daisy DSP by Kate Morgan, Independent Demonstrator Australia

I added a piece of ribbon to the left of the label die, which is an addition to the original creator. I just thought it helped show that is where to pull to open this style of card.

Fancy Fold Card using Stampin' Up!s Blooms & Wishes stamp set, Birthday Blossoms stamp set & Delightful Daisy DSP by Kate Morgan, Independent Demonstrator Australia DIY

Here it is open!

If you want to see how to create this, visit Dawn’s YouTube video here

What do you think of my version of this fancy fold card?

Blog Button - Catalogue  Blog Button - Shop   Blog Button - Classes  Blog Button - Join my Team  Blog Button - Watermark

Don’t forget to Follow My Blog to receive blog updates and join my Newsletter Subscription for all the latest news and specials!

Happy Stamping!

Blog Signature

Product List

Christmas, Stampin' Up!

6″ x 6″ Fancy Fold

Dear Crafters,

Christmas is only just over 5 weeks away and today’s card is all about Christmas, and it’s a fancy fold card!

When it is closed it is a 6″ x 6″ card and I have used the yummy Candy Cane Lane DSP and Cookie Cutter Christmas Bundle.

6x6-christmas-card-using-stampin-up-candy-cane-lane-and-cookie-cutter-by-kate-morgan-independent-stampin-up-demonstrator-classes-available-in-rowville-diy

and here it is open

6x6-christmas-card-using-stampin-up-candy-cane-lane-and-cookie-cutter-by-kate-morgan-independent-stampin-up-demonstrator-classes-available-in-rowville

Check out that cute little Santa and Gingerbread Lady!

There was quite a bit of work in cutting card for this project, but it certainly wasn’t difficult. What do you think of this Fancy Fold card?

I cased this from Kristine Reynolds

Products Used:

Stamp Sets: Cookie Cutter Christmas
Cardstock: Crumb Cake, Early Espresso, Real Red, Whisper White, White Glimmer, Candy Cane Lane DSP
Inks: Momento Black, Tip Top Taupe
Other: Big Shot, Layering Circles Framelits, Cookie Cutter Builder Punch, Early Espresso Seam Binding, Dimensionals, Tombo Multipurpose Glue, Trimmer, Stampin Scrub, Simply Scored, Copic pens

shop-online-copyget-a-catalogue-free-copy  classes-in-rowville-copy  join-my-team-copy

Don’t forget to Follow My Blog to receive blog updates and join my Newsletter Subscription for all the latest news and specials!

Happy Stamping!

Blog Signature-001


feminine, Flowers, Mother's Day, Stampin' Up!

Circle Fancy Fold card

Dear Crafters,

Today I have a circle fold card. I had seen one on a Facebook page that I am a member of, but there were no instructions, so I went about creating my own.

I started by die cutting the large scallop circle framelit from Lost Lagoon card stock and folding it in half. Then I die cut a smaller circle from the 2014-2016 In Colour DSP stack.

IMG_5570

I then die cut smaller circles again out of Lost Lagoon and Whisper White and adhered these together and then onto the bottom fold of the card.

The next step was die cutting all the leaves and flowers using the Botanical Builder Framelits with Lost Lagoon, Mint Macaron, Blushing Bride and So Saffron card stock, glued them together. I added some with dimensionals.

Lastly, I added Wink of Stella to the centres of the flowers, I think you can see it in the photos?! I also added some basic pearls to 2 of the smaller flowers.

IMG_5572

Isn’t this different? I love trying new things and not just our usual A5 cards all the time, but it still fits into our C6 envelopes….bonus!

And here is another one I made in black, white and the brights!

IMG_5584IMG_5585

What do you think?

All Catalogues, Clearance Rack & Weekly Deals are available online here! They are full of amazing new products and wonderful full colour picture inspiration. It is a must have for anyone interested in Ink, Paper and Stamps!

Shop Online 24/7 for products

Don’t forget to Follow My Blog to receive blog updates and join my Newsletter Subscription for all the latest news and specials!

Enjoy the many perks of being a Demonstrator (even just for yourself as a Hobby Demonstrator) by joining my friendly team, click HERE for details.

Happy Stamping!

Blog Signature-001

Birthday, Techniques & Tutorials

Origami Star card

Dear Crafters,

I am posting this early today, as I’m on my way to the airport for a mini break in Queensland for a few days, but don’t fear, you will still be hearing from me!

Today, I share a fancy fold card, called an Origami Star Triangle card. Yes it does look rather fancy, but it is actually quite simple to create.

Here it is closed and then opened up!

Origami Star Triangle Fold card #stampinup     Origami Star Triangle Fold card #stampinup

It’s quite simple as long as you follow the steps on closing it in the correct order.

Firstly close up the bottom right hand side, then the left and then the top folds down and the RHS slips underneath.

Origami Star Triangle Fold card #stampinup  Origami Star Triangle Fold card #stampinup  Origami Star Triangle Fold card #stampinup

I added the DSP to the front and the back so when the star is closed, you get that gorgeous pattern.

I die cut some stars and mounted them to the finished card, being careful to only have the dimensionals on the upper LHS of the star so it only sticks to the top flap of the triangle!

Origami Star Triangle Fold card #stampinup

Please leave a comment below if you like my card today.

All Catalogues, Clearance Rack & Weekly Deals are available online here! They are full of amazing new products and wonderful inspiration. It is a must have for anyone interested in Ink, Paper and Stamps!

Shop Online 24/7 for products

Don’t forget to Follow My Blog to receive blog updates and join my Newsletter Subscription for all the latest news and specials!

Happy Stamping,
Name Banner