
Don’t forget to Follow My Blog to receive blog updates and all the latest news and specials!
Independent Stampin Up!® Demonstrator, Victoria, Australia
I fold love into every card I make

Don’t forget to Follow My Blog to receive blog updates and all the latest news and specials!

I’m thrilled you are here to join us each Wednesday evening for the AWHT Colour Creations Blog Hop showcasing the full range of 50+ gorgeous Stampin’ Up! colours.
Features the Spotlight on Nature stamp set with some beautiful watercolouring.
On a Thick White card base are 2 matt layers of Peach Pie & Azure Afternoon cardstock. The Fluid 100 Watercolour paper is stamped with the floral image with Black Stazon ink .

I then masked around the edges with some washi tape, before applying a watercolour wash with Azure Afternoon, Granny Apple Green & Pretty Peacock inks and a Water Painter. This is carefully applied around the floral image. Once this was dry (I used my Heat Tool to quicken the process), before adding some darker splatters and drops of water to carefully lift some of the colour. I carefully removed the washi tape.

The image is coloured with Peach Pie ink for the flowers, and the leaves and stems I used Granny Apple Green & Pretty Peacock by mixing them on a clear acrylic block. The sentiment is stamped and fussy cut and added on Mini Dimensionals and one of the Brushed Brass Butterflies added.
The inside of the card and the envelope were decorated the same, by adding a masked circle of Azure Afternoon ink applied with a Blending Brush and then the beautiful butterfly image was stamped.
Features the Charming Duckpond Bundle for a sweet baby card. A piece of the Country Woods DSP was cut to the card front size and die cut with the largest die. Behind this I added 2 more patterns from the same DSP pack, but I used a Blending Brush to add Azure Afternoon ink to the bottom section to reflect water.

The mother duck & ducklings are stamped in Gray Granite and diecut before using my Wink of Stella to add a very light tone of Azure Afternoon ink & Peach Pie for the beak and feet. The duck in the water is just diecut and coloured. The reeds are cut from more of the same DSP and coloured the same way as the water.

The sentiment is stamped using the Unbounded Love stamp set and diecut using the Spotlight on Nature dies.
Thanks for dropping by. I hope you join me next Wednesday for inspiration using Balmy Blue.
Please enjoy the wonderful inspiration of our next team member, Di Furniss.
The full list of participants for this week can be viewed on Catherine Proctor’s blog.

Don’t forget to Follow My Blog to receive blog updates and all the latest news and specials!


Each week some of the Art With Heart team are joining the Colour Creations Blog Hop to bring you creative inspiration showcasing our range of 50+ gorgeous Stampin’ Up! colours.
How are you enjoying Saleabration? It is such a generous way for Stampin’ Up! to give free product with qualifying orders to customers and demonstrators. Have you placed an order and what was your favourite SAB item?
Today I feature the Little Dreamers Bundle. I started off with masking the images and adding some blending, but I changed my mind and decided to just add diecuts. The panel with the blending is Crumb Cake card, which helped make the night sky darker. I used Night of Navy at the top and Pretty Peacock below. Then I took some white ink refill and placed it onto my glass mat and using a Water Painter, added some water and tapped it across the card. Some of the larger splats I needed to dab dry with a tissue.

I just love this little calf sitting on some clouds under a night sky. I added this panel to a Basic White card matt then onto a Night of Navy card base. The moon and stars are diecut using the Silver & Gold Adhesive-backed Glimmer paper.
On the inside, I added some ink around the edges with what was left on my Blending Brushes. A simple sentiment and shooting star were stamped in Night of Navy ink.

My second card is a fancy fold design. I’m not sure what it is called, maybe a Gatefold Pop Out card? I am using the Countryside Inn Designer Series Paper and the Countryside Corners dies.

To open the card, you simply push both sides of the card backwards and they will then pop out from behind the centre diecut feature. To close the card, fold each of the sides in behind the diecut feature. I just love the patterned papers in this pack and I love how this showcases them perfectly. The embossed white panels use the coordinating Countryside Blossoms Textured Impressions Embossing Folder.

The sentiment is from the Throughout the Year stamp set and the foliage diecuts are from the Grove dies. Some Boho Blue 2023-2025 In Color Dots were added around the sentiment. The sentiment diecut panel is added on Dimensionals to the centre panel of the card. I adore this design and can see myself making loads of these with different DSPs.
Thanks for dropping by. I hope you join me next Wednesday for inspiration using Old Olive.
Please hop across to our next participant and enjoy the wonderful inspiration of Rosa Leyden.
If you come across a broken link or have come from a different entry point, a full list of participants can be viewed on Cathy’s blog.
Don’t forget to Follow My Blog to receive blog updates and join my Newsletter Subscription for all the latest news and specials!


Each week some of the Art With Heart team are joining the Colour Creations Blog Hop to bring you creative inspiration to showcase our range of 50+ gorgeous Stampin’ Up! colours.
Tonight’s card is using the All for Baby Bundle, which is a recent addition to my supplies. I don’t actually have a lot of baby style stamp sets, but this one is rather cute with the distinctive stamps that create the shading/tone when you stamp the image – how clever is that?!!

The Coastal Cabana card base is covered with the Plenty of Patterns Decorative Masks, new in the Annual Catalogue. They are a great way to add patterns with the Blending Brushes and inkpads without using DSP. I also used the same technique on the Basic White card cut with the Stitched So Sweetly die. Although, this time, I left the card in the die and placed the Mask over the top so that it left the gorgeous, crisp, white scallop border. I wrapped around some White 3/8″ (1cm) Glittered Organdy Ribbon and tied it in a bow, before adding the centre panel on dimensionals. The images are stamped in Fresh Fressia and Soft Suede inks, die cut and added on dimensionals. The pegs are die cut from the new Silver Foil 12×12 Specialty Pack and also added on some cut-down dimensionals.

On the inside, I stamped another bodysuit and die cut the little pocket in Coastal Cabana card and added it to the corner with a lovely stamped sentiment.

Thanks for dropping by. All the products used tonight are linked at the end of this post!
Please click on the image below to head across to the next blog on tonight’s hop and see the wonderful inspiration of Ros Davidson!
If you come across a broken link or have come from a different entry point, a full list of participants can be viewed on Catherine Proctor’s blog.
♥ Shop Now for Items relating to this project ♥
Saleabration Products (select free with qualifying order)
Don’t forget to Follow My Blog to receive blog updates and join my Newsletter Subscription for all the latest news and specials!


Welcome to another Art With Heart Team Colour Creations weekly Blog Hop. Today we are featuring Crumb Cake!!!
I am using the Baby Bear stamp set with the new Buffalo Check background stamp (available 5 September in the Holiday catalogue). I have only used two colours; Crumb Cake and Copper… can you believe that?!!!
Baby Bear is a photopolymer 3-step stamp and I used it with the Stamparatus to get the darkest colour I could for the 3rd image. The 2nd image is inked a couple of times and the 1st image only once, to get the colour variation. The Buffalo Check background stamp I also did with the Stamparatus to get a nice dark colour, reinking about 7 or 8 times!

I used the Versamark inkpad and wiped it along the edges of the checked layer and dipped it in copper embossing powder and heat set. I love how it gives a jagged look and not the perfect layer. I added a copper foil layer using the Layering Squares Scallop framelit before adding the baby bear layer with dimensionals. I love the copper trim bow too. Those metallic brass brads you’ll find on page 198 of the Annual catalogue!

Head on over to Catherine’s blog where you’ll find the links to other participants.
A full list of products can be found at the end of this post!
2018-2019 Annual Catalogue ends 3 June 2019
Be sure to download a PDF copy from my SU Catalogue Library page today.
Don’t forget to Follow My Blog to receive blog updates and join my Newsletter Subscription for all the latest news and specials!

Product List

Dear Crafters,
Tonight the Art with Heart team are sharing creative projects CASED from the annual catalogue. If you would like a copy of the 2018 – 2019 annual catalogue, contact any of the girls on the blog hop and we will get in touch with you.
If you’re already hopping, then you just came to me from the lovely, Kathryn Ruddick. If you’re just joining, great! Use the “next” button at the end of my post to hop all the way around. Blog Hops are full circles, so you can start hopping here and then at the end of each post there is a link to the next one. There is also a list of participants at the end in case of any broken links.
Now let’s get started!
At OnStage in April, we got the Animal Outings stamp set in our bags when we arrived and I couldn’t have been more pleased. I think everyone who attended the event were super excited that we had some Aussie animal friend images.
The other great news once we got our hands on the catalogue, was that there are coordinating framelits so we don’t have to fussy cut each of the images, super exciting! So when 1st June came around, those framelits were first on my order.
I have cased my cards from page 26 of the catalogue.

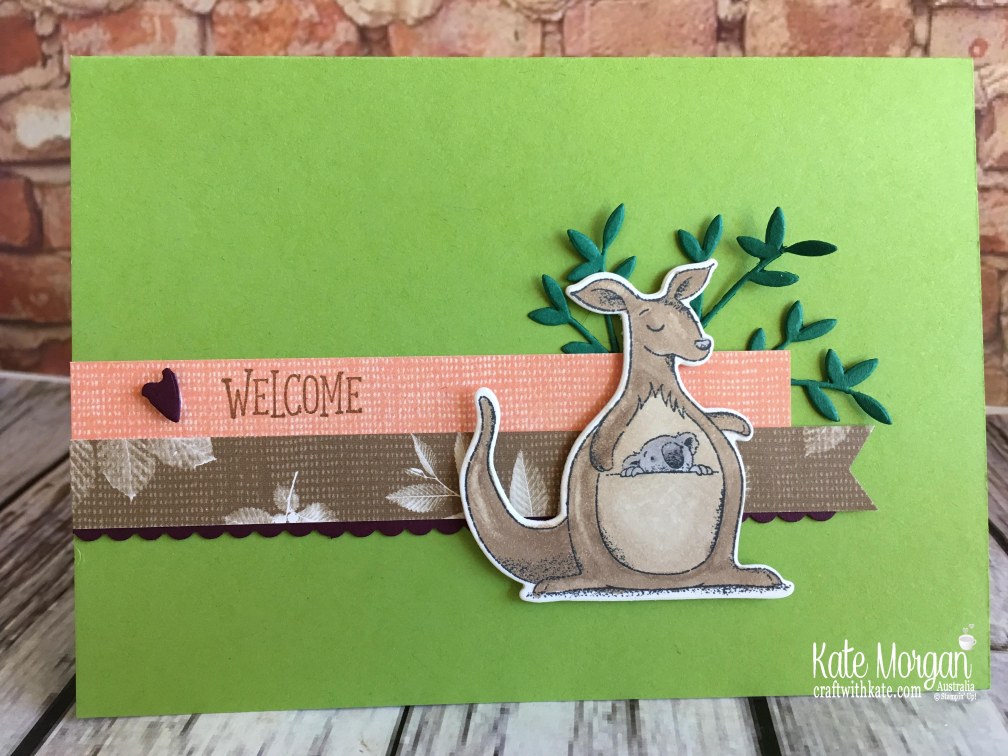
The base card is the new Granny Apple Green with the leaves die cut in Shaded Spruce. The banners are from the Nature’s Poem DSP and that small scallop edge is Blackberry Bliss (a returning colour) cut with the Decorative Ribbon Border punch. I coloured the kangaroo & koala with Stampin’ Blends and popped it up on dimensionals.

See that little Blackberry Bliss heart? It was actually an extra piece left over when the rhino was die cut and I trimmed it slightly. The sentiment was stamped in Soft Suede ink.

My next card uses the cute giraffe, again coloured with Stampin’ Blends. I’ve used So Saffron as my card base so the giraffe would stand out more. I’ve also used Crumb Cake and Soft Sea Foam. I love this die cut background.

The sentiment was stamped on Whisper White and cut out with the Tailored Tag punch. The branches were coloured with a Blender Pen and inkpads and added with Tombo multipurpose glue.

This last card is cased from page 48 of the catalogue (below) and it is my favourite.

I wanted to make it sweet and feminine, so I have used some of the Petal Promenade DSP and a Pearlised Doilie to soften the tone along with lots of different embellishments.

I stamped the rhino image repeatedly across the background of the new colour, Gray Granite, card base in the coordinating ink pad. A banner of the Petal Promenade DSP was glued down over the doilie, then a thin banner of Silver Glimmer paper. The rhino is added with dimensionals.
The Share What You Love Artisan Pearls, White Dotted Tulle and a White Baker’s Twine bow finish it off nicely.

Thanks for visiting today.
Don’t forget to email me at craftwithkate@live.com.au to request your copy of a Catalogue or to ask about joining the Art With Heart team.
Now it’s time to follow the blog hop to our next participant, the talented, Alisha Watson.
If you find a broken link or have come to this blog hop from a different entry point, you can view the participants below.
Happy Hopping!

Dear Crafters,
Today I have another card I saw on Pinterest but I’ve changed it up to use products that I have. It’s using the Thoughtful Branches dies along with a few others that you will be able to identify!
So here is my cute little hedgehog!

Oh my, have you seen this stunning Cable Knit Dynamic Embossing Folder? You have to get it! This is the first time I’ve used it and WOW, doesn’t it give a great effect!!!!
Can you tell that the spikes are created from the tree (less the trunk!) die?

I have used Early Espresso, Crumb Cake and Black card, along with Soft Sky.

I was super happy with the look of this one!
What do you think of this card?
All Catalogues and the Clearance Rack are available online here! They are full of amazing new products and wonderful full colour picture inspiration. It is a must have for anyone interested in Ink, Paper and Stamps!
Don’t forget to Follow My Blog to receive blog updates and join my Newsletter Subscription for all the latest news and specials!
Enjoy the many perks of being a Demonstrator (even just for yourself as a Hobby Demonstrator) by joining my friendly team, click HERE for details.
Happy Stamping!

Dear Crafters,
Today’s card is a double Z fold card which you will find all over the internet, on Pinterest, YouTube, everywhere!!!

They are really quite simple to create once you know how. It’s just a matter of having a card measuring 4-1/8″ x 11-5/8″, scored on the long edge at 2-3/4″ & 5-1/2″.

Then I took a 1″ x 11-5/8″ piece of card and scored it at 2-3/4″ & 5-1/2″ then added a piece of DSP the same length, but 3/4″ wide. Glue this strip onto the card.

The bear is stamped and fussy cut and added to the 1″ strip with tombo glue. Check out his cute little glimmer bow!
I haven’t added any sentiments to this card as yet, as I don’t have anyone to give it to, but I was thinking of maybe adding a brand new babies name to the front panel. I think that would look very cute!

Don’t forget to decorate your envelope to coordinate with your card!
Stamps: Baby Bear
Inks: Flirty Flamingo, Pink Pirouette, Watermelon Wonder
Card/Paper: Flirty Flamingo, Whisper White, White Glimmer, In Color DSP Stack
Accessories: Wonderful Wreath Framelits, Big Shot, Stampin’ Trimmer, Tombo Multipurpose Glue, Stampin’ Scrub, Paper Snips, Simply Scored.
Bonus Days – for every $90 you order in July, you will earn a $9 coupon to be used in August. Click here to find out more!
All Catalogues and the Clearance Rack are available online here! They are full of amazing new products and wonderful full colour picture inspiration. It is a must have for anyone interested in Ink, Paper and Stamps!
Don’t forget to Follow My Blog to receive blog updates and join my Newsletter Subscription for all the latest news and specials!
Enjoy the many perks of being a Demonstrator (even just for yourself as a Hobby Demonstrator) by joining my friendly team, click HERE for details.
Happy Stamping!


Dear Crafters,
I adore this Love Blossoms DSP stack and today is a baby card using this paper.
Once again I have used blushing bride & rose red with Whisper White.

How cute are these little ducks from the Something For Baby stamp set?

I just love how this card came together!
Weekly Deals
Starting today until next Tuesday, these amazing products are on sale! Click on the picture below to add it to your shopping cart.
I love those heart and star masks – great for the Bokeh technique which we are doing at our next class in January and those rhinestones add gorgeous bling to your cards!
All Catalogues, Clearance Rack & Weekly Deals are available online here! They are full of amazing new products and wonderful inspiration. It is a must have for anyone interested in Ink, Paper and Stamps!
Shop Online 24/7 for products
Don’t forget to Follow My Blog to receive blog updates and join my Newsletter Subscription for all the latest news and specials!
Enjoy the many perks of being a Demonstrator (even just for yourself as a Hobby Demonstrator) by joining my friendly team, click HERE for details.
Let the excitement begin and Happy Stamping!

Dear Crafters,
Today I share a card using the stamp set, Zoo Babies (pg 32 AC) and the Go Wild DSP (pg 144 AC)!
My base is Tip Top Taupe card stock with a layer of Pink Pirouette card and a layer of the Go Wild DSP.
I cut all the pieces of card to size, then punched a 2-1/2″ circle out of the Designer Paper. I tied a knot in some Pink Pirouette Seam Binding Ribbon and tied it around the DSP as shown.
I stamped the elephant image onto some Whisper White card using Tip Top Taupe ink before punching it out with a 2″circle punch. I used the Confetti Hearts Border Punch to get the tiny hearts!
The sentiment, Congratulations is from the same stamp set, inked in Pink Pirouette and cut with the Word Window punch.
Please leave a comment below if you like my card today.
All Catalogues, Clearance Rack & Weekly Deals are available online here! They are full of amazing new products and wonderful inspiration. It is a must have for anyone interested in Ink, Paper and Stamps!
Shop Online 24/7 for products
Don’t forget to Follow My Blog to receive blog updates and join my Newsletter Subscription for all the latest news and specials!
Papercrafter
Card Making Made Simple
June Kempster. Independent Stampin' Up! Demonstrator
With A Little Inspiration