Birthday, Challenges, feminine, JAI, Kids Cards, Techniques & Tutorials

Stars in their multitudes

Hello Crafters,

Melbourne has turned on a gorgeous sunny day today, so I will quickly share a card I have made for the Just Add Ink Colour Challenge before heading outside to enjoy the sunshine with my girls!

The challenge this week is a Colour Challenge JAI#235.

I love this colour combination and needed to make a card for my daughter’s friends birthday next weekend, and these colours screamed cupcake to me!

Birthday Cupcake Card

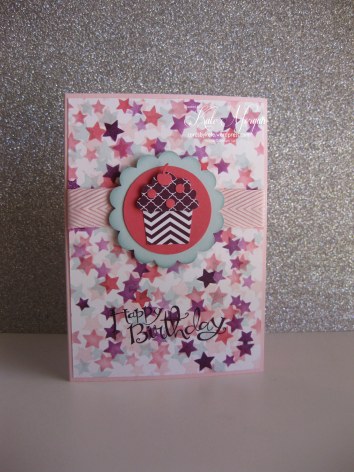
I started with a card base of Pink Pirouette. I then got out the Stars decorative mask and using my sponge daubers and the above colours, I began sponging from lightest to darkest randomly around some Whisper White card stock. This almost gives the effect of Bokeh!

Birthday Cupcake Card

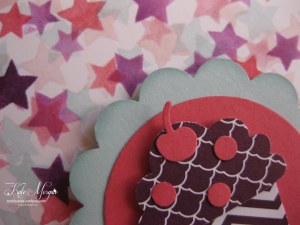
I used the Cupcake Builder punch with the 2014-2016 In Colours Backgrounds DSP, then Strawberry Slush card for the cherry and sprinkles.

I added some chevron ribbon before adding the embellishment with dimensionals.

Birthday Cupcake Card

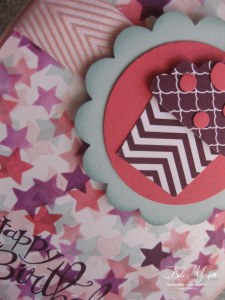
I added the sentiment from the Sassy Salutations Stamp Set in Blackberry Bliss.

Birthday Cupcake Card

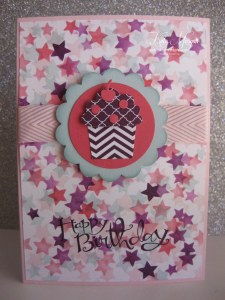
I think this is a very sweet little card and I am loving the stars background. I know I will definitely be creating more of these!

This background is very cheap and easy to create, why don’t you give it a go too.

Please leave a comment below, what you think of my card.

PS I was the winner at JAI for this card!!!

Products Used:

Why don’t you give a challenge a go, they are so much fun. Head across to the Just Add Ink page for more inspiration and see how the designers interpreted this challenge.

The 2014-2015 Annual Catalogue is available online here. This catalogue is full of amazing new products and wonderful coloured pictures full of ideas. It is a must have for anyone interested in Ink, Paper and Stamps!

Shop Online 24/7 for products

Don’t forget to Follow My Blog to receive blog updates and join my Newsletter Subscription for all the latest news and specials!

Happy Stamping,

Name Banner

Kids Cards

Frozen Olaf

Hello Crafters,

I have so many kids birthday invites on our fridge at the moment that I need to get cracking on some of the cards to place on their pressies!

Miss 4 has been invited to a Frozen party and what better than creating a little punch art. I know when I watched the movie FROZEN, I fell in love with Olaf, the little snowman, so here he is!

Frozen Olaf Punch Art Card

I used Whisper White, Smoky Slate, Soft Suede, Tangelo Twist and Basic Black card stock to create Olaf. I used the Basic Black Stampin’ Write marker for his eyebrows and hair. The lines on the buttons I used the chalk marker.

The Designer Series Paper has retired (it was from last year’s holiday catalogue), but there are plenty of gorgeous DSPs in this years Holiday Catalogue which will be available from 28th August, so not long now to wait!

Frozen Olaf Punch Art Card

The punches I used were:

  • 2 1/2″ Circle
  • 1 3/8″ circle
  • 1/2″ circle
  • 3/4″ x 15/16″ oval
  • 1 3/4″ x 7/8″ oval
  • 2″ x 1 3/8″ oval
  • I cut the head, arms & teeth out by hand!

So with a few punches that you probably already have in your stash, you too can recreate this gorgeous card. Go on give it a go, the little munchkin who receives it will be blown away!!!

This design was based on one I saw on Pinterest by Michelle Suit in the USA.


The Annual Catalogue is full of amazing new products and wonderful coloured pictures for ideas. It is a must have for anyone interested in Ink, Paper and Stamps!

Shop Online 24/7 for products

Don’t forget to Follow My Blog to receive blog updates and join my Newsletter Subscription for all the latest news and specials!

Happy Stamping,

Name Banner

Kids Cards

Monkey Punch Art

Hello Crafters,

Happy Good Friday to you and I hope you are enjoying the start of this Easter break!!!

I know the excitement is certainly building in our house with two very excited girls looking forward to the Easter Bunny visiting on Sunday!

In following on from Wednesday’s blog post on Punch Art, I have another one for you which is super duper cute!

Monkey Punch Art

Isn’t she the most gorgeous thing you have seen?!!! I am so pleased with this card, I can see myself making many more!

The base card is white then I layered a piece of Sahara Sand Core’dinations cardstock which I embossed with the Arrows TIEF (available until 30 June) and then sanded it.

The next layer is Melon Mambo and then White on top.

The monkey is created with Crumb Cake & Soft Suede cardstock and the nose is black.

The heart was created by stamping the largest heart in the Hearts a Flutter stamp set and die cutting it out with the coordinating Framelits. The large heart is a punch and the smaller heart is from the Hearts a Flutter framelits. The tiny heart on her head is also a punch with a rhinestone for a bit of bling!

Monkey Punch Art

I used the black Stampin’ Write Marker to draw the mouth and dots. I added some googly eyes for a more effective finish. Doesn’t she just make you go, awwww!

This was so much fun to make and see her come alive as I put it together! Go on, have a go yourself, I know you want to!

I must thank http://www.brandyscards.com for showing me how to create this gorgeous card.

Doing anything special on Anzac Day afternoon? No?

Well why not join my Punch Art Class.

Be sure to Email Me and book your seat now or join via my Facebook link!


All the punches used to create this little monkey are Stampin’ Up! products:

2-1/2″ Circle (120906)

1-3/4″ Circle (119850)

1″ Circle (119868)

3/4″ Circle (119873)

3/8″ Circle (118309) part of 3 set pack

Large Oval (199855)

XL Oval (119859)

Word Window (119857)

Small Heart (117193)

Large Heart (119883)

Shop Online 24/7 for products

Don’t forget to Follow my Blog and join my Newsletter subscription to receive all the latest news from Stampin’ Up!

Happy Stamping,
Name Banner
Kids Cards

Dragon Punch Art

Hello Crafters,

Having my gorgeous two girls home on school holidays and with the wet weather, we have had to find indoor activities and what better way to spend the day creating punch art!

Dinosaur Punch Art     Dinosaur Punch Art

Not sure exactly what they are, whether a dinosaur or a dragon, but how cool are these little fellas?!!!

Yes, they can be quite fiddly to make, but they are so much fun and look at the end result.

If you love this and want to get started making your own, all you need are a few punches. And if you don’t have some of them, they are all available in my online store and orders are shipped to your door within 48hrs of placing the order.

Using Stampin’ Dimensionals gives your creature a real life 3D effect and makes him pop up off the page!

Dinosaur Punch Art

Here I added some detail using a White Gel Pen to the nostrils and eyes (punched using a hole punch)!

Dinosaur Punch Art

These are such effective cards and wonderful characters to create. Why not have a go yourself, you may just surprise yourself!

 Dinosaur Punch Art

Be sure to click on the follow my blog link on the right had side of my homepage as I have another super duper cute card for you shortly!

Stampin’ Up! Punches used:

Shop Online 24/7 for products

 Happy Stamping,
Name Banner
Kids Cards

Who loves Lego?

Hello Crafters,

Tomorrow my little girl heads off to her first birthday party ‘she’ has been invited to, by a friend at Preschool. She is so excited to be invited and her sister isn’t!!! She feels like a big girl now!

Lego

Because it is a boys birthday, I thought that Lego was the way to go for this card (especially with the Lego movie out at the moment) and what kid doesn’t love Lego?!!!.

I started with a card base of red, layered with white and sponged the edges for a bit of a grungy look.

I cut 4 squares from coloured card and punched circles and added them with dimensionals.

I used the white gel pen to each dot to give the glossy effect.

The ribbon was tied in a bow and added with a glue dot. This ribbon was actually cut off a top I purchased recently… you know the bits they put on the inside of the shoulders to stop the top sliding off the hangers!!! Nothing gets wasted in this house!!!! LOL

The sentiment is from the stamp set, Morning Meadow, a hostess gift with the current catalogue.

Lego

This is such an effective card and so simple to create! Why not have a go yourself, you will be surprised how quickly it will come together.


Shop Online 24/7 for products

 Happy Stamping,
Name Banner
Kids Cards

Rainbow Sunburst Card

Morning Stampers,

Today I want to show you what I created for my daughter who turns 4 today and she brightens my life!

I have used papers from the Polka Dot Parade DSP Pack (Order here).

IMG_3143

You may notice that I once again used the little embellishment in the centre from the new Holiday Catalogue which you too can purchase from 29 August 2013.

Be sure to visit my Blog on that day to view the online version of the Holiday Catalogue jam-packed with loads of festive products or drop by to collect your copy now!

Don’t forget that the DSPs are on sale from 1-28 August ~ Buy 3 get 1 FREE!

It is amazing value.

CLICK HERE to go to my online store to choose your designer series papers now.


Stampin Up items used:

Stamp Sets: Petite Pairs

Inkpads: Real Red

Cardstock: Daffodil Delight, Polka Dot Parade DSP Pack

Accessories:  Trimmer, Tombo Glue, Dimensionals, Stitched Grosgrain Ribbon, Soda Pop Top (r) & Frosted Finishes Embellishments (Holiday Catalogue)

To purchase any of these items, be sure to visit my online store!

Happy stamping,

Kate

Handmade Cards

Girly card

IMG_3052

Every little girls wants to be a princess and carry her own handbag!

This has been created using punches (Decorative Label, Circle, Oval & Scallop Oval) and a gem.

Very quick and easy but so effective. Isn’t it cute?!!!

All of these items can be purchased through my 24/7 online store via the link HERE.

Enjoy,

Kate