![]()
Each week some of the Art With Heart team are joining the Colour Creations Blog Hop to bring you creative inspiration showcasing our range of 50+ gorgeous Stampin’ Up! colours in alphabetical order.
Week 26 – Highland Heather
Today is the first time I have inked up the Sending Smiles stamp set, I can’t believe it’s taken me so long. With the coordinating dies, it makes it super easy to cut out many of the images as well as this Partial Die Cutting Technique.

Taking a piece of Basic White Thick card stock, I stamped the four flowers across the top. Place the coordinating die for each one and hold it with washi tape so they don’t move. Place it on your die cutting machine (ensure it is straight), and move the top acrylic plate so it only covers the top half of the dies. This ensures only that only the top section will cut. After removing the dies, place it in your Trimmer to cut between the images in straight line to remove the excess card or you can use a craft knife and ruler. I then cut a strip of Gold Metallic Specialty Paper and glued it behind the cut flowers. I then stamped the leaves and extra flowers, some directly onto the card and some die cut to add extra dimension using Dimensionals.

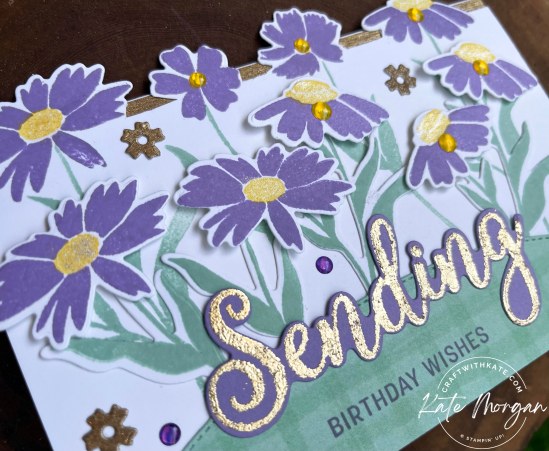
I glued this to an A5 landscape Basic White card, ensuring the gold was against the fold. Now I could trim off the excess at the bottom so it would fit into a C6 envelope. Using the Basic Border die, I cut a strip of Gingham Cottage DSP and glued it to the bottom of the card. The ‘sending’ sentiment is stamped in Versamark ink onto Highland Heather card stock using the Stamparatus, as I like to ink it a couple of times. Sprinkle some Heat & Stick powder over, shake off the excess and melt it with a Heat Tool. Now add some Gilded Leaf and press it on to cover the sentiment. I use a sponge dauber to gently rub off the excess. Cut it out with the coordinating die. ‘Birthday Wishes’ is stamped directly to the card.
You can really see the Gilded Leaf on the sentiment below and the Wink of Stella on the flower centres.
On the inside, I used the left over piece of the Gingham Cottage paper from the front and added it to the bottom of the card, with another stamped flower.

I finished it off with some Glossy Dots Assortment in Daffodil Delight and Gorgeous Grape and the Wink of Stella.

Thanks for dropping by. I hope you can join me next week for inspiration using Mango Melody.
Please hop across to our next participant and enjoy the wonderful inspiration of Di Furniss.

If you come across a broken link or have come from a different entry point, a full list of participants can be viewed on Cathy Proctor’s blog.
♥ Click here to see the full list of products used in this project ♥

Don’t forget to Follow My Blog to receive blog updates and join my Newsletter Subscription for all the latest news and specials!


Oh wow Kate. Your card is gorgeous. I love the way you have used the partial die cut technique to have flowers sitting over the top edge; and this with a field of flowers over the whole card front. Delightful. I am so impressed with your gilding of the word sending. (I haven’t been able to heat the ‘heat n stick powder’ to the right level so the gilding sticks.) xxx
LikeLiked by 1 person
Such a bright and cheerful card Kate. How effective is the Partial Die Cutting technique and this set is perfect for it. Thanks for the explanation as well.
LikeLiked by 1 person
Such a happy card with daisies popping up everywhere. The gingham looks great with the flowers.
LikeLiked by 1 person
Your flowers look so happy and whimsical! I love the blooms that peek over the top of the card, and the touches of gold are fabulous.
LikeLiked by 1 person
Kate, this is such a pretty card! The partial die-cutting adds a real “wow” to your card design … and I just love how many flowers you added to the card front. So beautifully cheery. Love the gingham “hill”, and the gilded sentiment. I am also impressed that you used the negative of the Basic Borders die cut piece, on the inside of your card; it ties in beautifully with the front.
LikeLiked by 1 person
What an amazing card, Kate! I love that you have included the detailed instructions for the partially die cut top – the final effect you have achieved is definitely worth the effort!
LikeLiked by 1 person